ITSM User Guide
1. Ticket Center
1.1. Overview
The Ticket Center consolidates all tickets related to the user, supporting ticket creation, querying, and processing. It also supports custom ticket groups.
The overall layout of the Ticket Center is as follows:

Area A: Create Ticket:
The entry point for creating tickets in the Ticket Center. Click to select a workflow and create a ticket.
Area B: Ticket Groups:
The ticket group list area. By default, it includes built-in group lists such as All My Tickets, My To-Do, My Handled, My Drafts, My Warnings, and My Suspended. It also supports custom groups, allowing you to configure group conditions based on scenarios and create new ticket group lists.
Area C: Filter Tickets:
The basic ticket filtering area, located below the column headers in the ticket list. It supports querying tickets by the corresponding header fields.
Area D: Ticket List:
Displays all tickets under the corresponding ticket group. Click the ticket number to enter the ticket detail page, where you can view detailed information or process the ticket.
Area E: Ticket List Actions:
Supports other operations on tickets, such as batch processing and ticket export.
1.2. Creating Tickets
The Ticket Center provides an entry point for creating tickets. Unlike the Service Catalog, the Ticket Center creates tickets by directly selecting a workflow rather than a specific service.
Go to the Ticket Center and click the "Create Ticket" button in the upper left corner.

The ticket creation page opens. The top categories correspond to the associated applications, and the side categories correspond to workflow types. Select a workflow to enter the ticket submission page.

Fill in the form information and click "Submit".
Additionally, the system provides Save Template and Save Draft features:
- Save Template: Saves the current form information as a template. The next time you submit a ticket using the same workflow, you can select "Use Template" to quickly fill in the form.
- Save Draft: When the form is not fully completed, you can click "Save Draft" to store the current content in the drafts folder. You can later open the corresponding ticket from the "My Drafts" list, complete the form, and submit it.

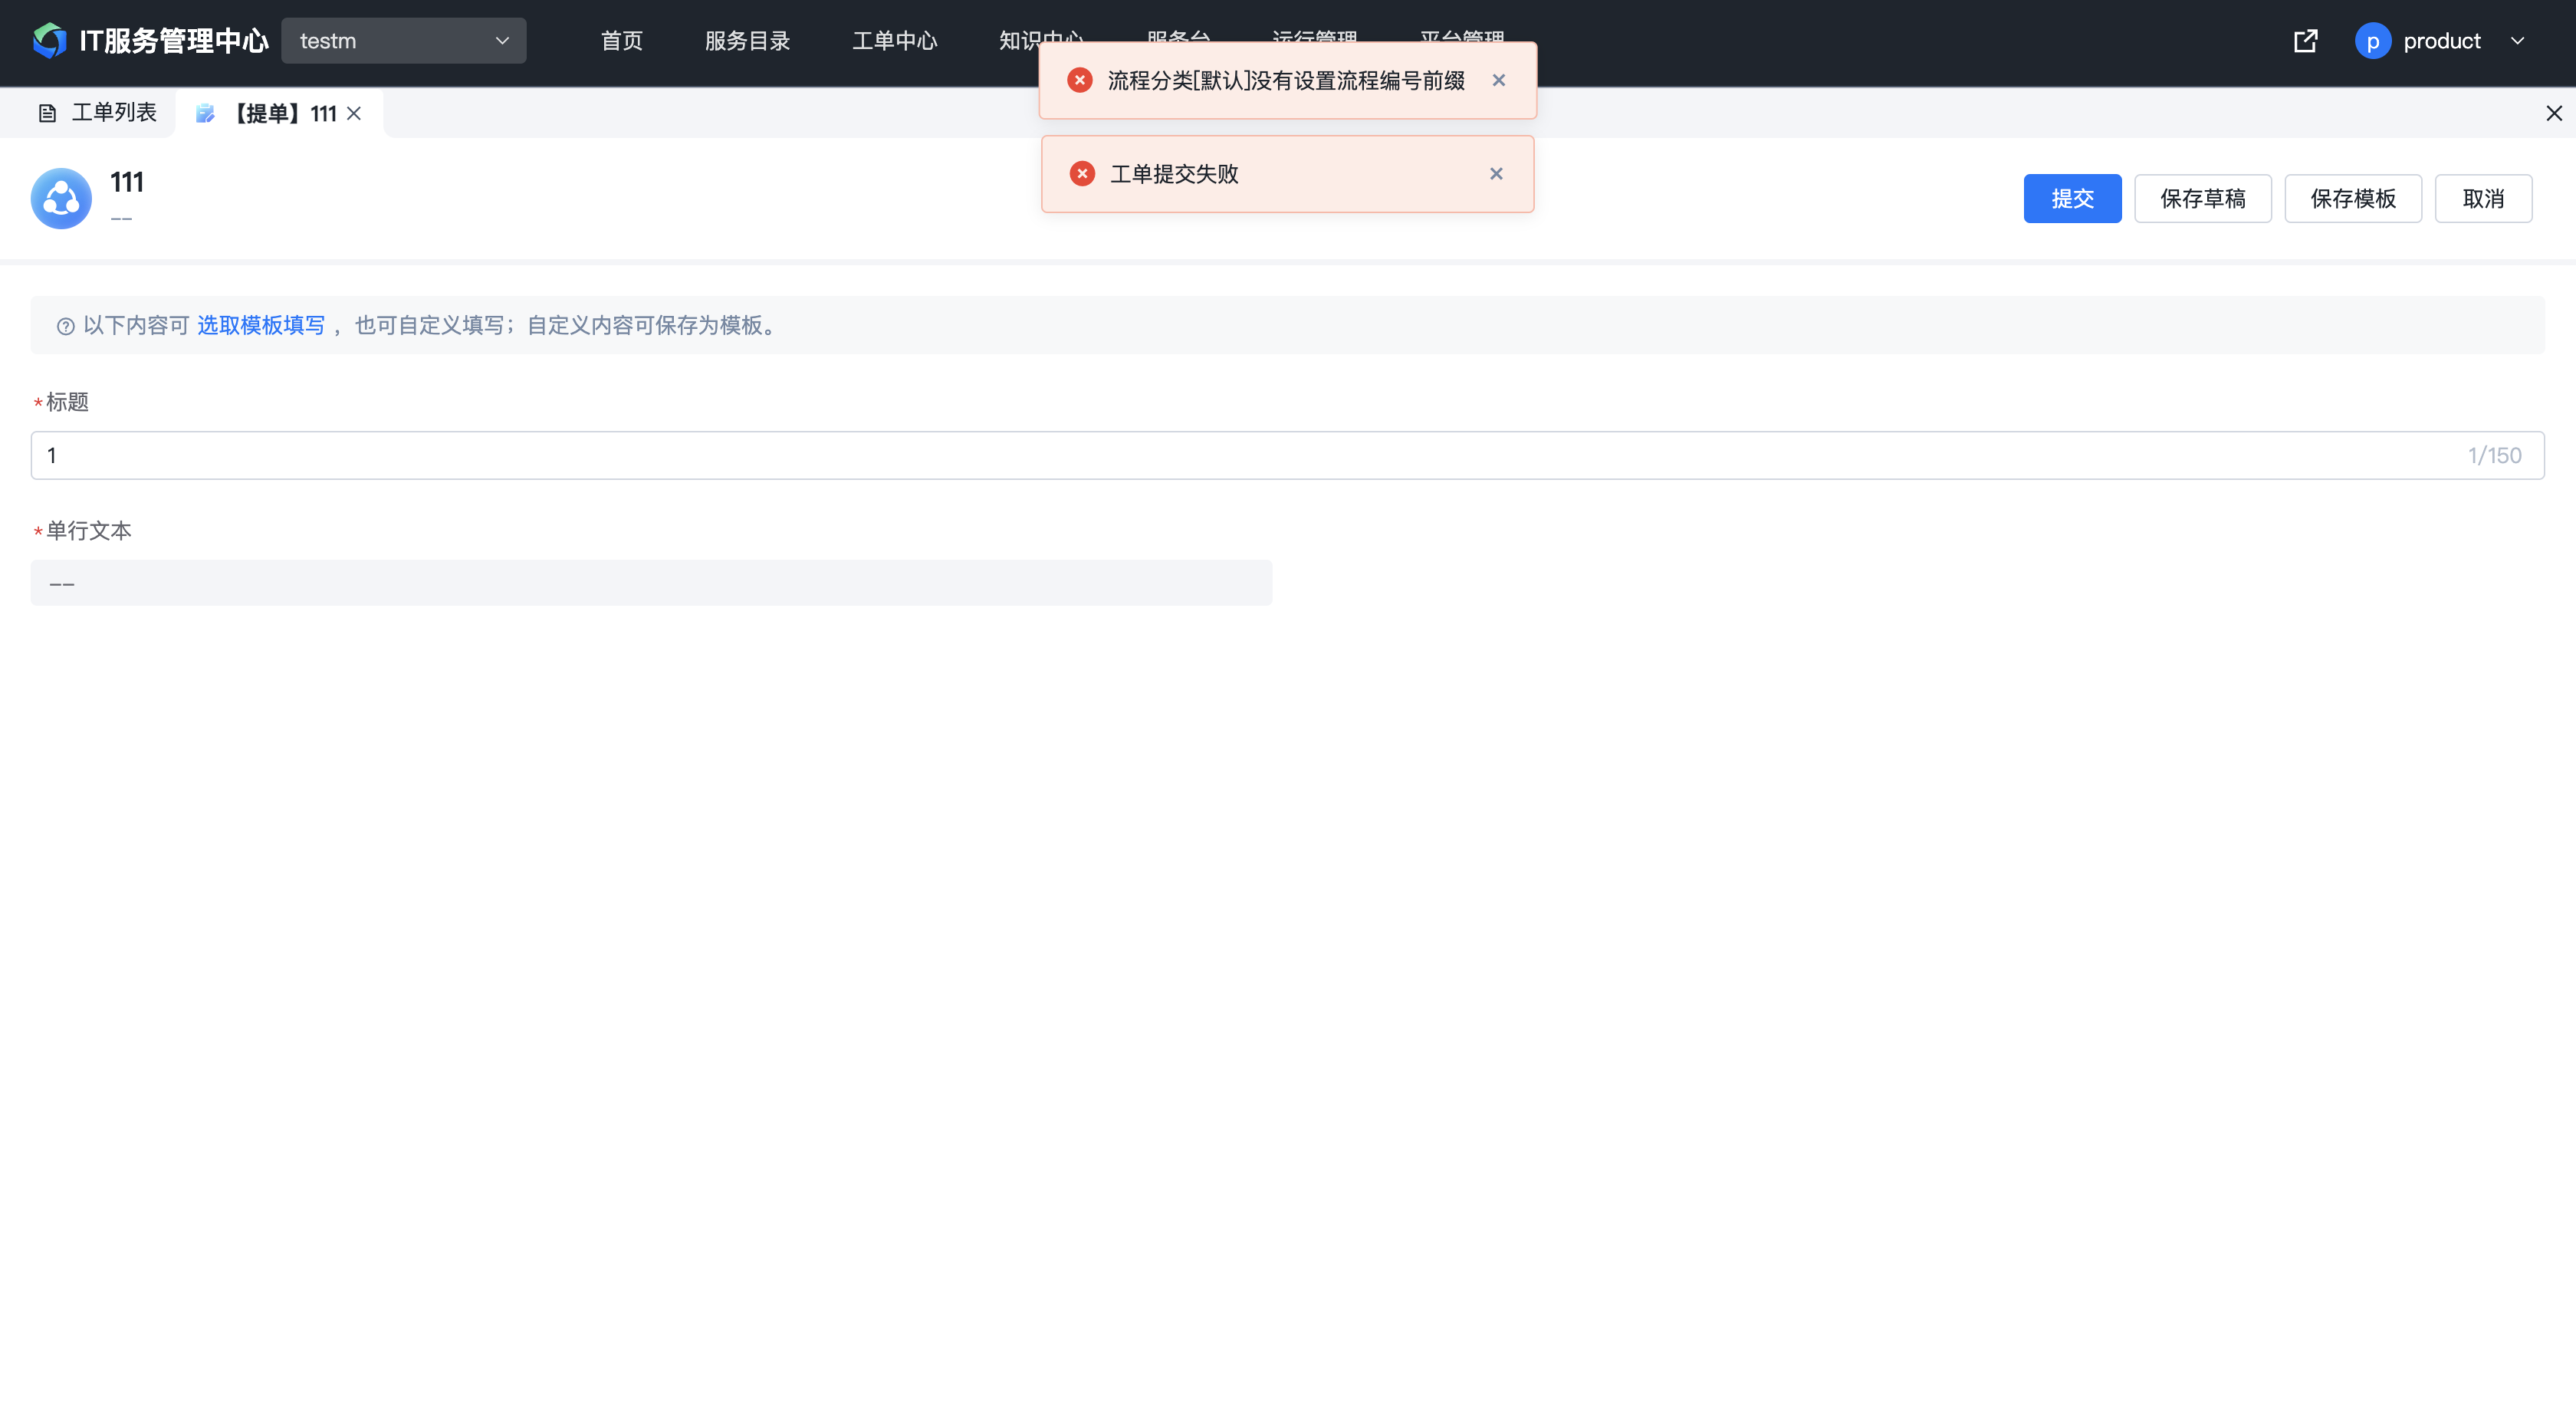
Note: Please make sure to set the ticket number prefix for the corresponding workflow type under "Platform Management / Global Configuration / Workflow Types" before publishing the workflow. Otherwise, ticket submission will fail.

1.3. Ticket Groups
The left panel of the Ticket Center categorizes tickets into groups, allowing users to quickly locate the relevant group to view tickets. In addition to the built-in common groups, the product also provides custom grouping capabilities, enabling users to configure group conditions based on scenarios and create new ticket group lists.
1.3.1. Built-in Groups
The current built-in groups are: All My Tickets, My To-Do, My Handled, My Drafts, My Warnings, My Suspended.
- All My Tickets: Displays all tickets that you have permission to view.
- My To-Do: Displays tickets pending your processing, i.e., tickets where you are listed as one of the current assignees.
- My Approvals: Displays all tickets with approval nodes pending your action.
- My Submissions: Displays all tickets initiated by you, i.e., tickets where you are the submitter.
- My Handled: Displays all tickets you have processed.
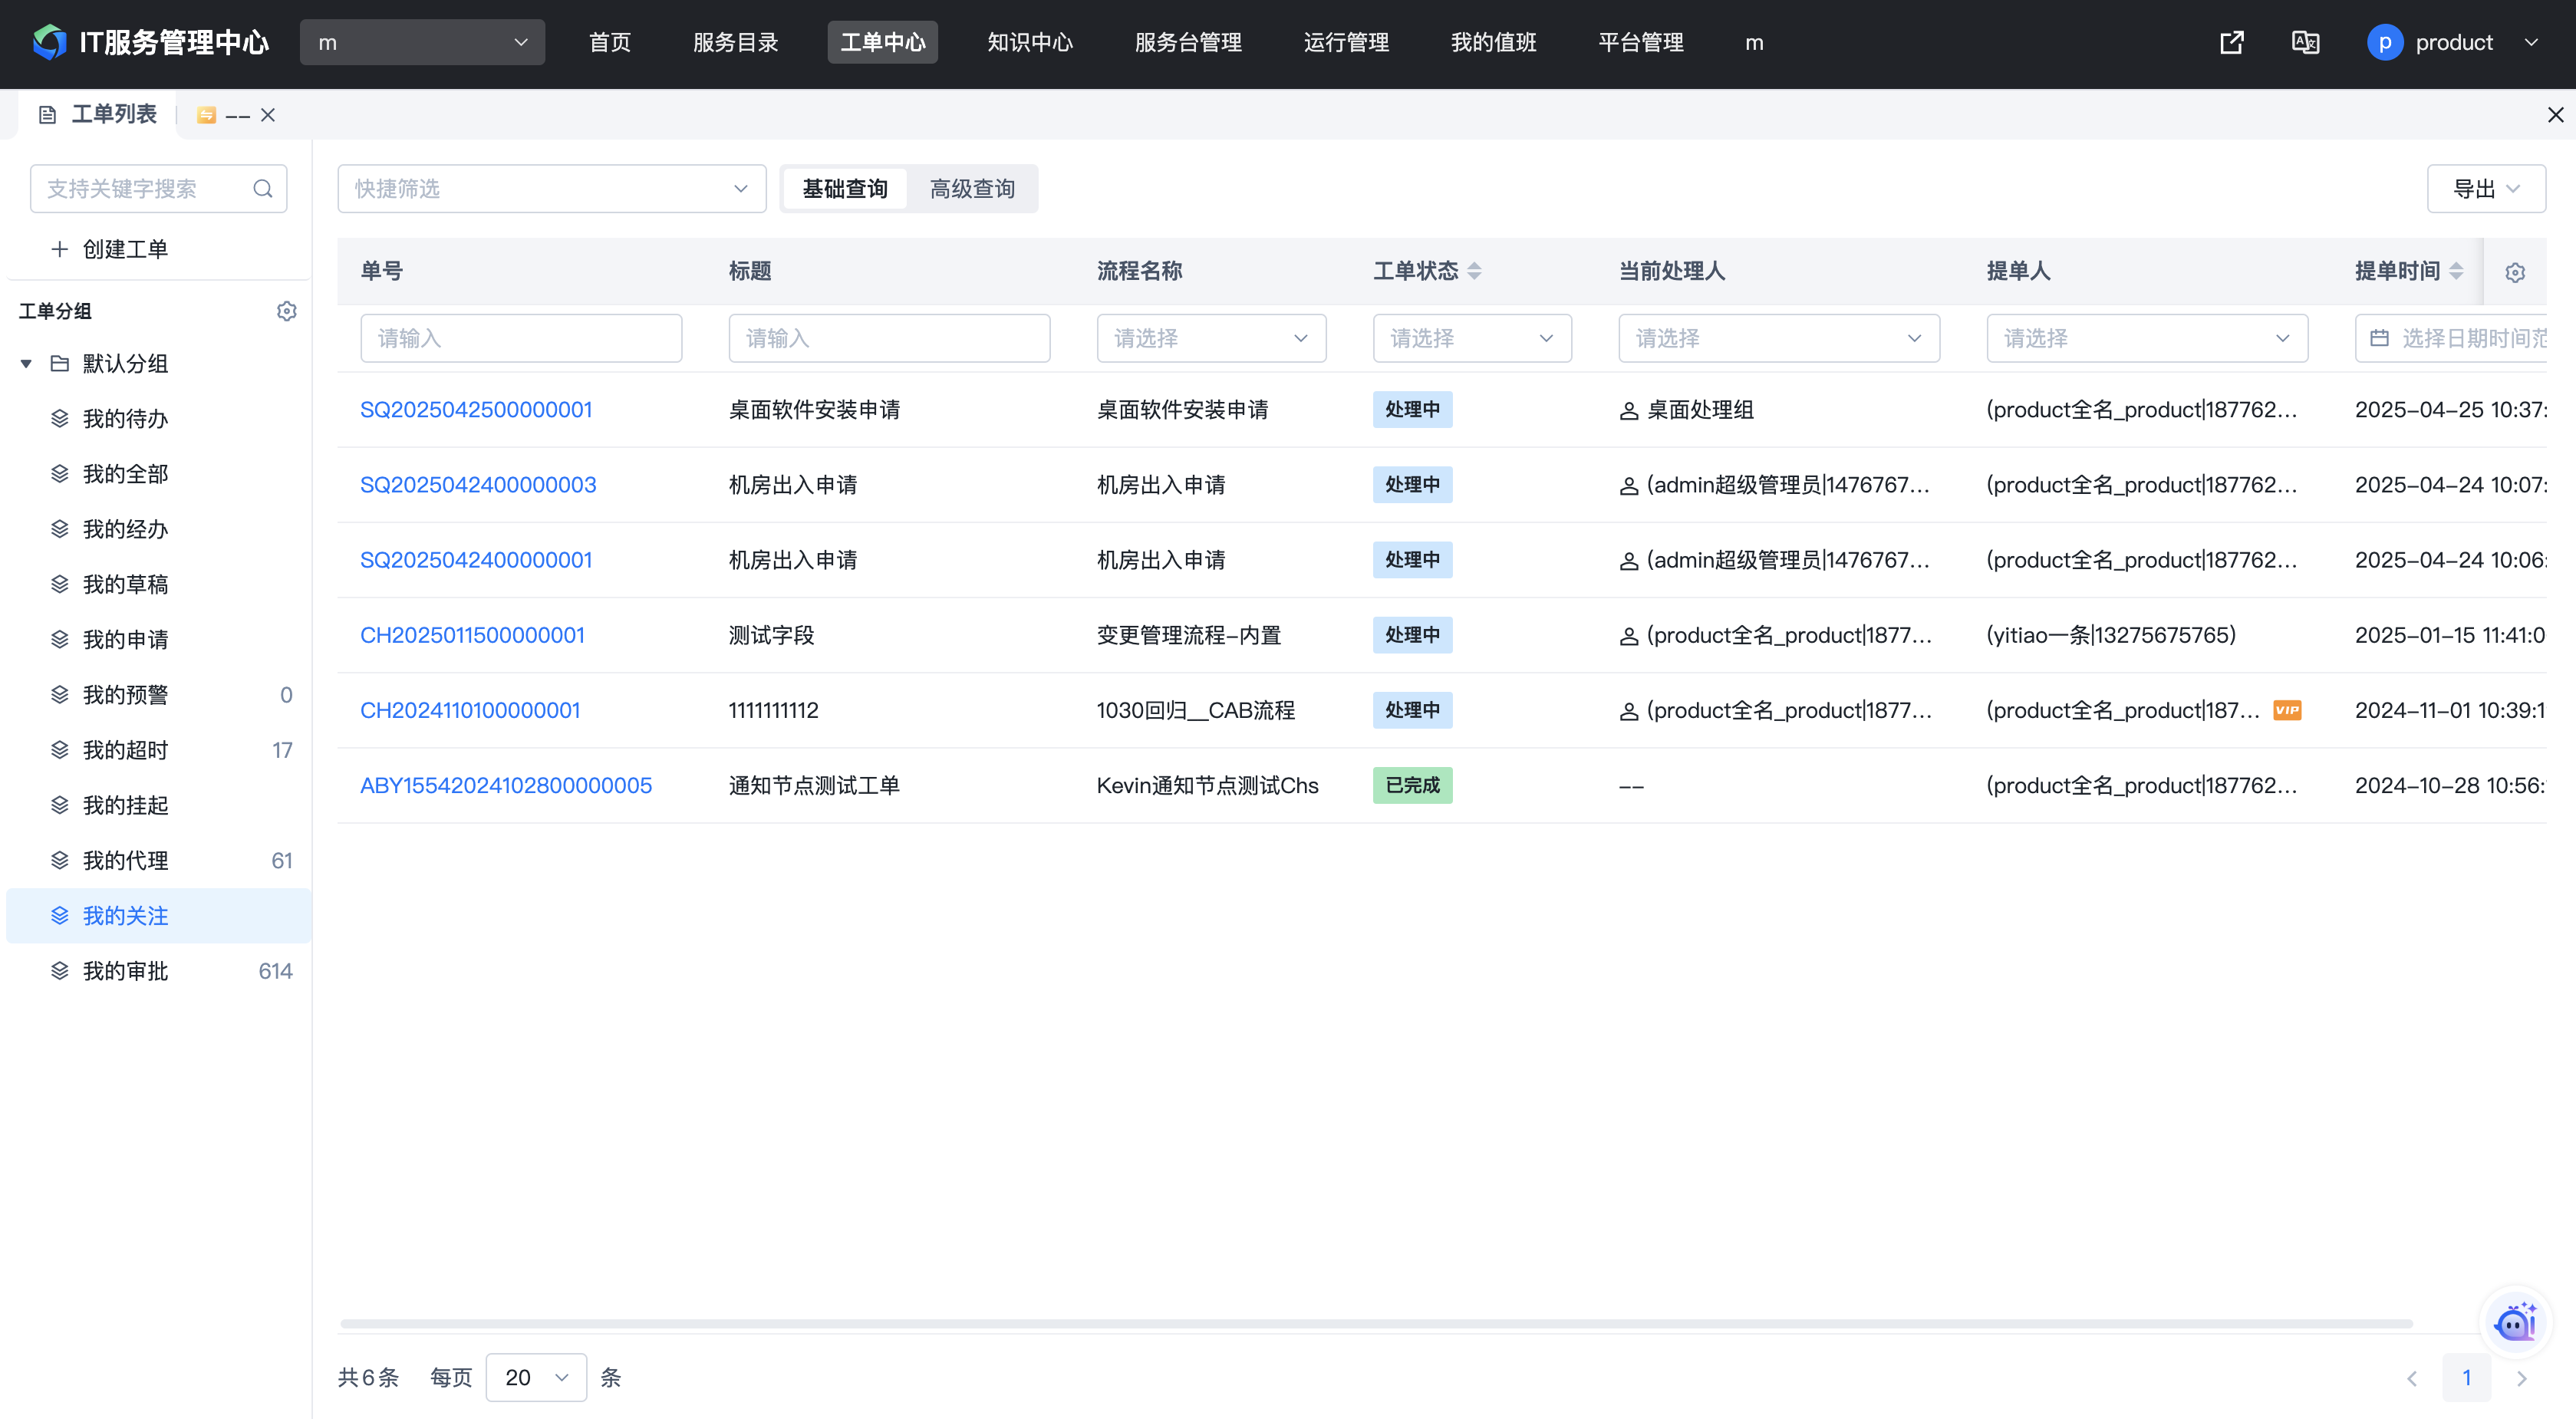
- My Followed: Displays all tickets you are following.
- My Drafts: Displays tickets saved as drafts when creating tickets. Open a specific draft to edit and submit.
- My Warnings: Displays tickets pending your processing that are under SLA timing and have not yet timed out.
- My Overdue: Displays tickets pending your processing that are under SLA timing and have already timed out.
- My Suspended: Displays all tickets related to you that are in a "Suspended" status.

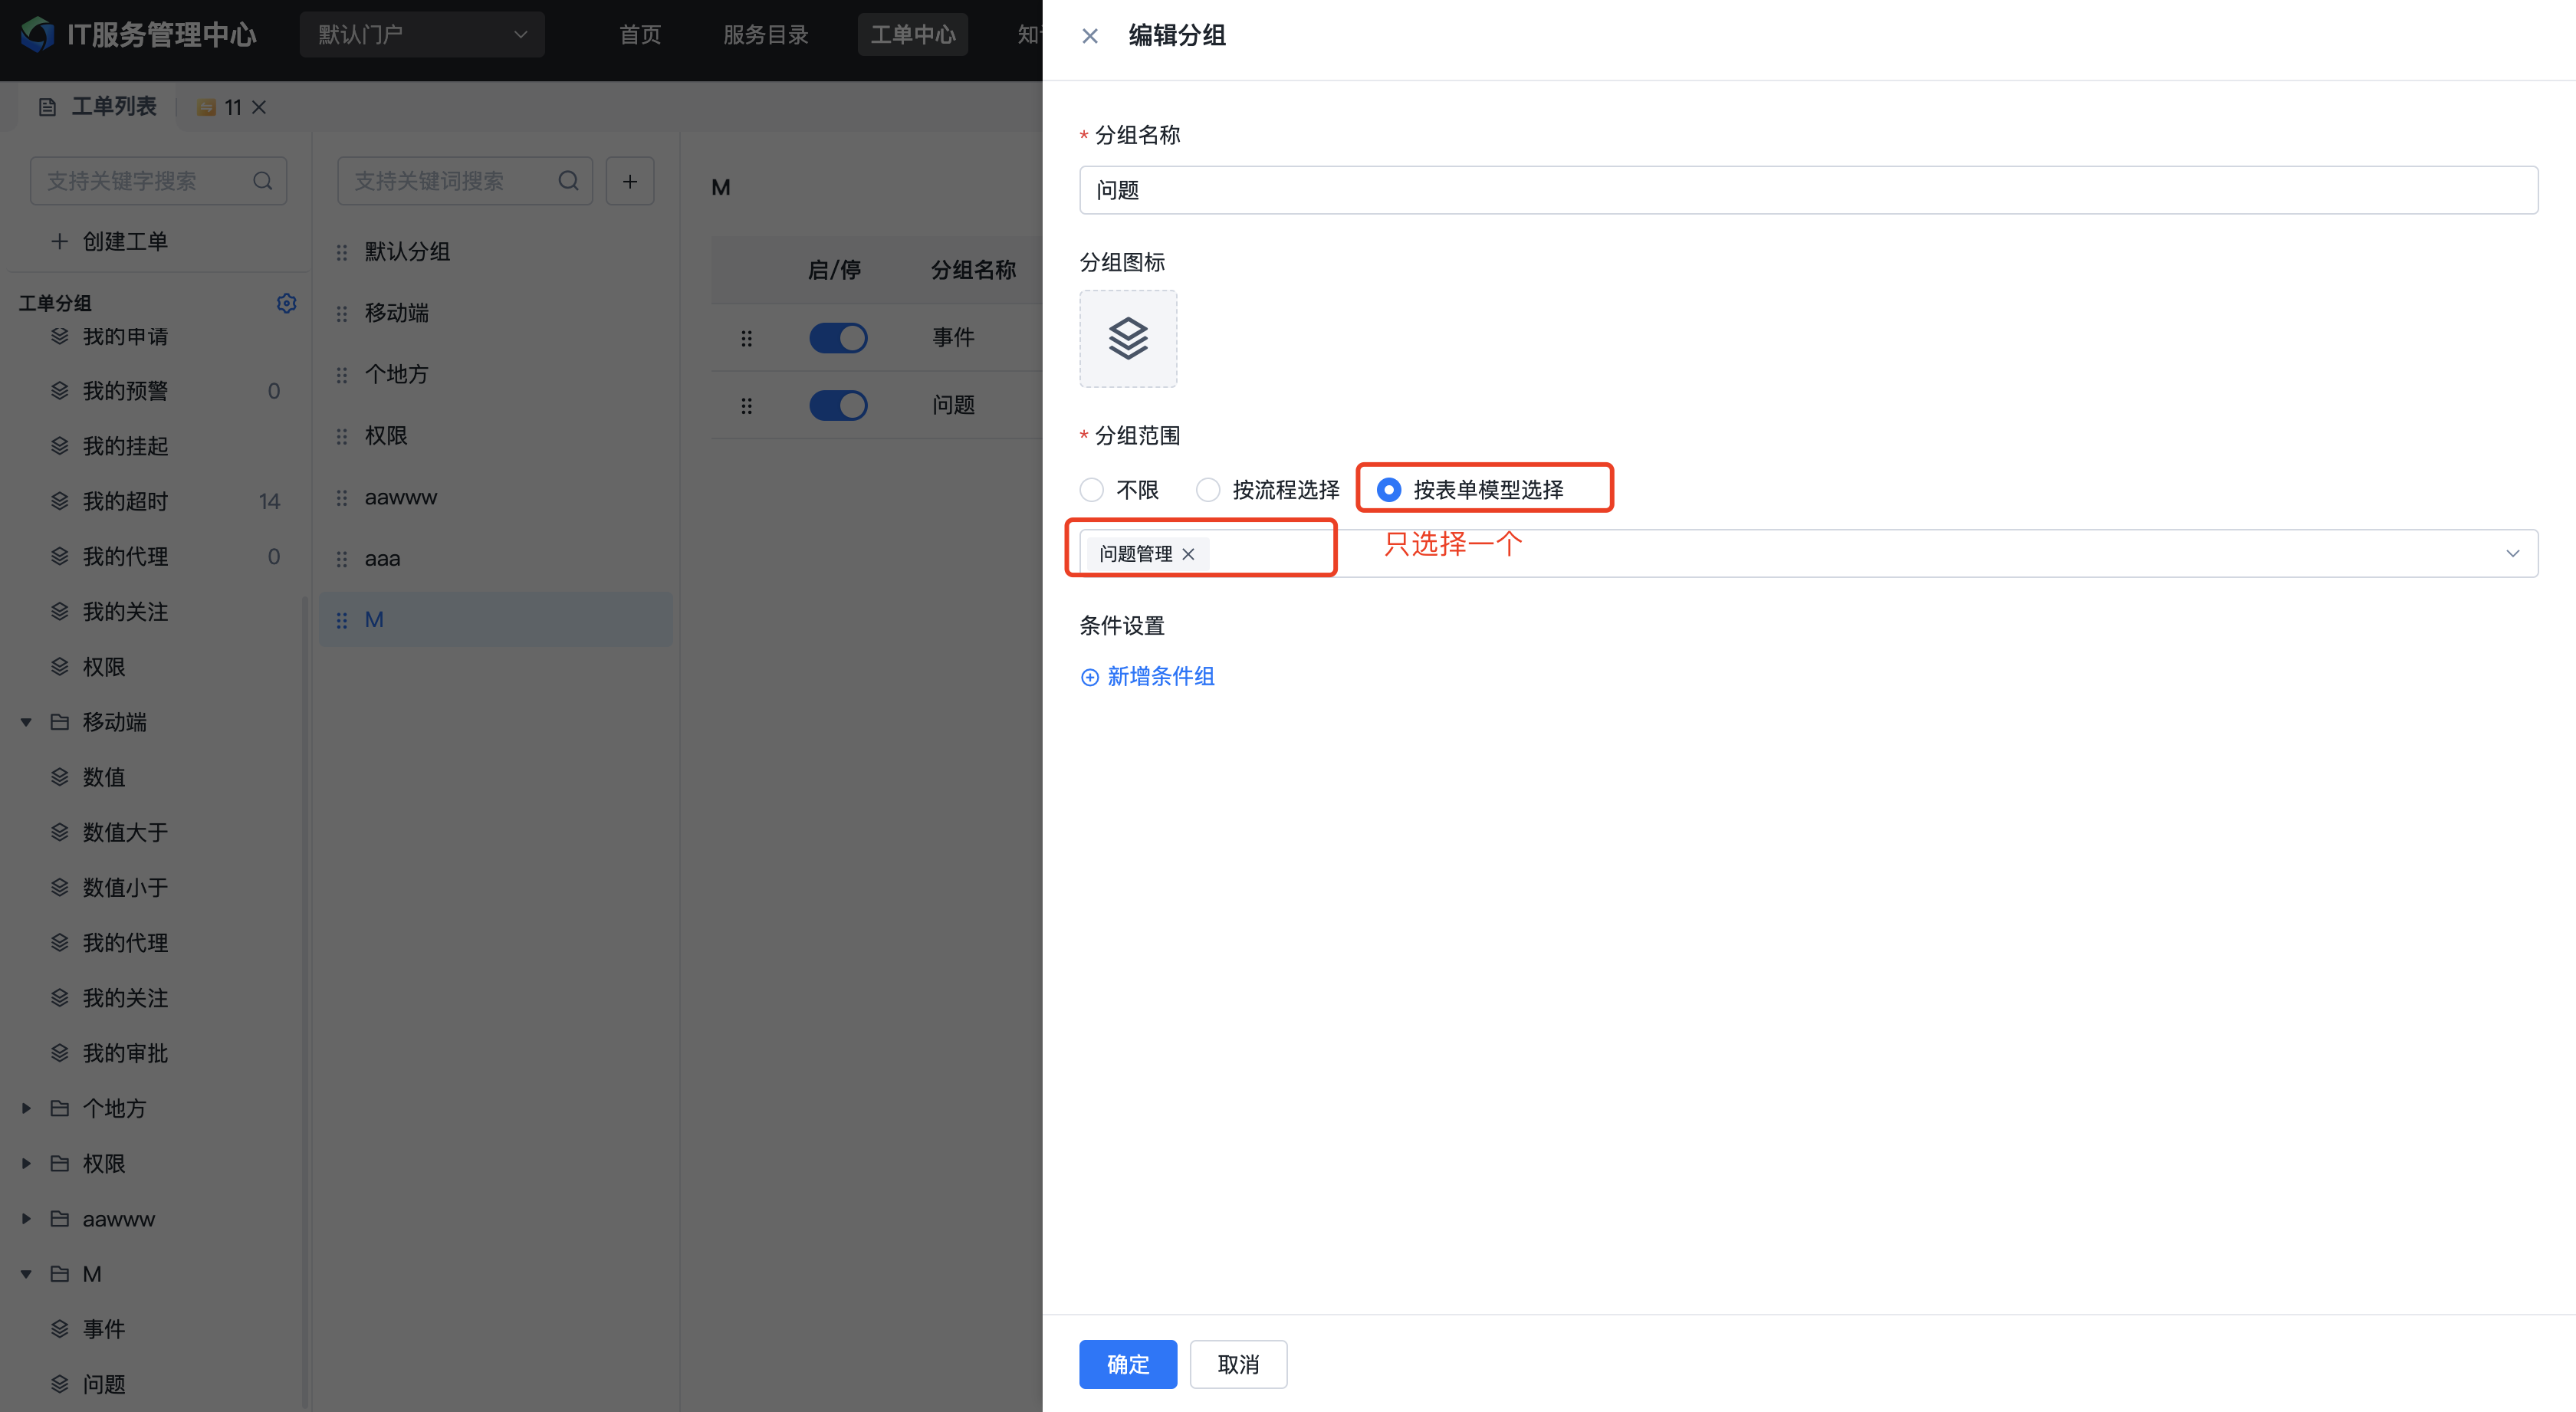
1.3.2. Custom Groups
Provides the ability to create custom ticket groups. You can configure group conditions based on scenarios and create new ticket group lists. Custom groups you create are visible only to you.
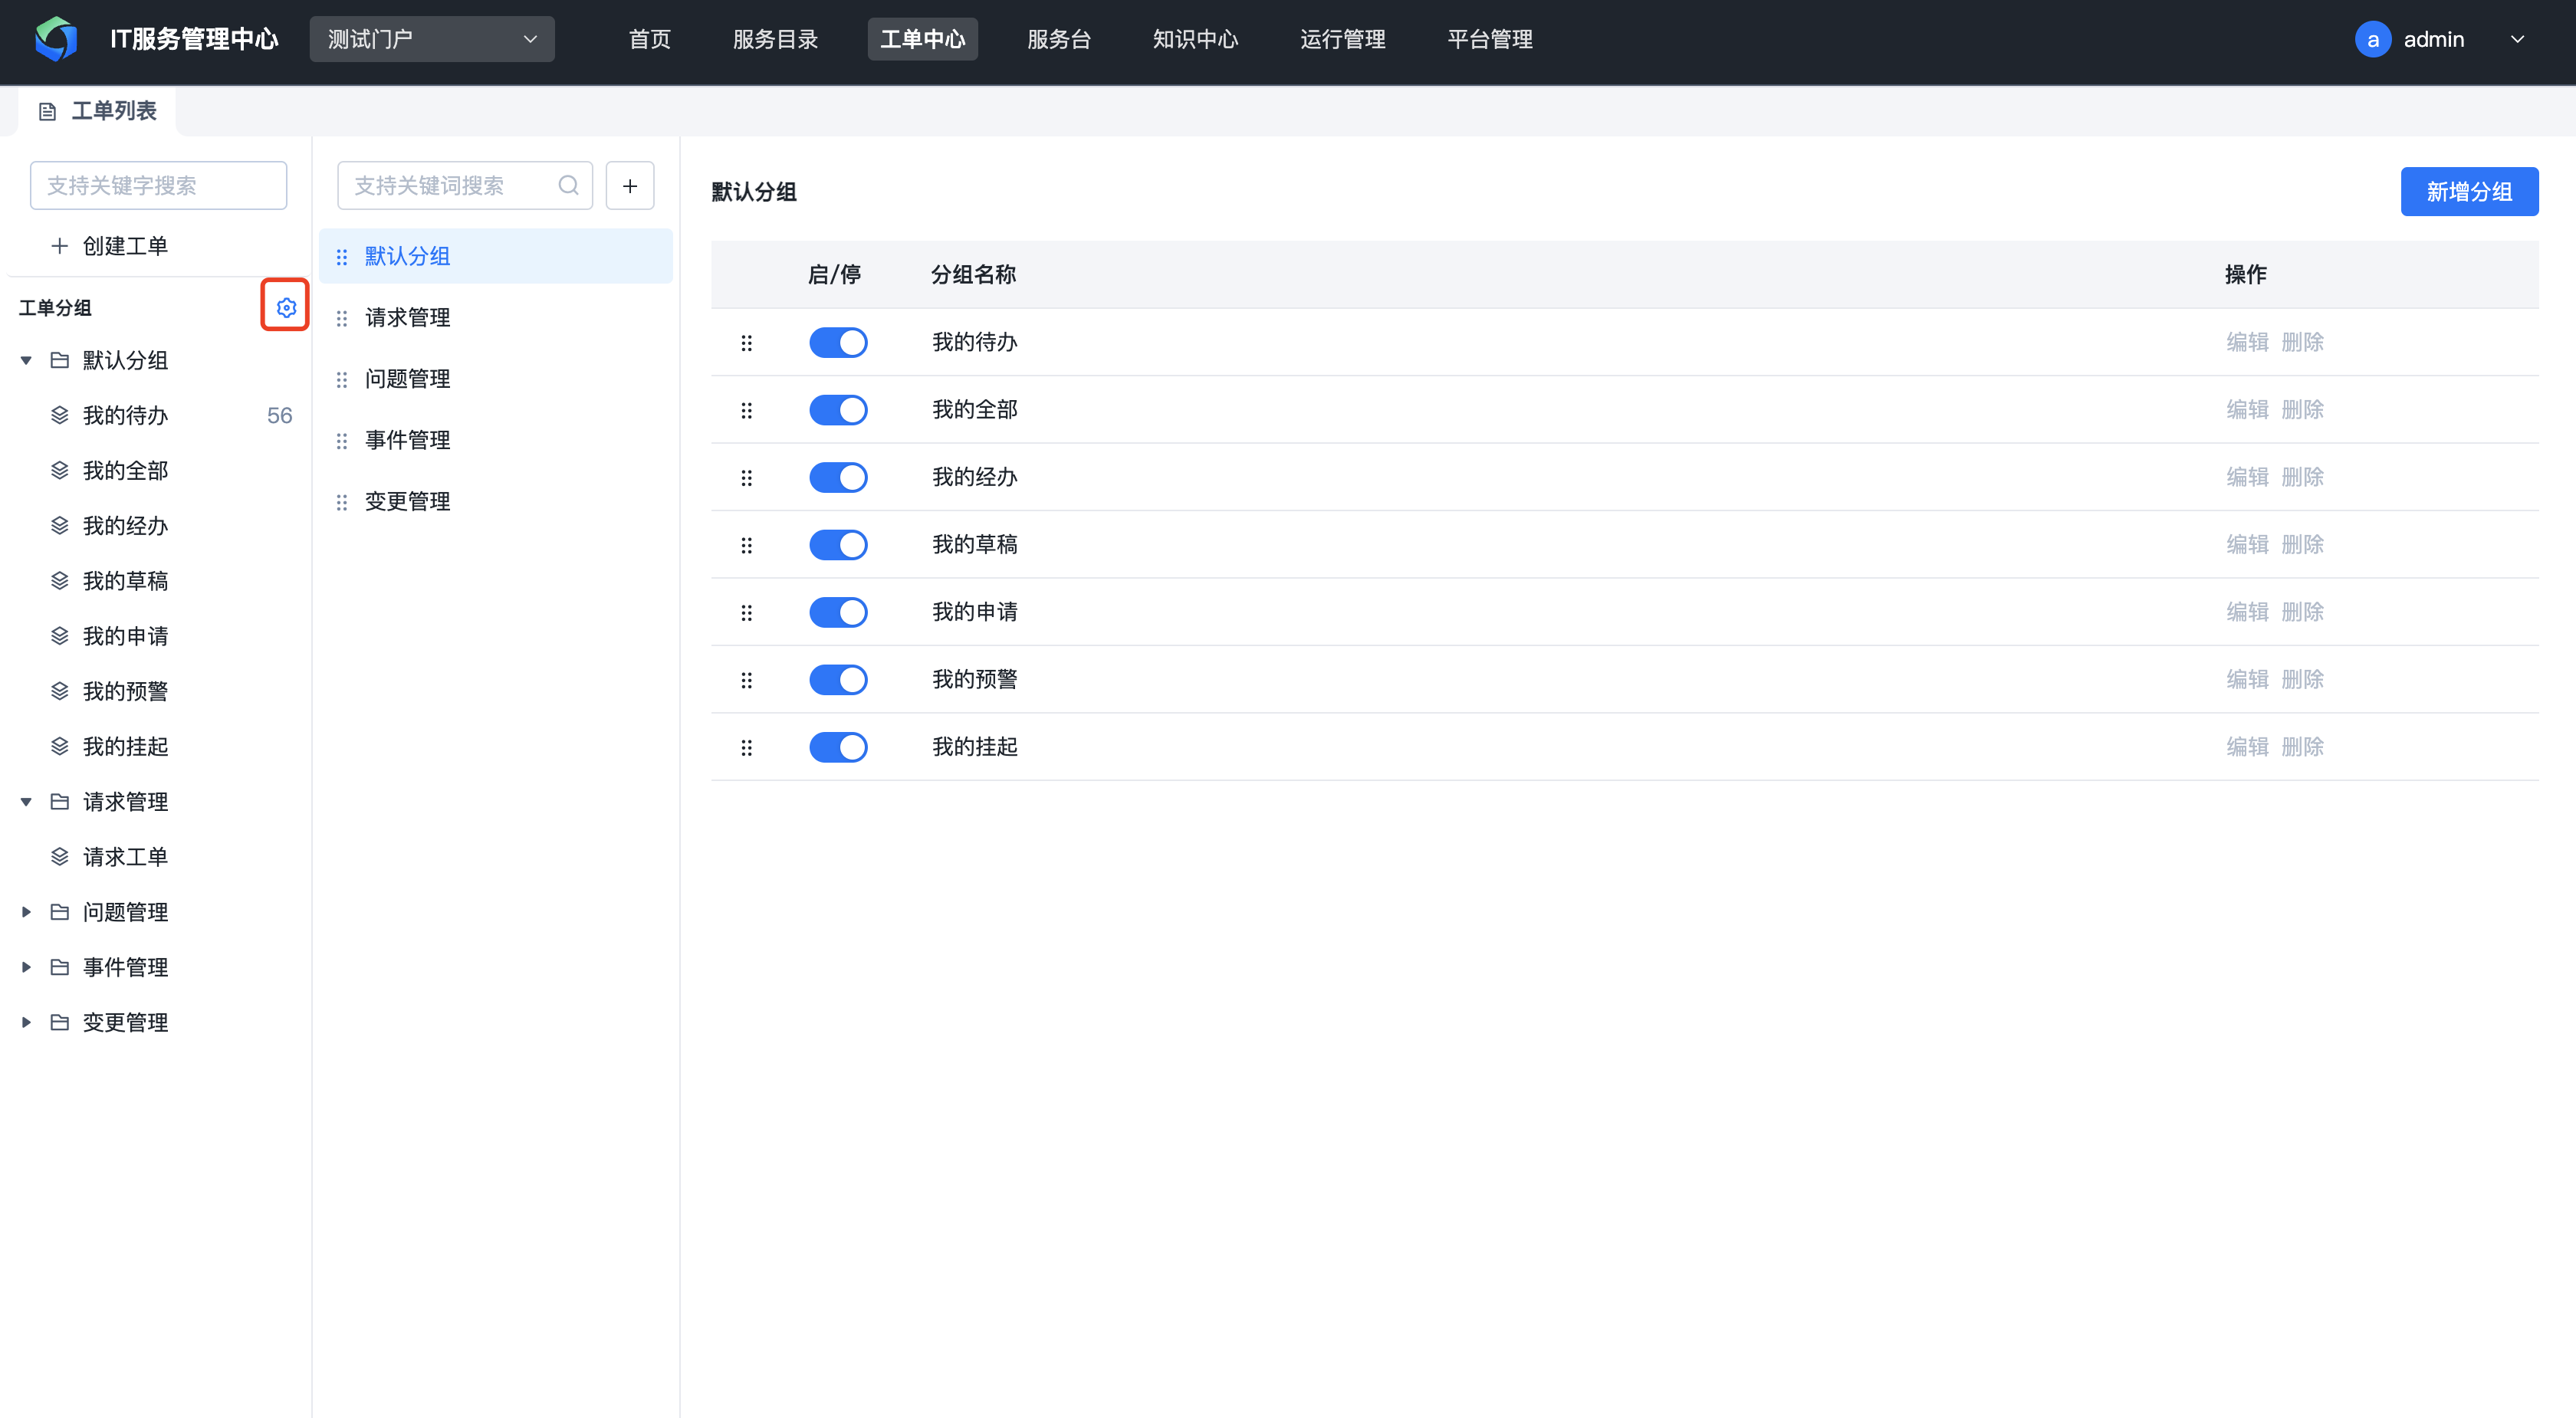
Click the settings icon on the ticket group to enter the custom group management page.
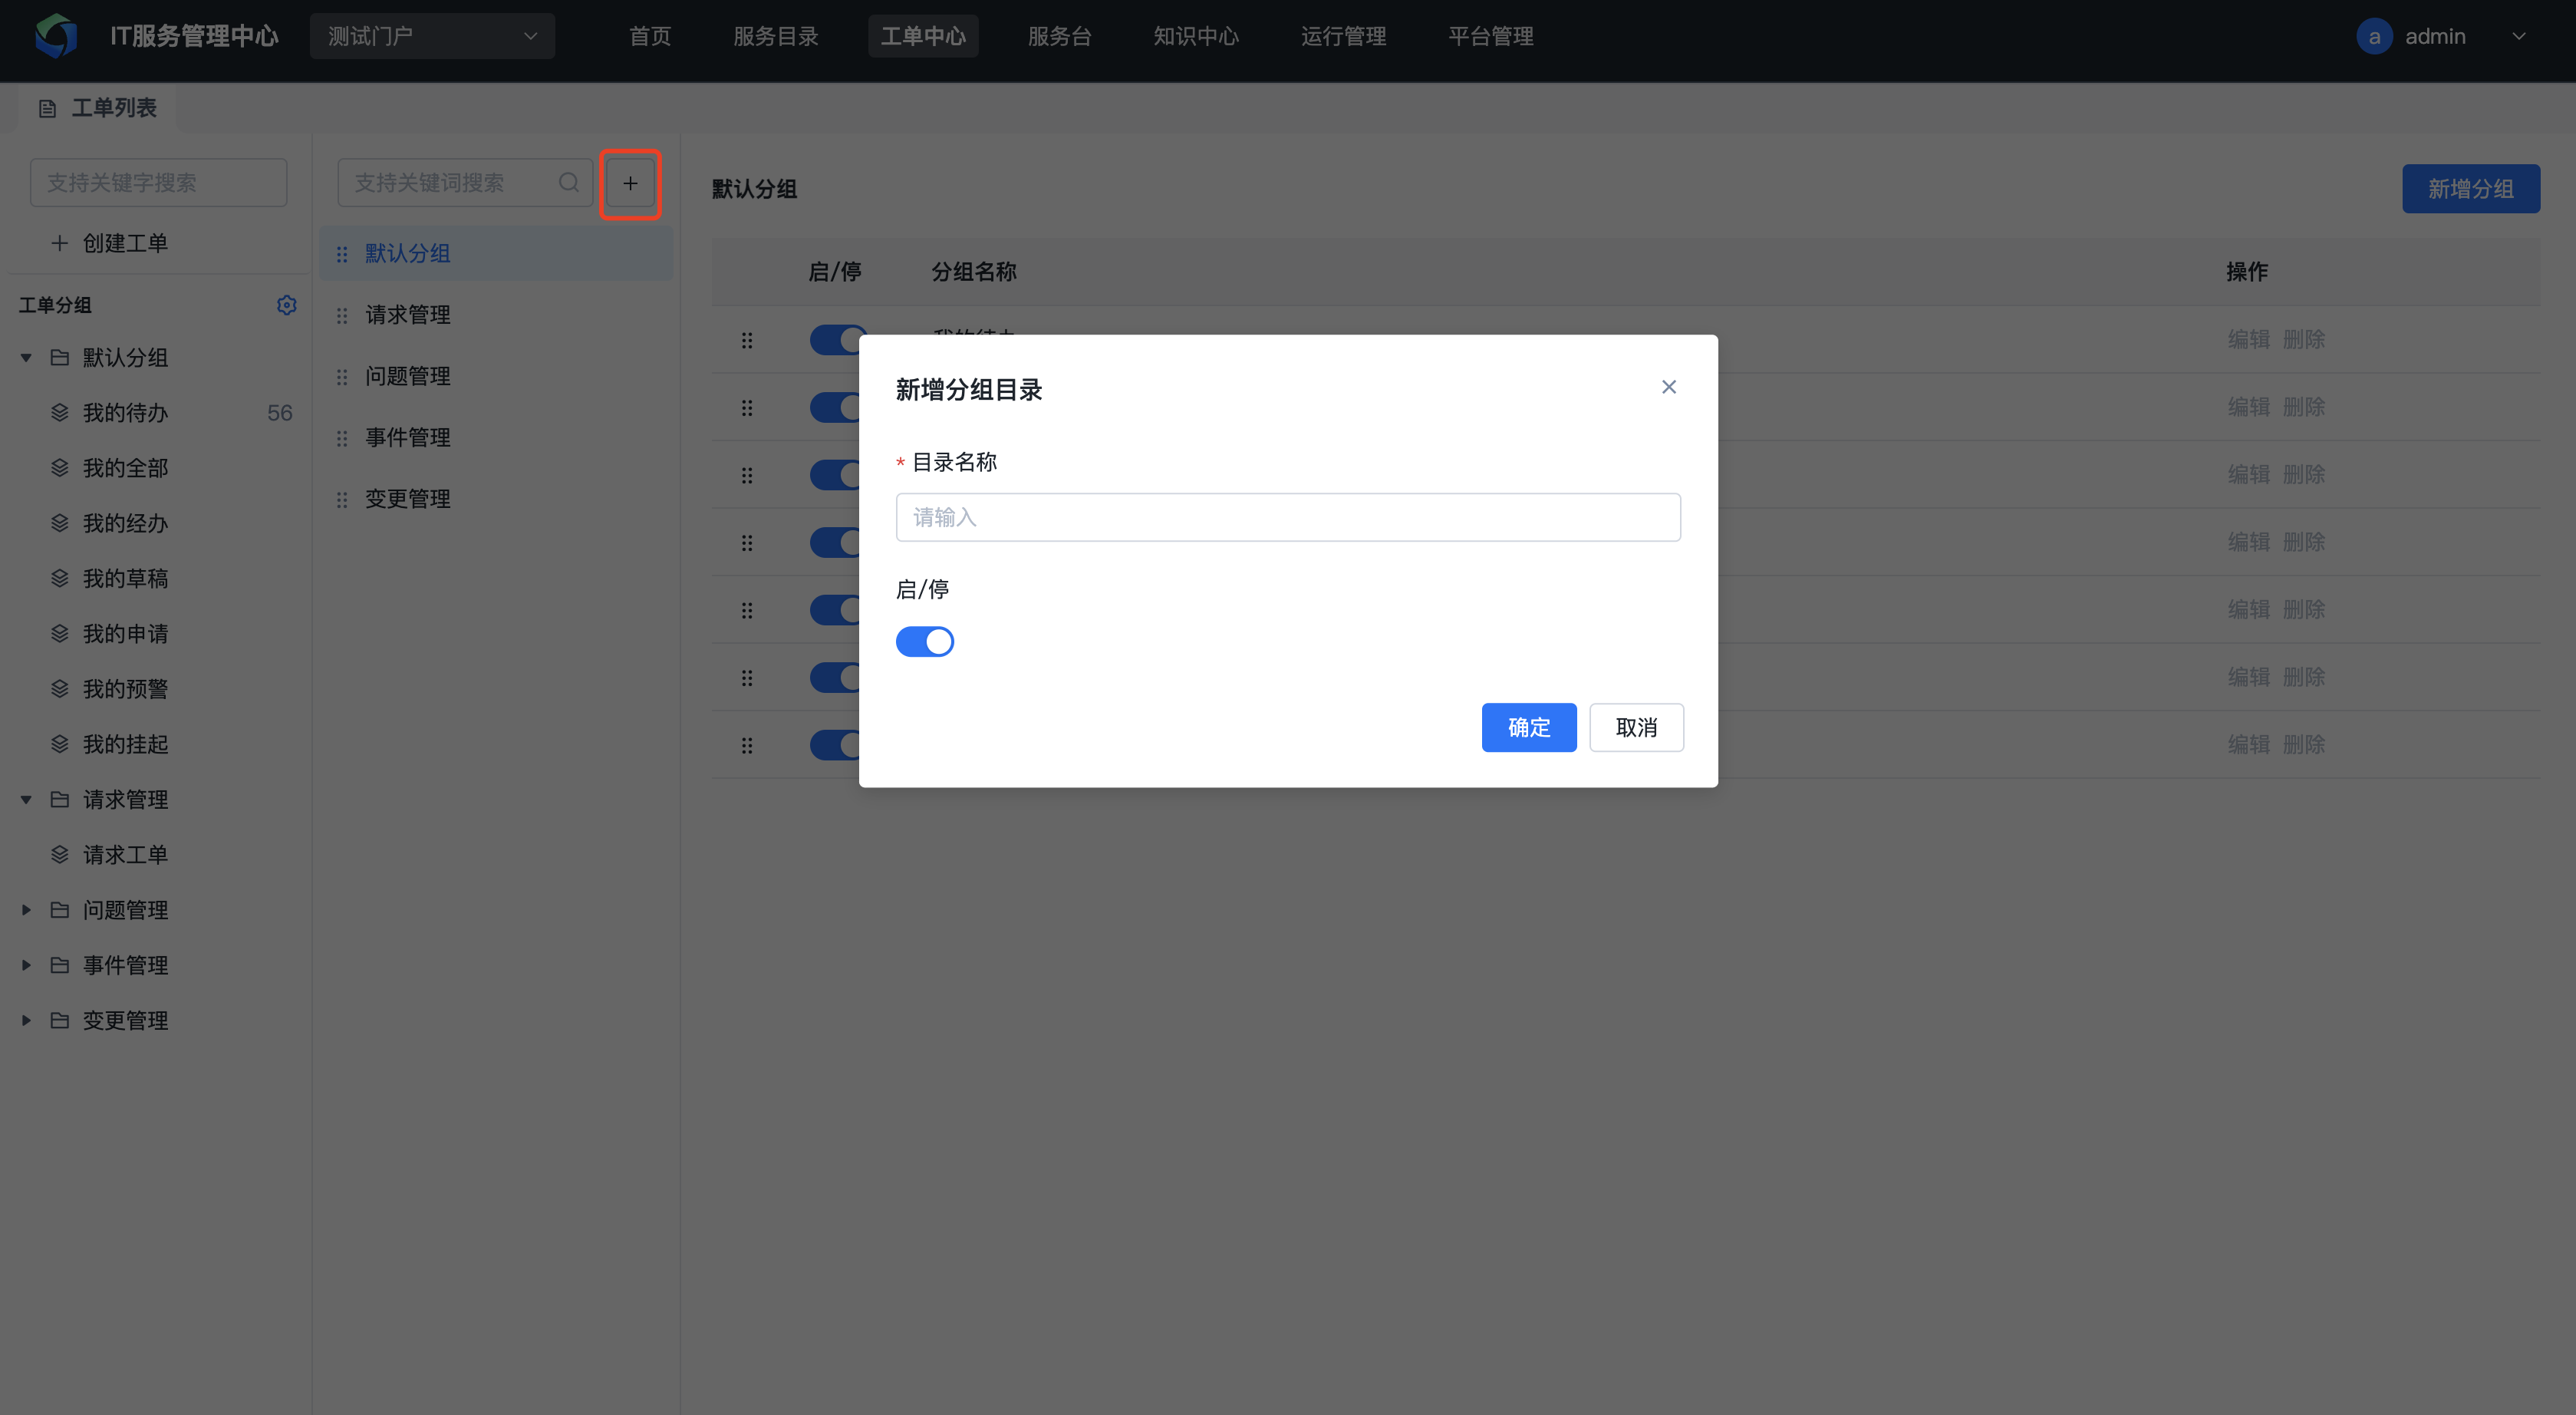
Click the add button on the ticket group to create a new group directory.
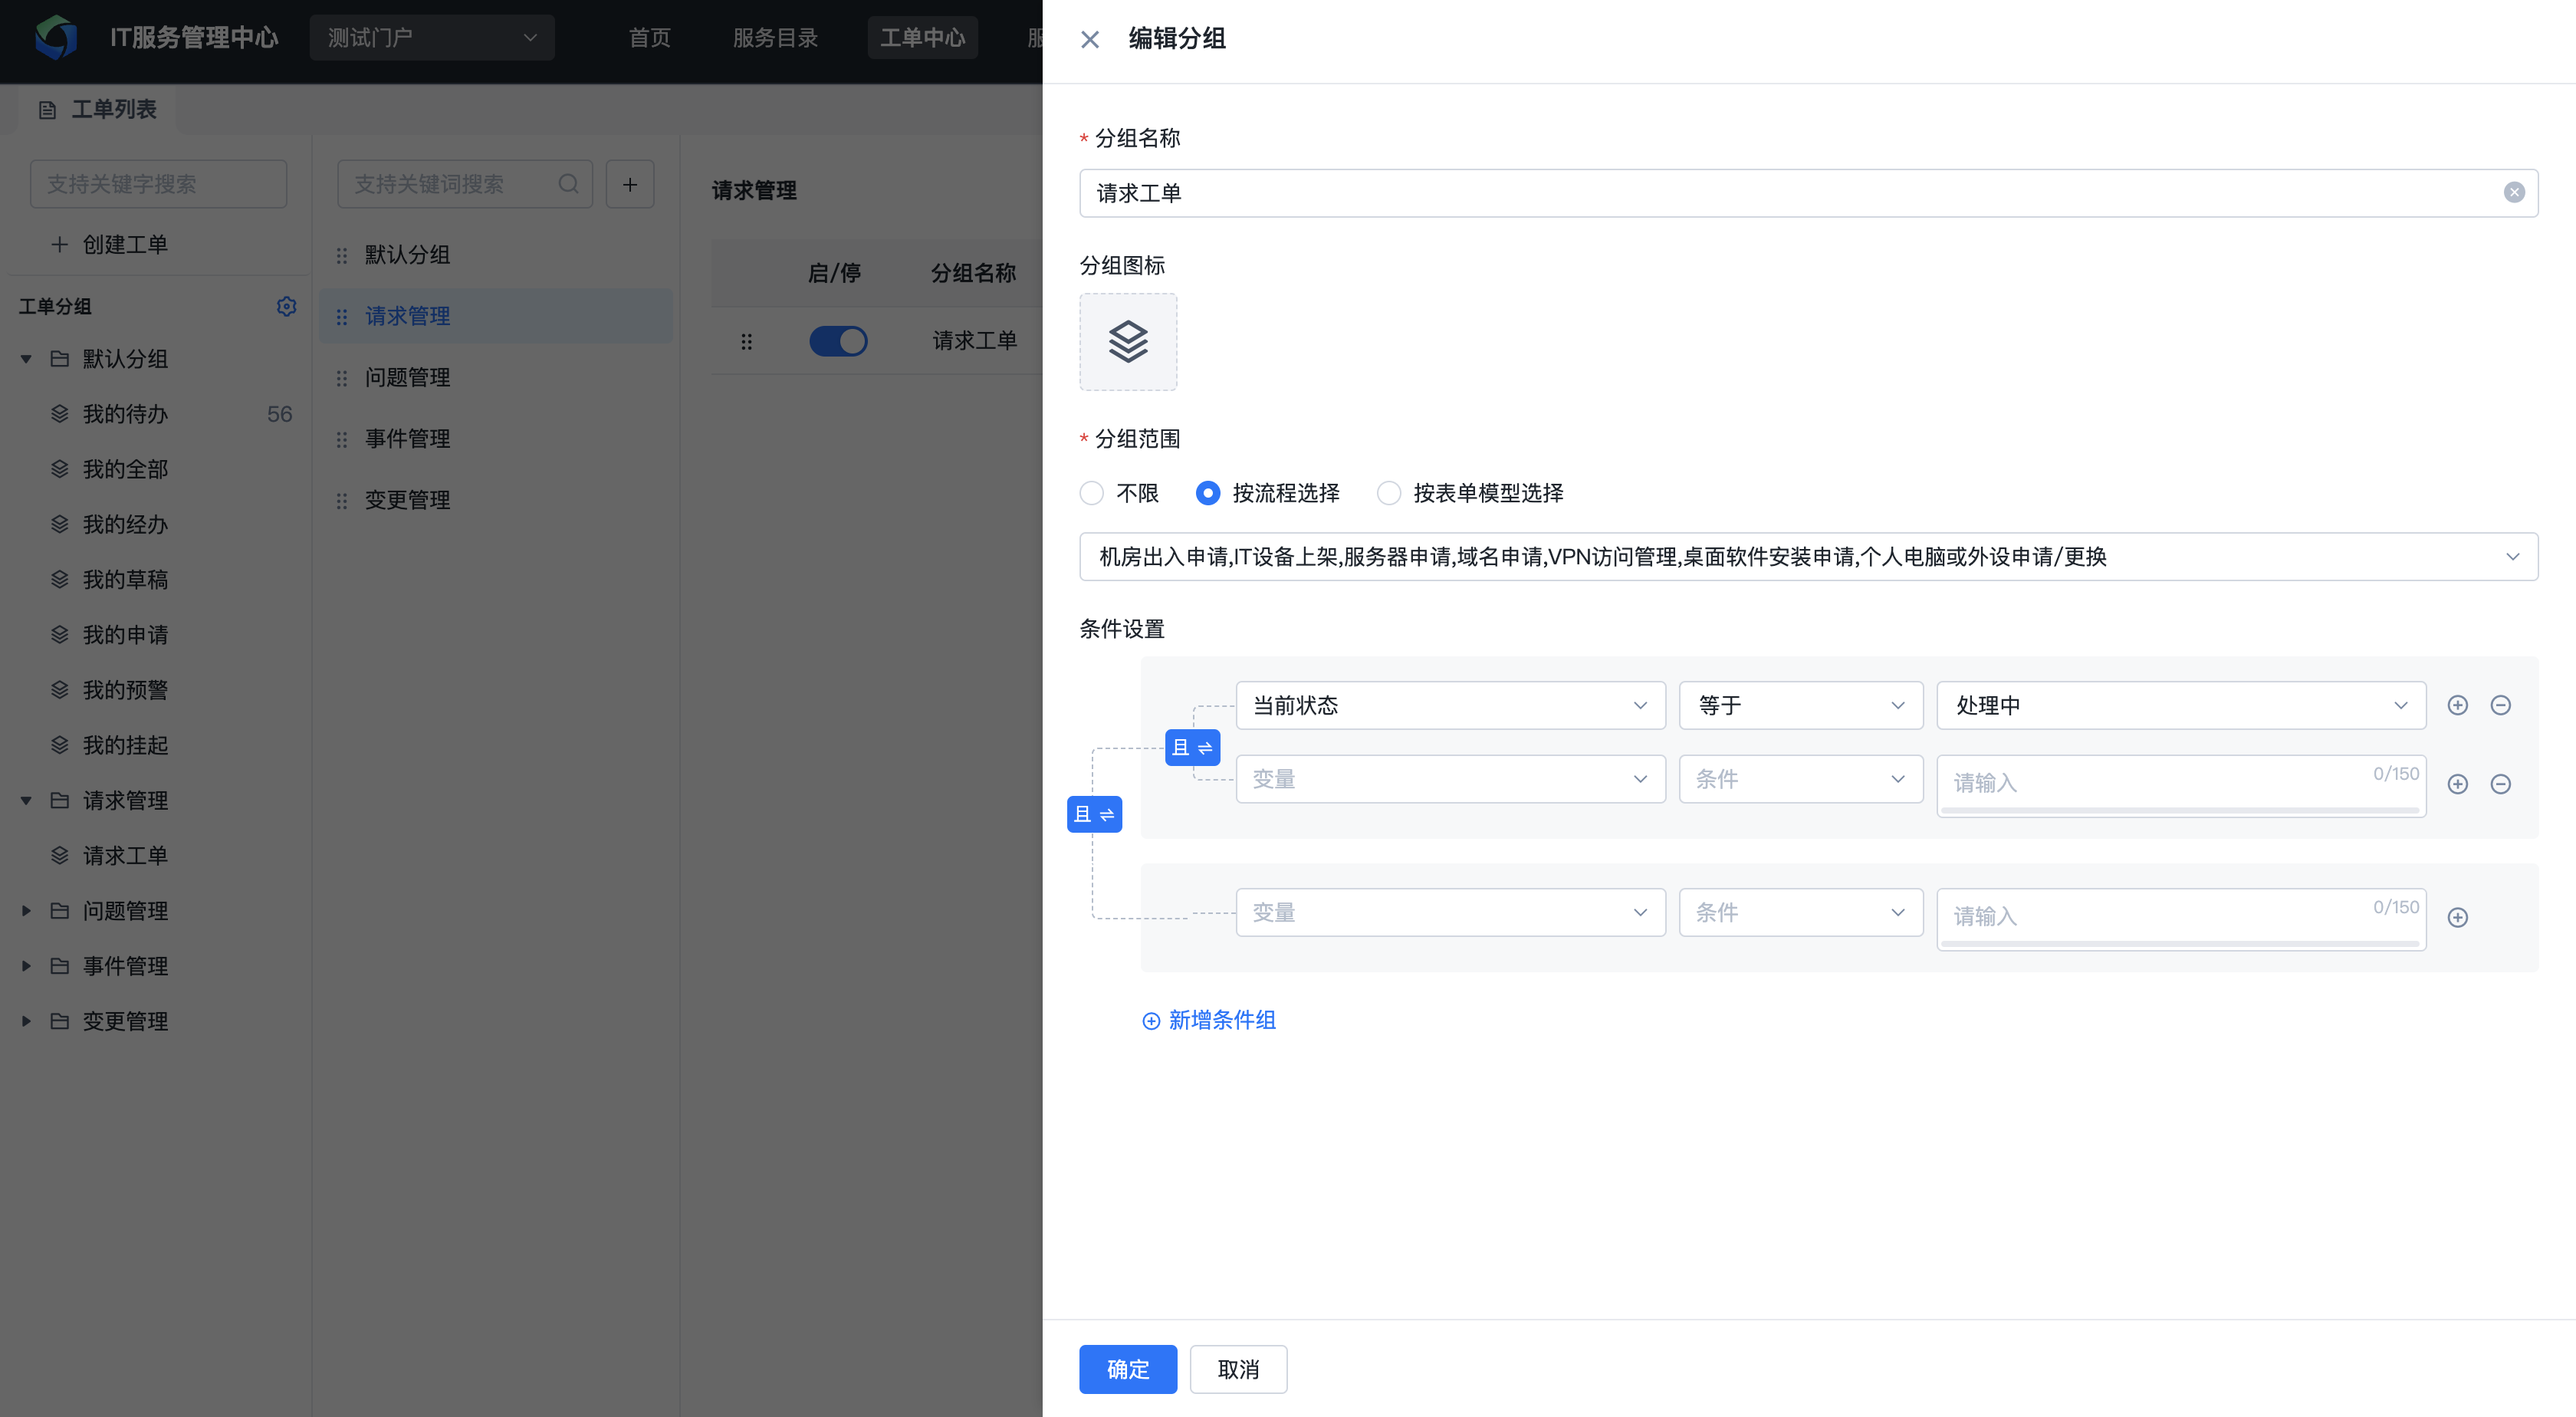
Under the corresponding group directory, click the "Add Group" button to create a new group. After creation, enable the group, and it will appear in the group list in the Ticket Center.
Note: When exporting tickets or configuring list display fields, built-in groups can only select basic fields. For custom groups scoped to a single workflow or a single form model, you can select custom fields defined in the workflow or model.
1.4. Ticket Details
Click on a ticket number in the ticket list to enter the ticket detail page and view detailed ticket information.
Once opened, the ticket appears as a tab above the Ticket Center. You can open multiple tickets and switch between them. Click the close icon on a ticket tab to close the current ticket detail page, or click the close button on the far right of the tab bar to close all open tickets.

The ticket detail content includes basic ticket information, form data, workflow diagram, transition logs, comments, triggers, attachments, related tickets, and SLA. Detailed descriptions follow.
1.4.1. Workflow Diagram
On the ticket detail page, click to view the workflow diagram and the current transition progress.


In the workflow diagram:
- Completed nodes: The node card is colored and shows the assignee. The connecting line is blue, as shown in the submission node in the diagram.
- Current active node: The node card has a blue border, is colored, and shows the assignee. The connecting line is blue, as shown in the approval node in the diagram.
- Unreached nodes: The node card is gray-white, and the connecting line is gray.
- The workflow diagram page supports zooming in, zooming out, resetting, and full-screen display.
- The workflow diagram page supports zooming out, zooming in, resetting, and full-screen display.
- Hovering over a node in the workflow diagram displays assignee information (the specific displayed information can be configured under Platform Management - Basic Configuration), as shown below:
1.4.2. Transition Logs
On the right sidebar of the ticket detail page, all transition logs are displayed, showing transition time, node, operation, operator, and field change information.

1.4.3. Ticket Comments
On the right sidebar of the ticket detail page, click the "Comments" tab to view, post, or reply to comments. Ticket comments support pasting images, uploading files, and @mentioning other users. Mentioned users will receive comment notifications.

1.4.4. Triggers
On the right sidebar of the ticket detail page, click the "Triggers" tab to view execution records and detailed information of triggers bound to the ticket, including execution time, status, and execution logs.
- Trigger list

- Execution details

1.4.5. Attachments
On the right sidebar of the ticket detail page, click the "Attachments" tab to view all attachments related to the ticket, including attachments from comments and attachments uploaded via form attachment fields. All are displayed here in a unified manner.
Note: When attachments in comments or form fields are deleted, the attachment list will be updated accordingly.

1.4.6. Related Tickets
On the right sidebar of the ticket detail page, click the "Related Tickets" tab to view related tickets.
Related tickets fall into two categories: one type is directly added from the related tickets list, and the other type is created through the related ticket button configured in the workflow (e.g., converting an incident to a problem; see the Workflow Design module documentation for details).

1.4.7. Followers
Ticket followers displays all users who are following the ticket.
Ticket followers cover two scenarios:
- During ticket processing, you may want to designate key followers so they can stay informed about the ticket's progress.
In this case, users with ticket viewing permission can add other users as ticket followers. Once added, followers are automatically granted permission to view the ticket.
After adding ticket followers, you can include a notification message, and the followers will receive the notification (provided that ticket follow notifications have been manually configured and enabled in the Notification Management module).

- You may want to proactively follow a ticket and view a list of followed tickets for easy tracking.
In this scenario, click the follow icon next to the ticket title to follow the current ticket.
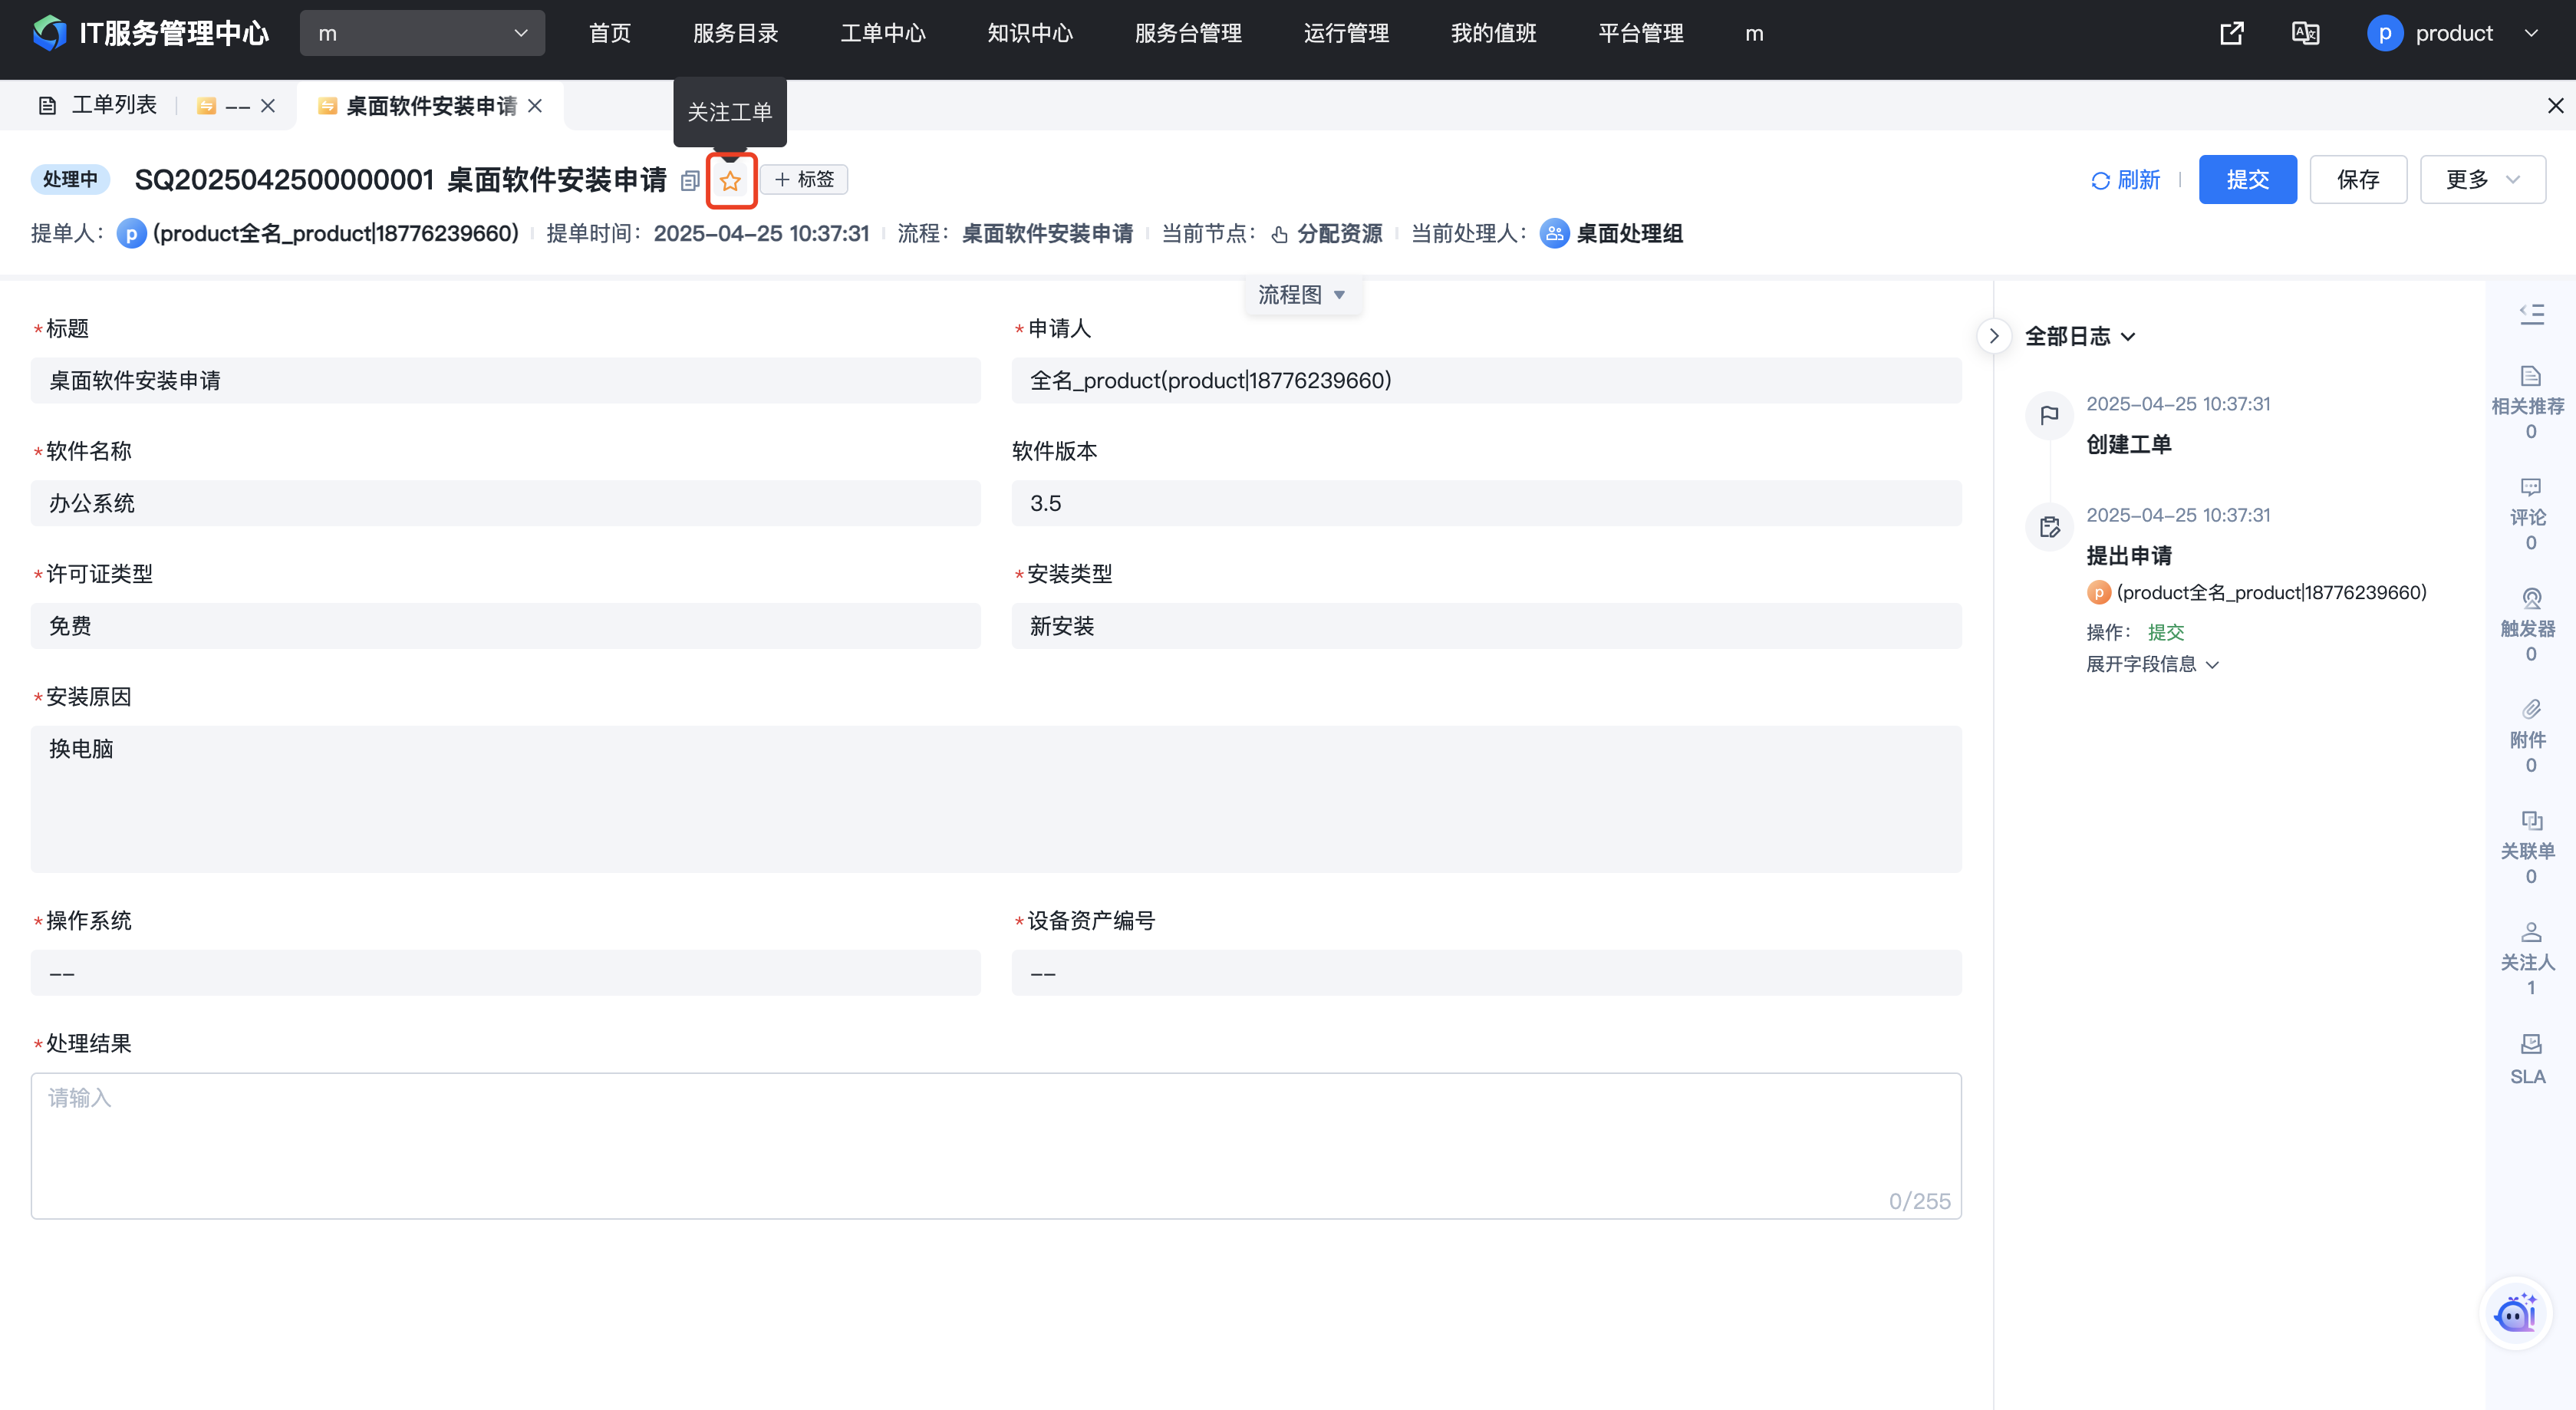
All followed tickets can be viewed in the "My Followed" ticket list.
1.4.8. SLA
When a ticket has an active SLA timer, the SLA deadline and remaining time are displayed below the ticket title on the detail page.

Click "SLA" in the right sidebar to view all SLA timing records for the current ticket. Click the "View Details" button to see more detailed SLA information.


1.5. Processing Tickets
1.5.1. Operation Instructions
After clicking a ticket number to enter the ticket detail page, the available operation buttons for the current ticket are displayed in the upper right corner. You can perform the corresponding operations based on actual needs.

Operation descriptions are as follows:
-
Manual node: Submit, Update, Save, Claim, Transfer, Return
-
Approval node: Approve, Reject, Update, Save, Transfer, Countersign, Return
-
Automatic node: Retry, Manual Execution
-
Other operations: Withdraw, Suspend/Resume, Close, Terminate, Reopen, Custom Button (Related Ticket)
| Operation | Description |
| Submit | Submits the current form information (manual nodes only). The workflow continues to the next step after submission. When the form is confirmed to be complete, submit to advance the workflow. |
| Update | Updates the current form information. Unlike Submit, it only updates the form without advancing the workflow. Required fields are not validated on update. When an assignee has only partially filled in the form and wants to share the progress without advancing to the next node, they can click Update. |
| Save | Saves the content filled in the current task for later completion. Saved content is not officially updated and is only visible to users with processing permissions. |
| Claim | When a ticket is assigned to a group of users, a user can proactively claim the current task. For nodes with the claim feature enabled, the ticket must be claimed before processing. |
| Transfer | When the ticket assignee cannot process the ticket personally, they can transfer it to another person. |
| Return | When the current node assignee disagrees with how a previous node was handled, they can return the ticket to the previous node assignee for reprocessing. |
| Approval | The approval buttons for approval nodes are "Approve" and "Reject". Both actions submit the current form information, and the workflow continues afterward. |
| Countersign | Adds additional approvers to the current approval node (approval nodes only). When the current approval task requires input from other members, you can use the countersign feature. It supports pre-countersign and post-countersign. Pre-countersign: The countersigned person must approve before I can approve. Post-countersign: I approve first, then the countersigned person approves. |
| Retry/Manual Execution | When an automatic node's task fails, you can click Retry or Manual Execution. Retry: Triggers the automatic task again. Manual Execution: When automatic execution consistently fails, you can use manual execution to fill in the output parameters and submit manually. |
| Withdraw | When the assignee of the previous node needs to reprocess their task, they can withdraw. Withdrawal is only possible if the next node has not yet been processed. If the next node has already been processed, withdrawal is not possible. |
| Suspend/Resume | Suspend: When a ticket temporarily does not need processing, you can choose to suspend it. Resume: When a suspended ticket needs to continue processing, click Resume. |
| Close | If the ticket content has been resolved in advance and does not need to follow the established workflow, you can close the ticket early. After closing, the ticket ends with a status of "Completed" and will not proceed further. |
| Terminate | If the ticket content does not need to be completed for some reason, you can terminate it. After termination, the ticket ends with a status of "Terminated" and will not proceed further. |
| Reopen | After a ticket reaches the end state, if it needs to be re-processed for some reason, you can reopen it. After reopening, the ticket restarts from after the submission node. |
| Expedite | When processing progress is not meeting expectations, you can click Expedite to urge the assignee. The assignee will receive a ticket expedite notification. |
| Custom Button (Related Ticket) | Typically used for scenarios like converting an incident to a problem or an incident to a change. When you need to create a problem ticket from the current incident ticket and automatically populate relevant information, you can configure a related ticket button under the workflow's custom buttons. |
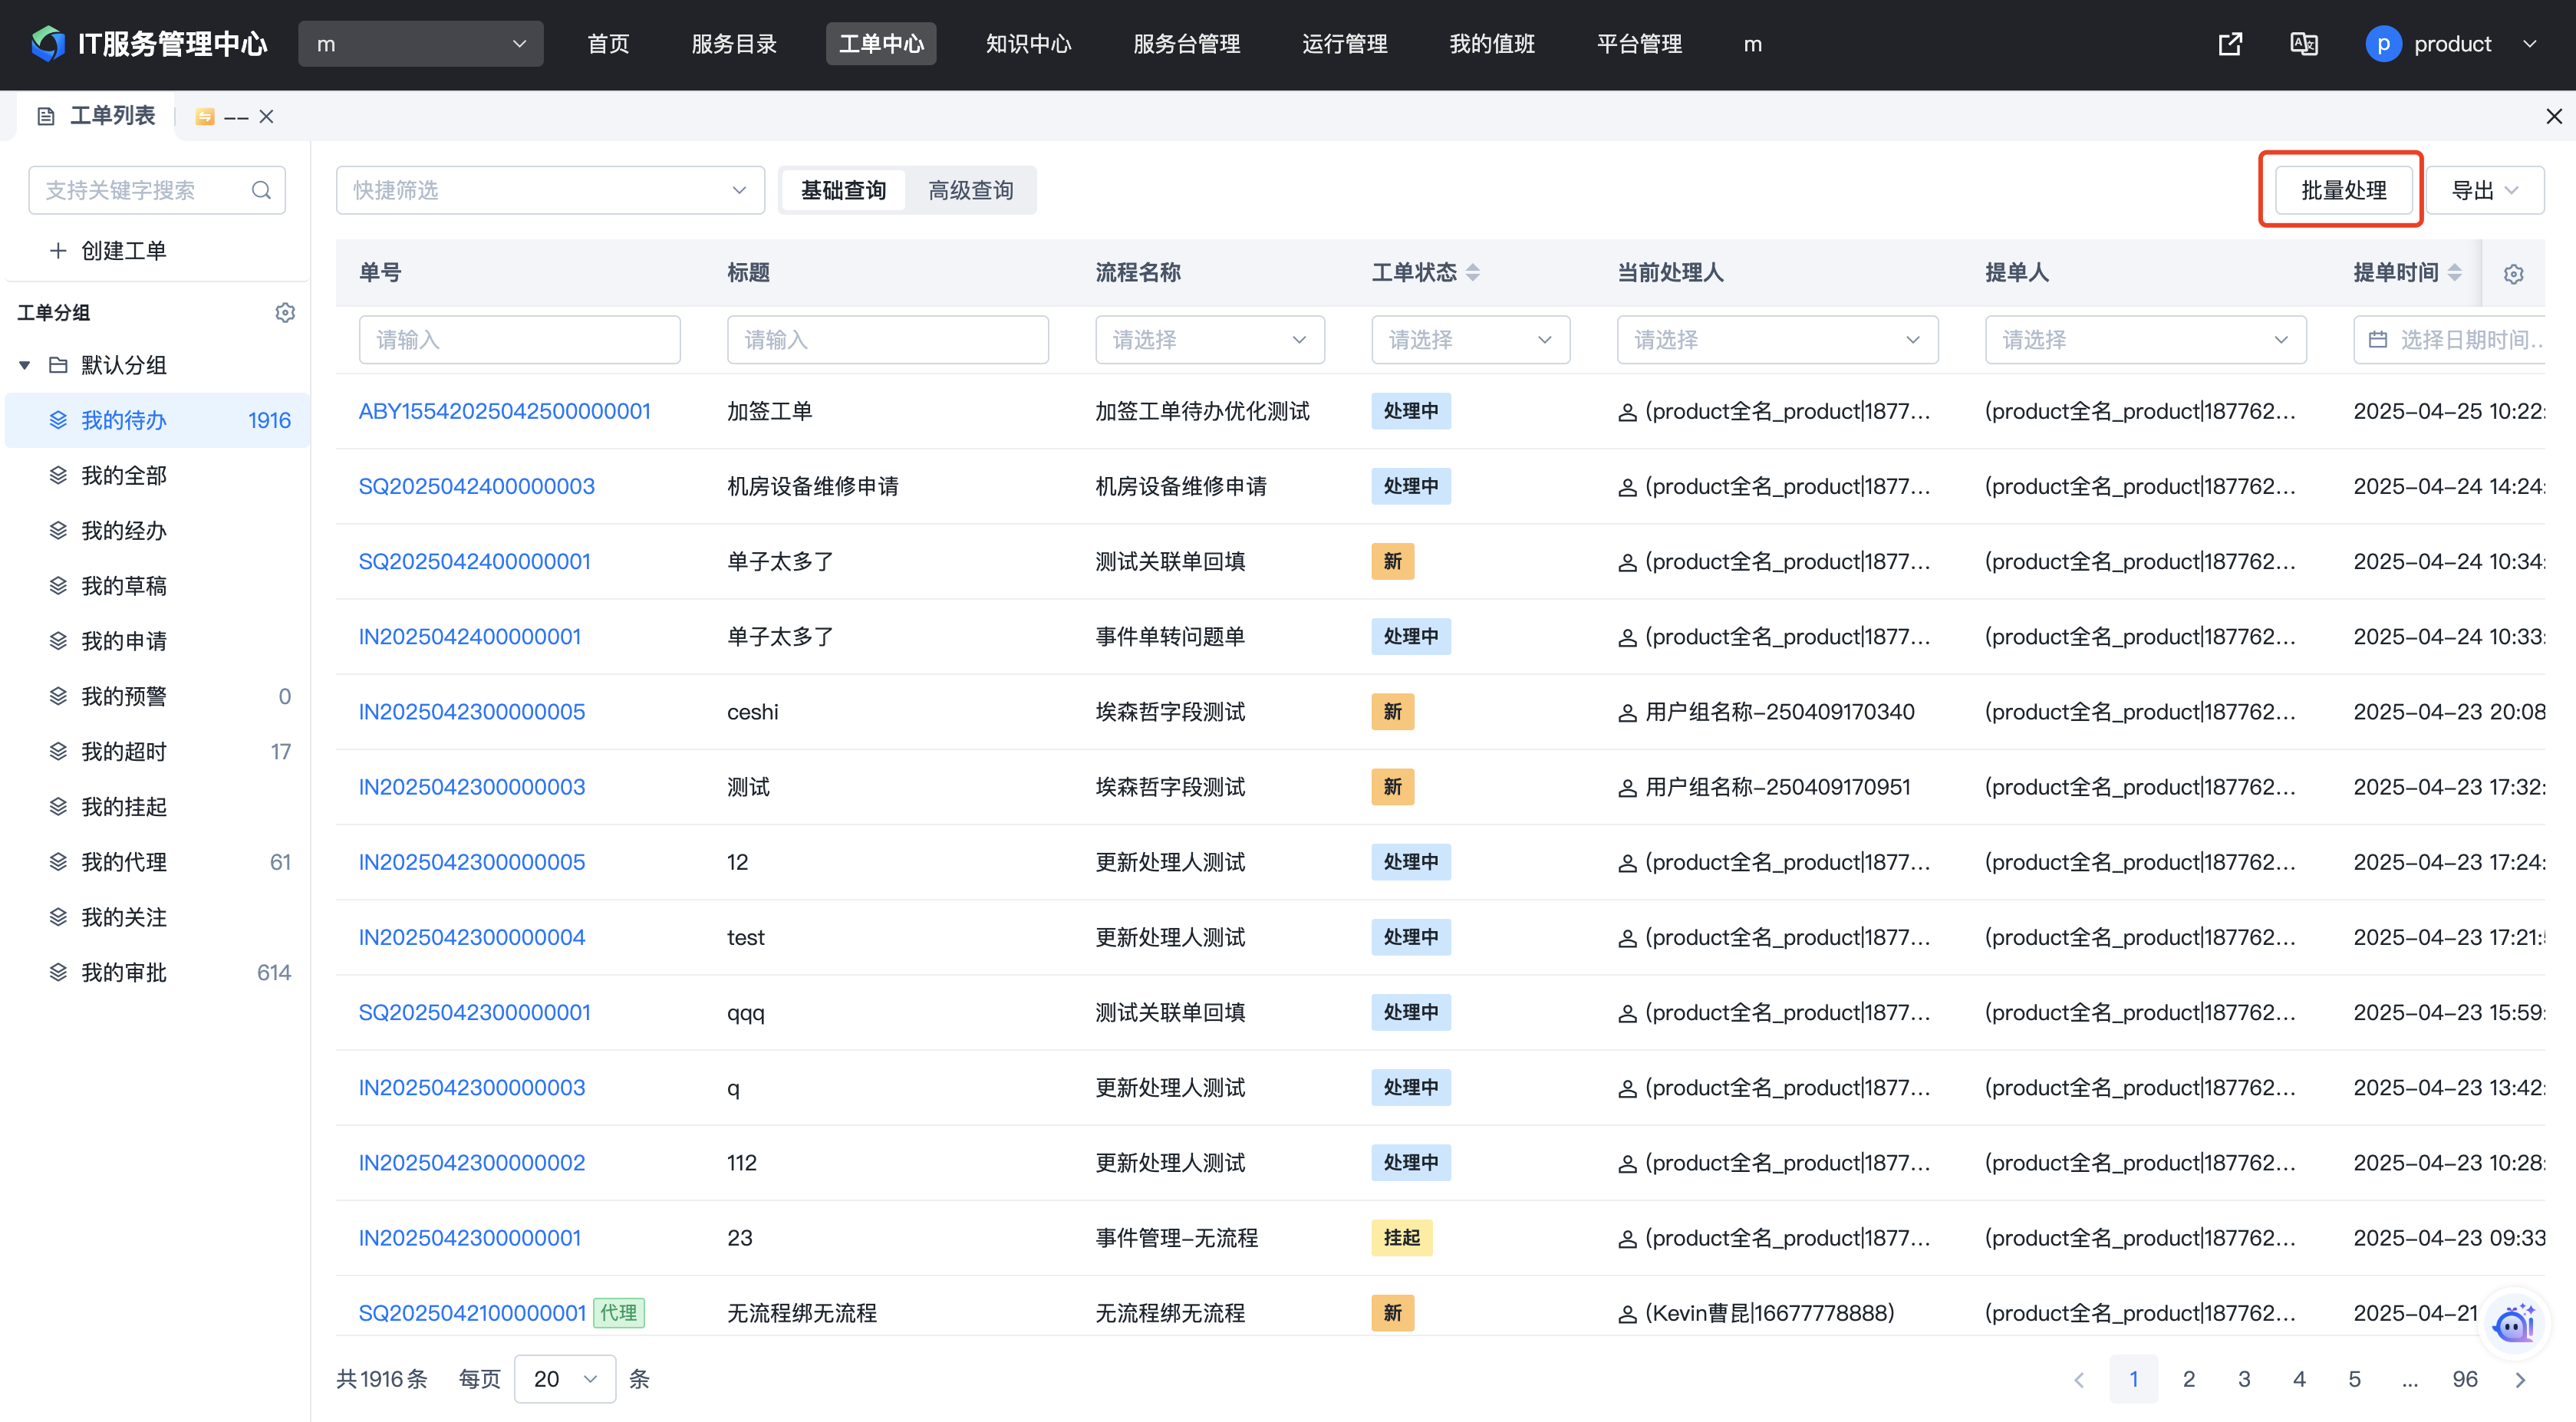
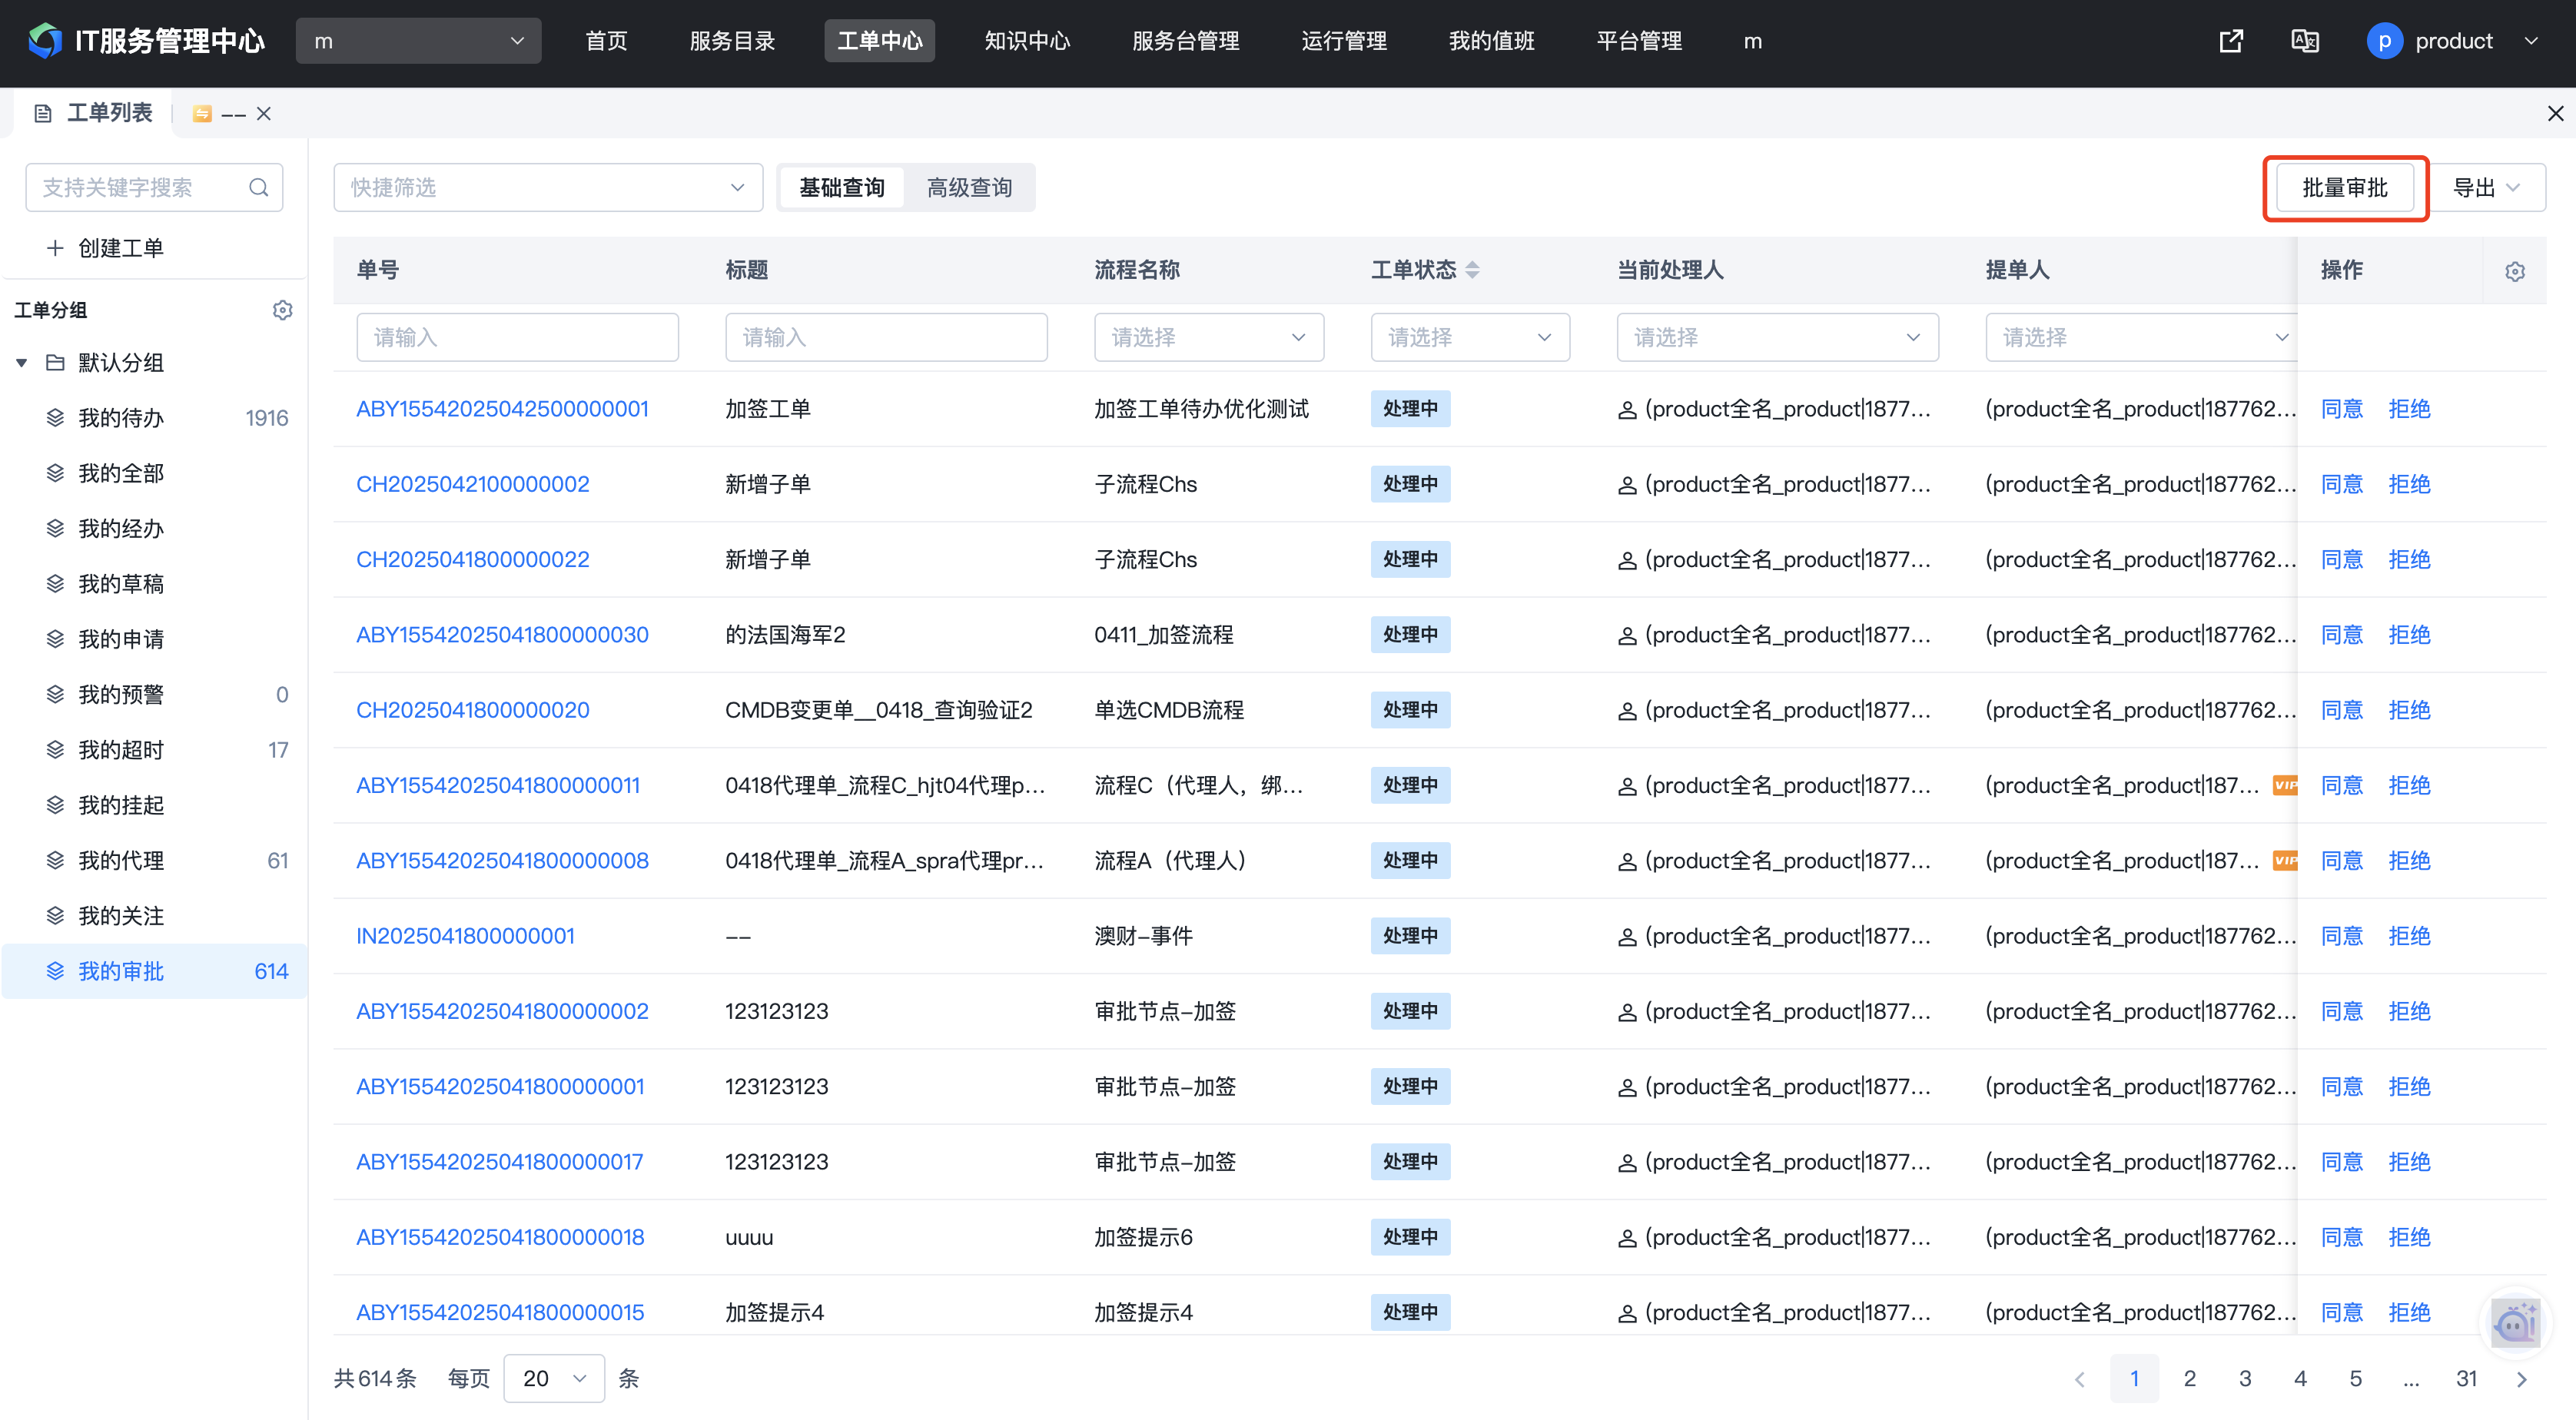
1.5.2. Batch Processing
In the My To-Do list, click the batch processing button in the upper right corner to batch process tickets.
Select the tickets to batch process and click Confirm.
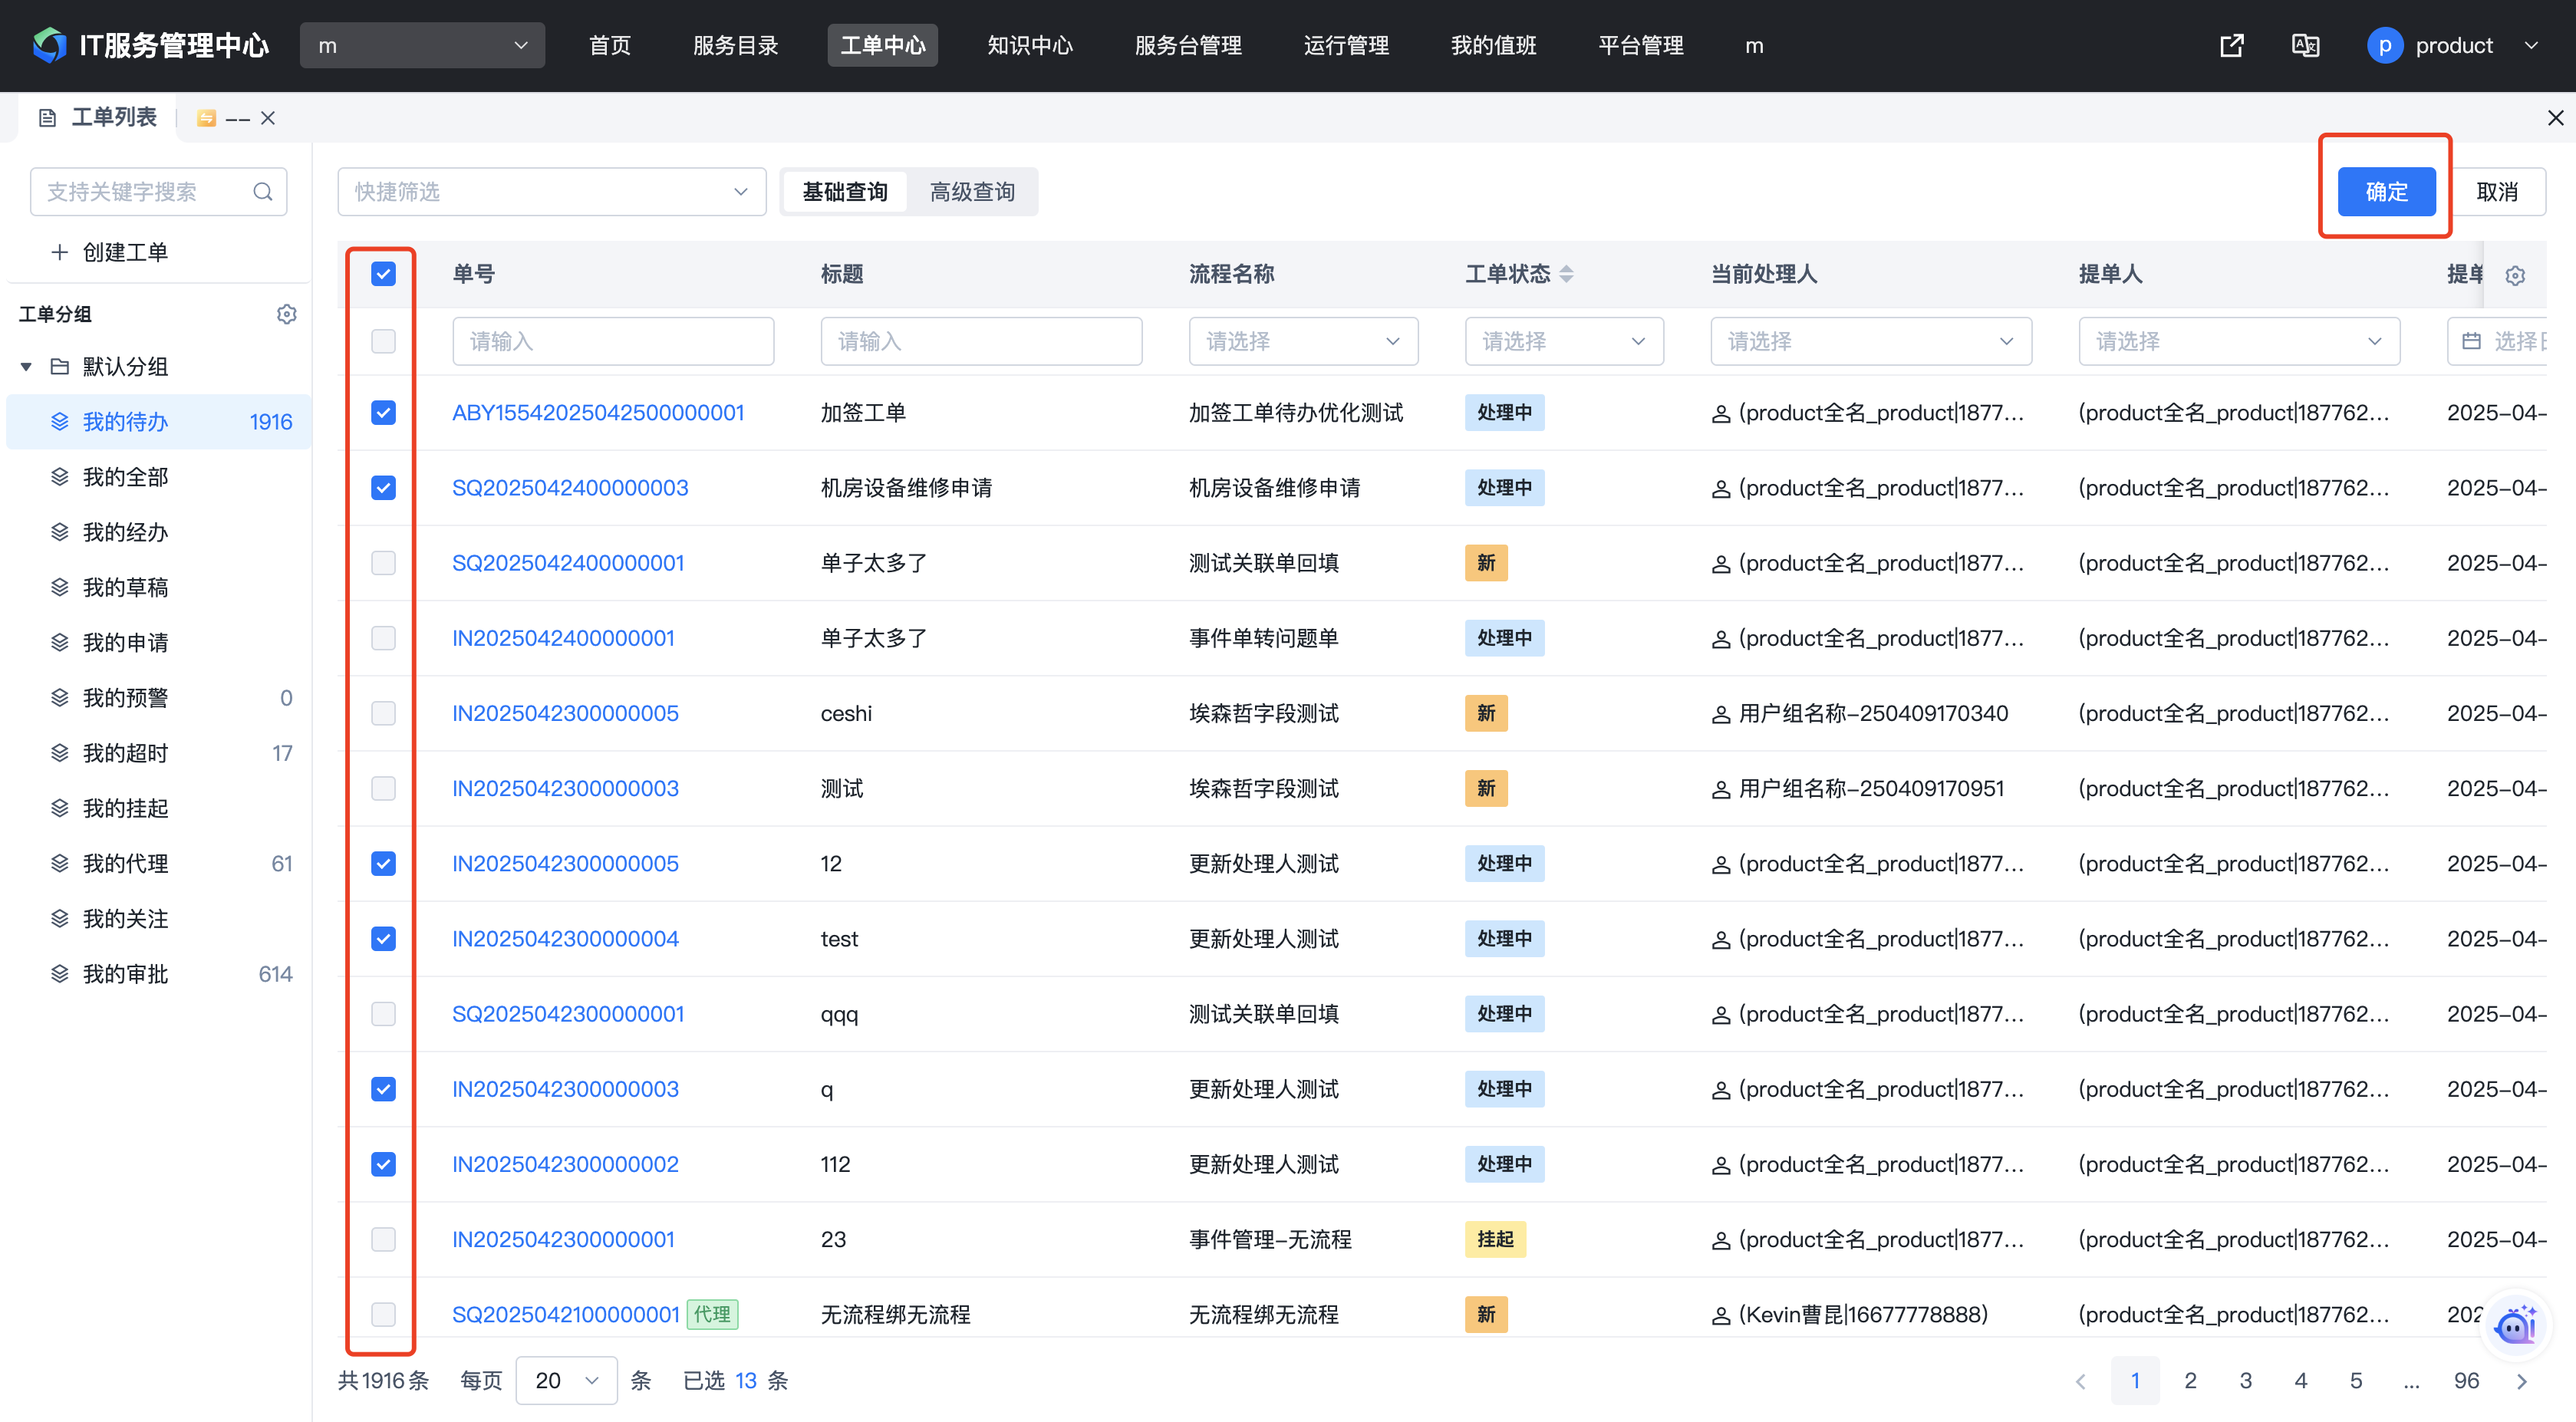
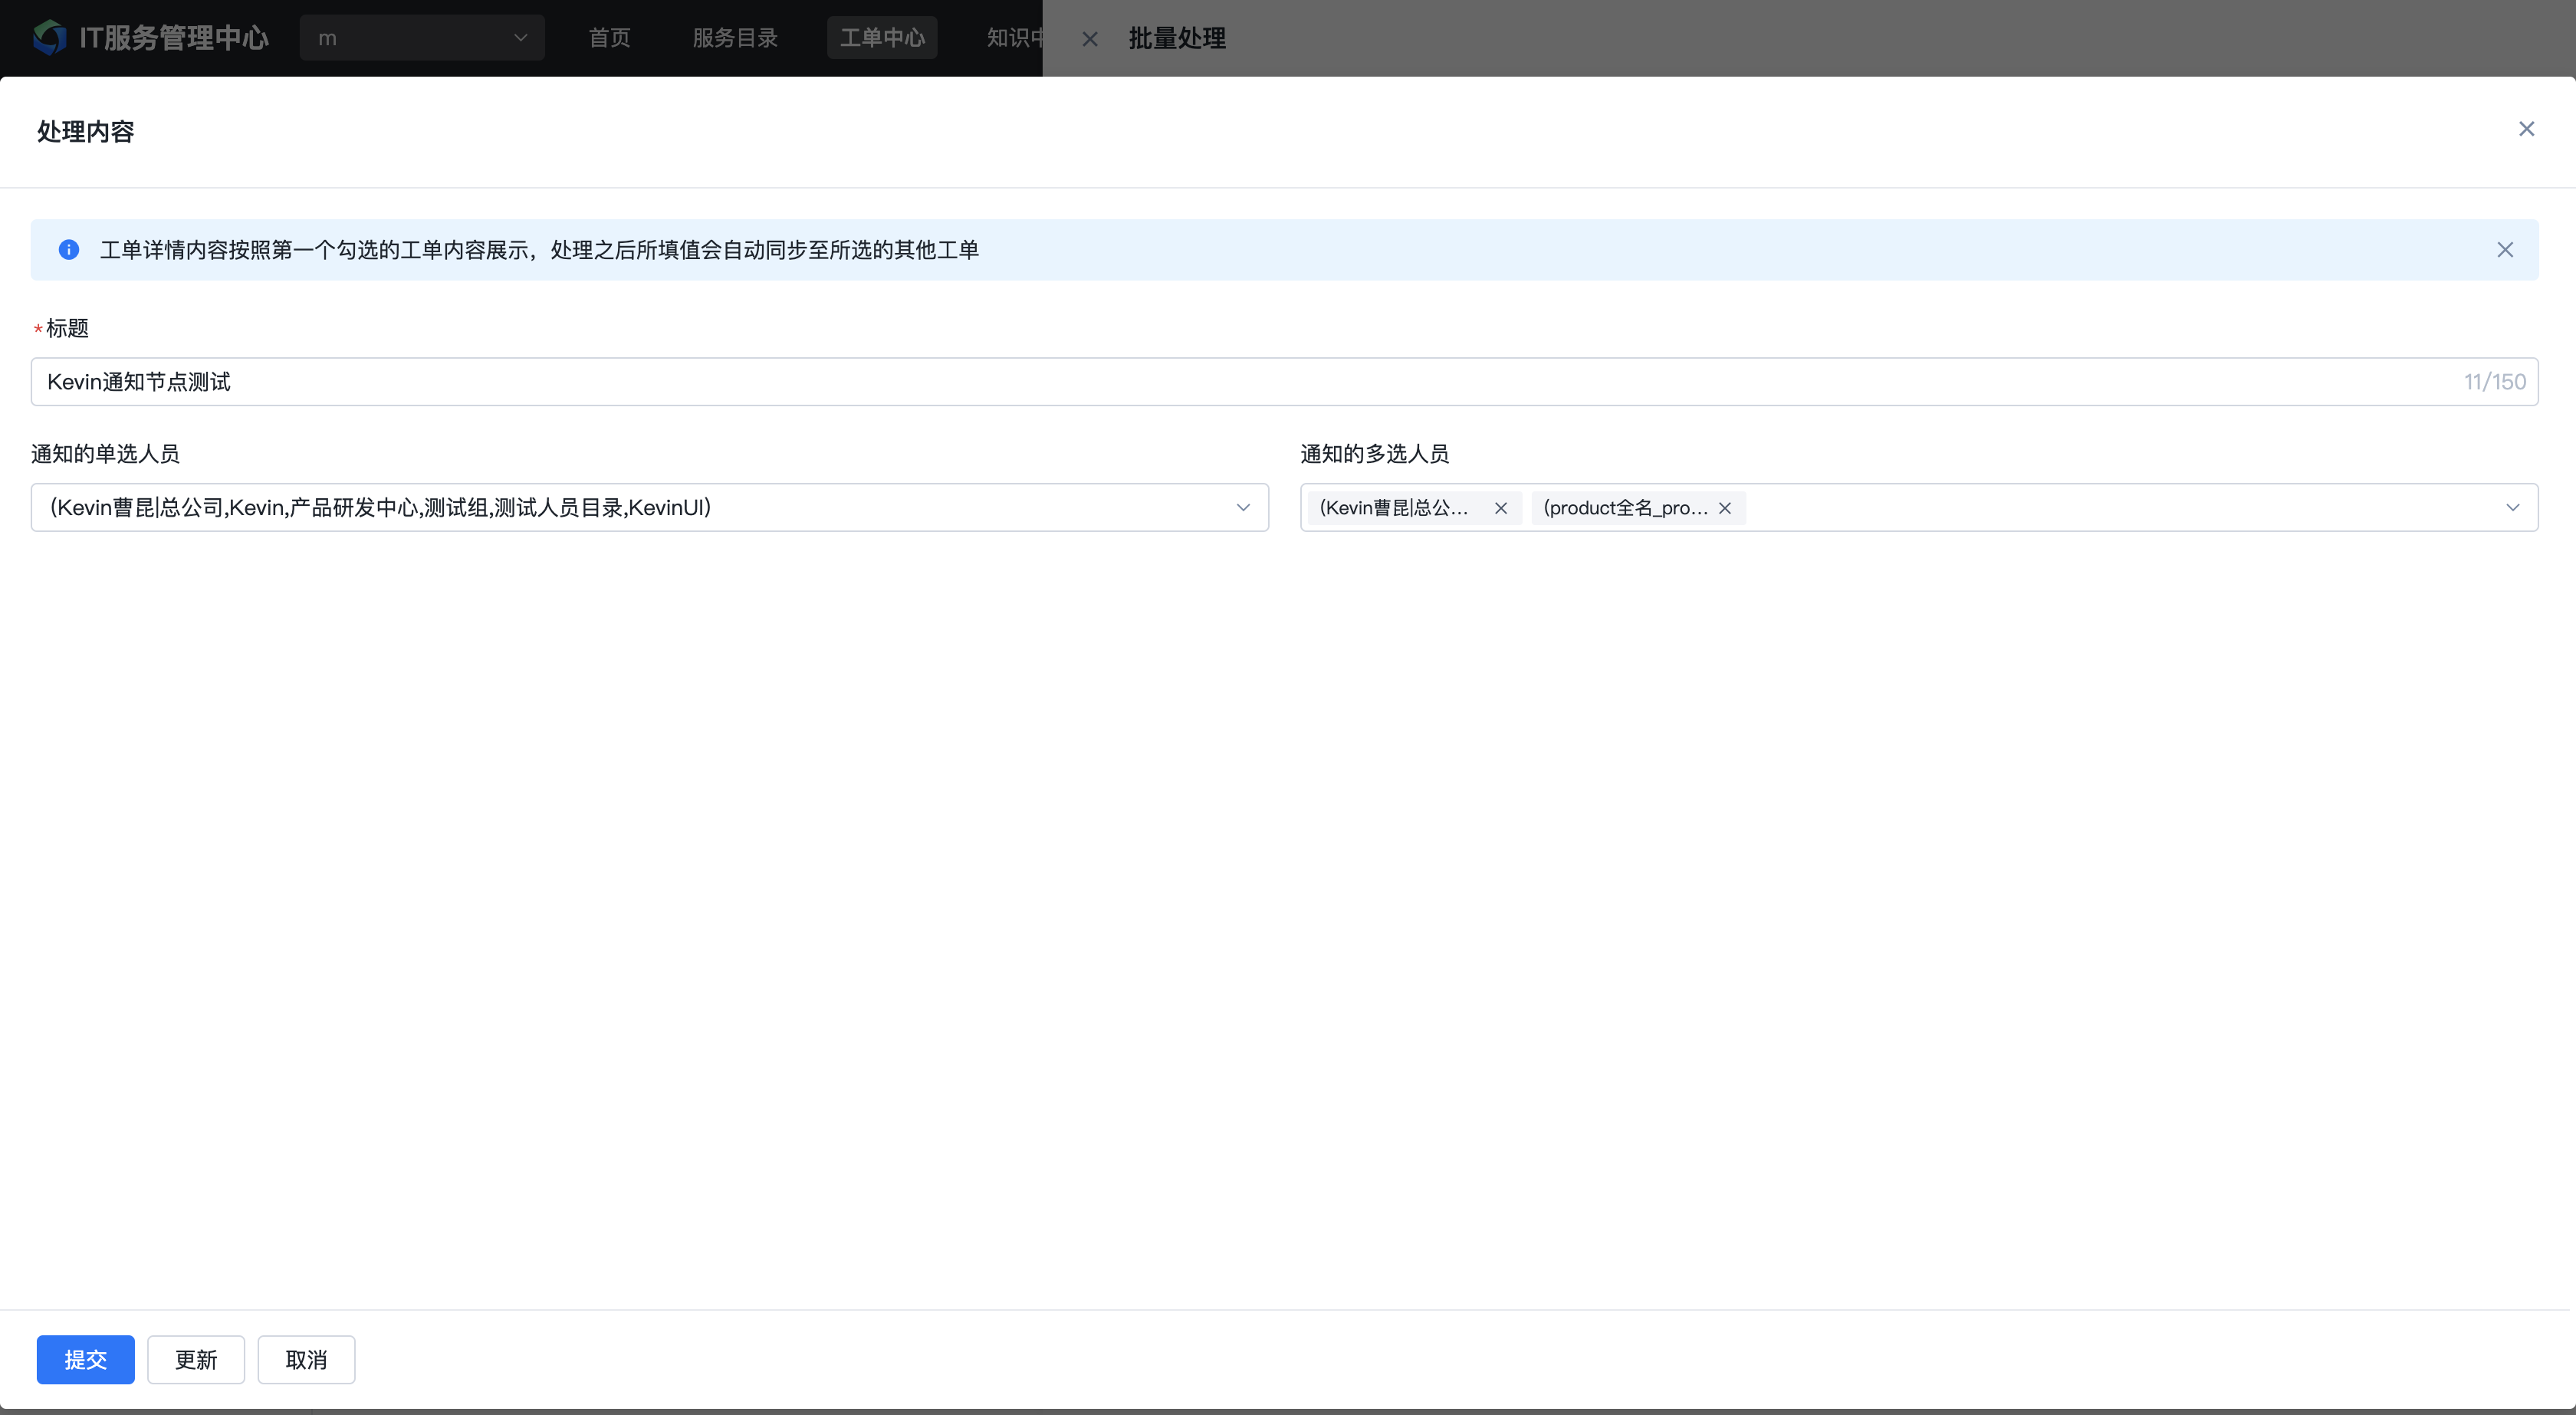
The system groups tickets by workflow version and current node (only tickets at the same node of the same workflow version can be batch processed). Select the corresponding batch and click Batch Process.
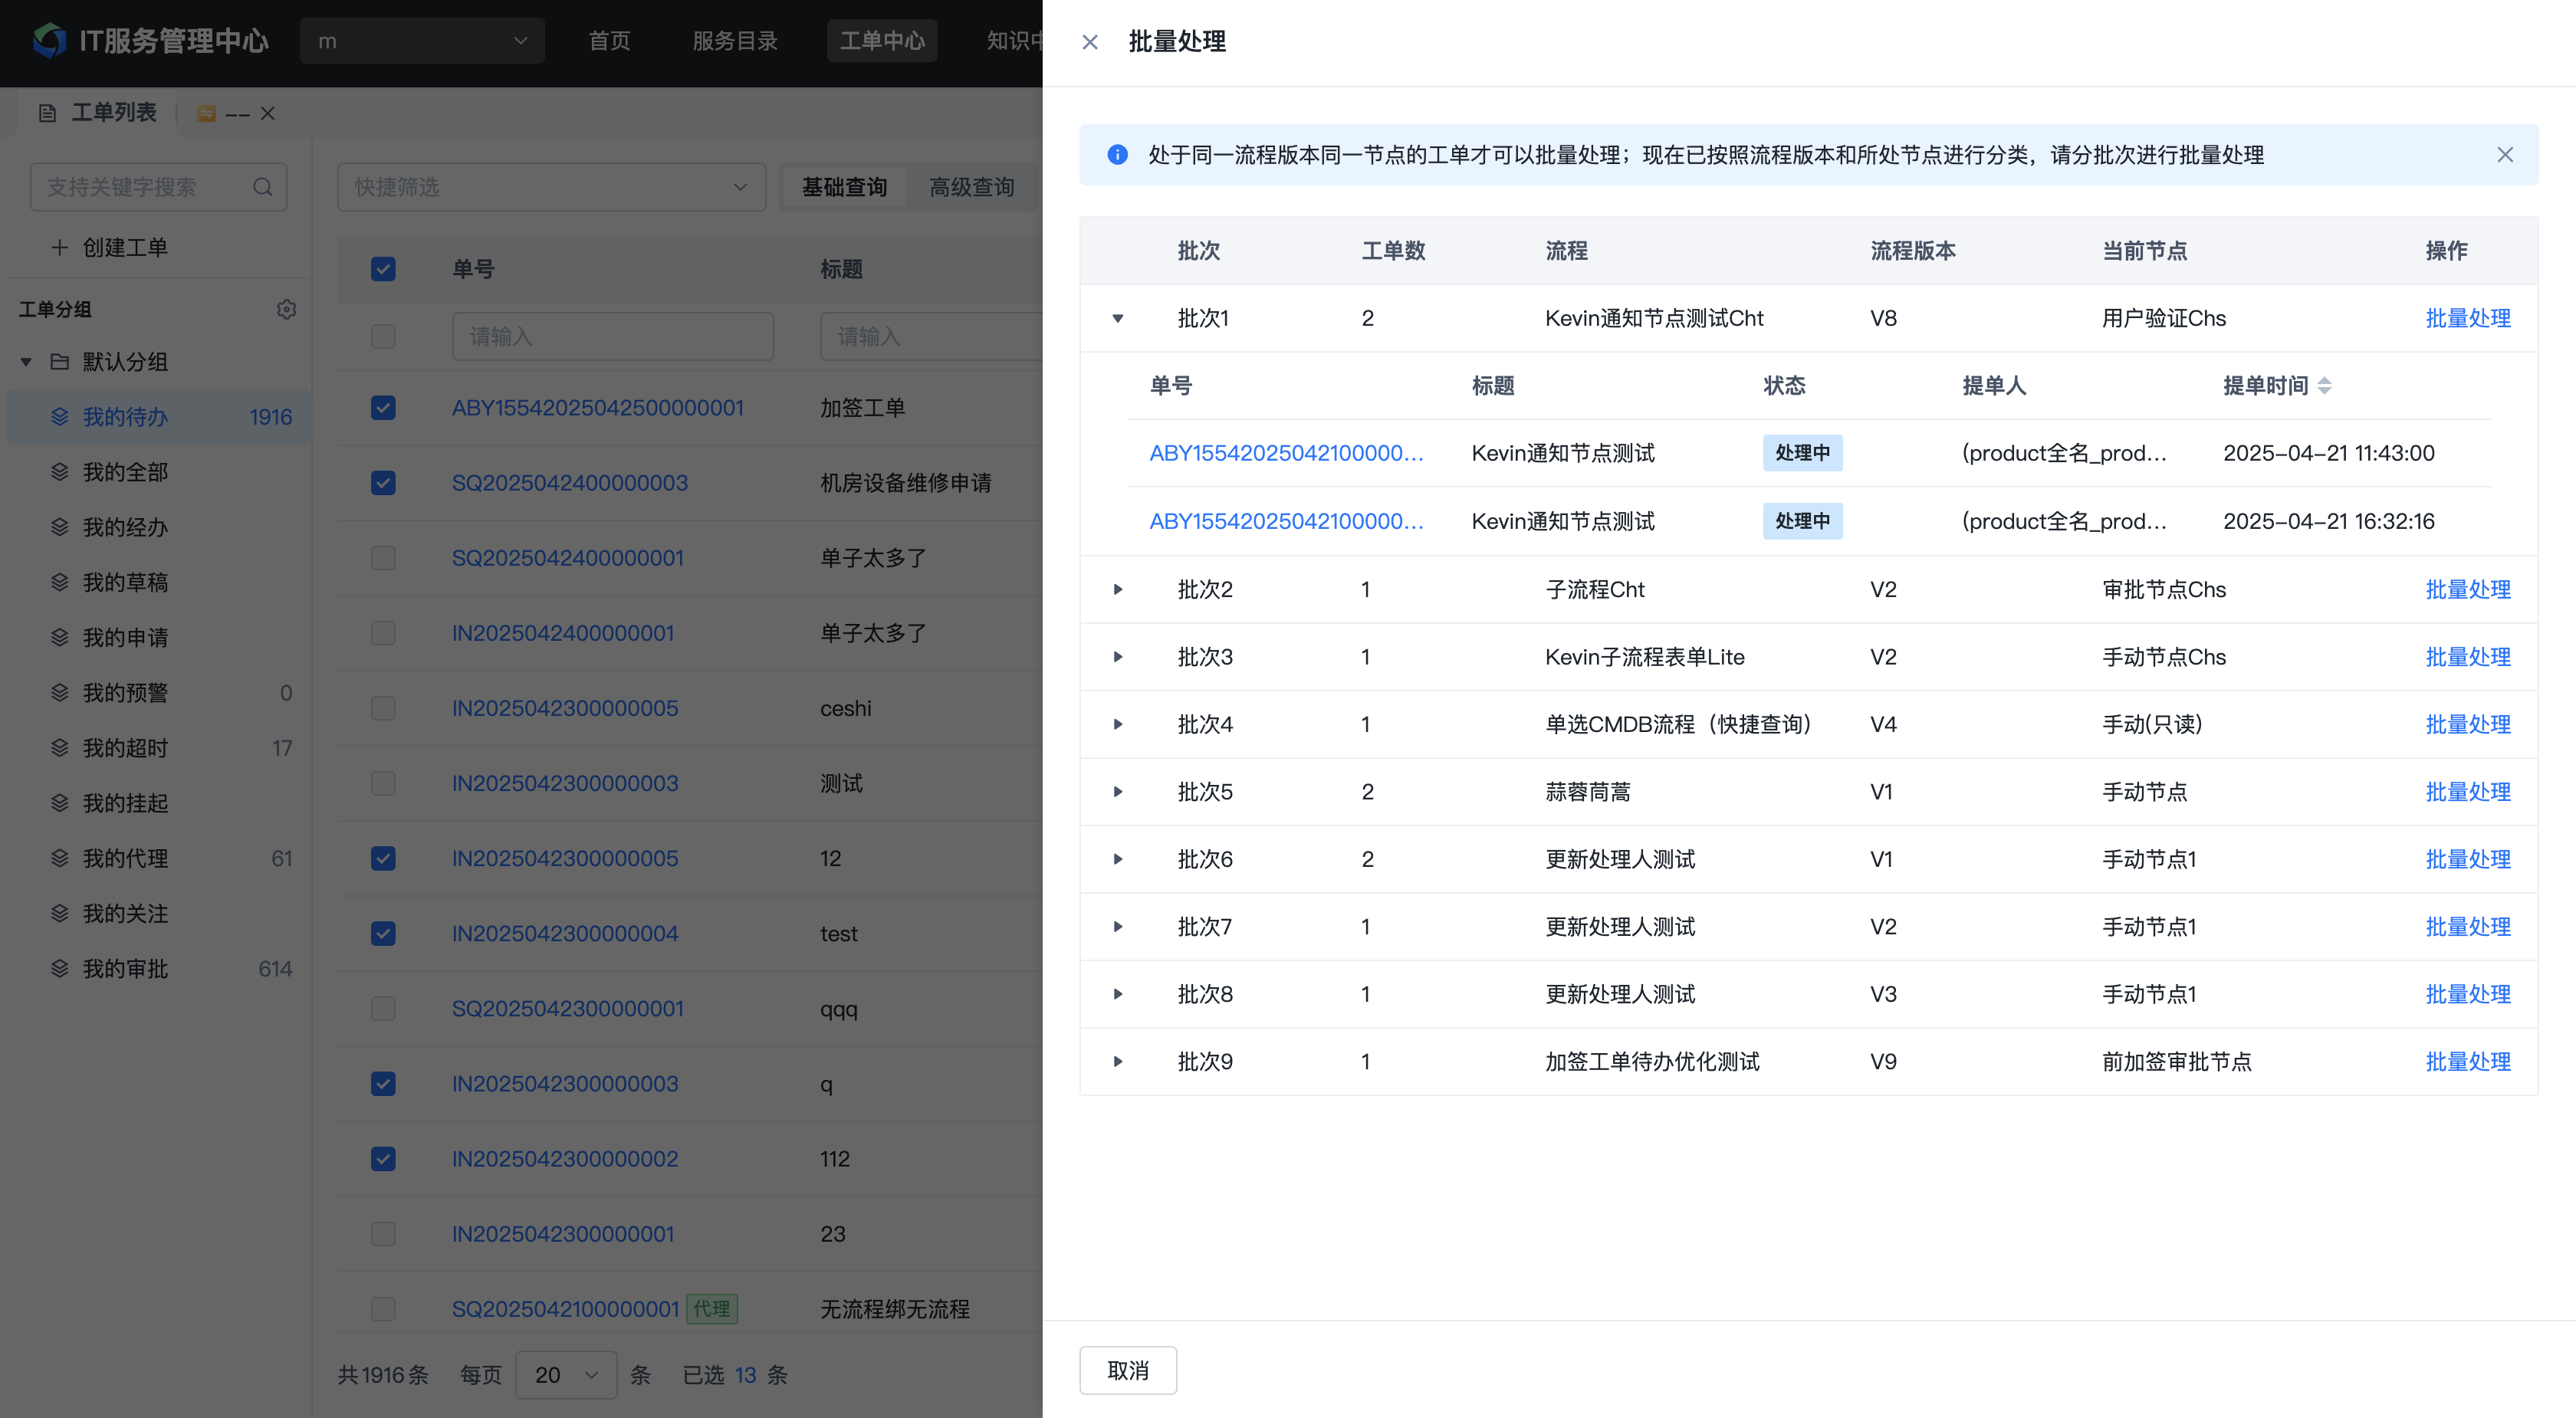
The ticket detail content is displayed based on the first selected ticket. After processing, the values entered will automatically sync to the other selected tickets.
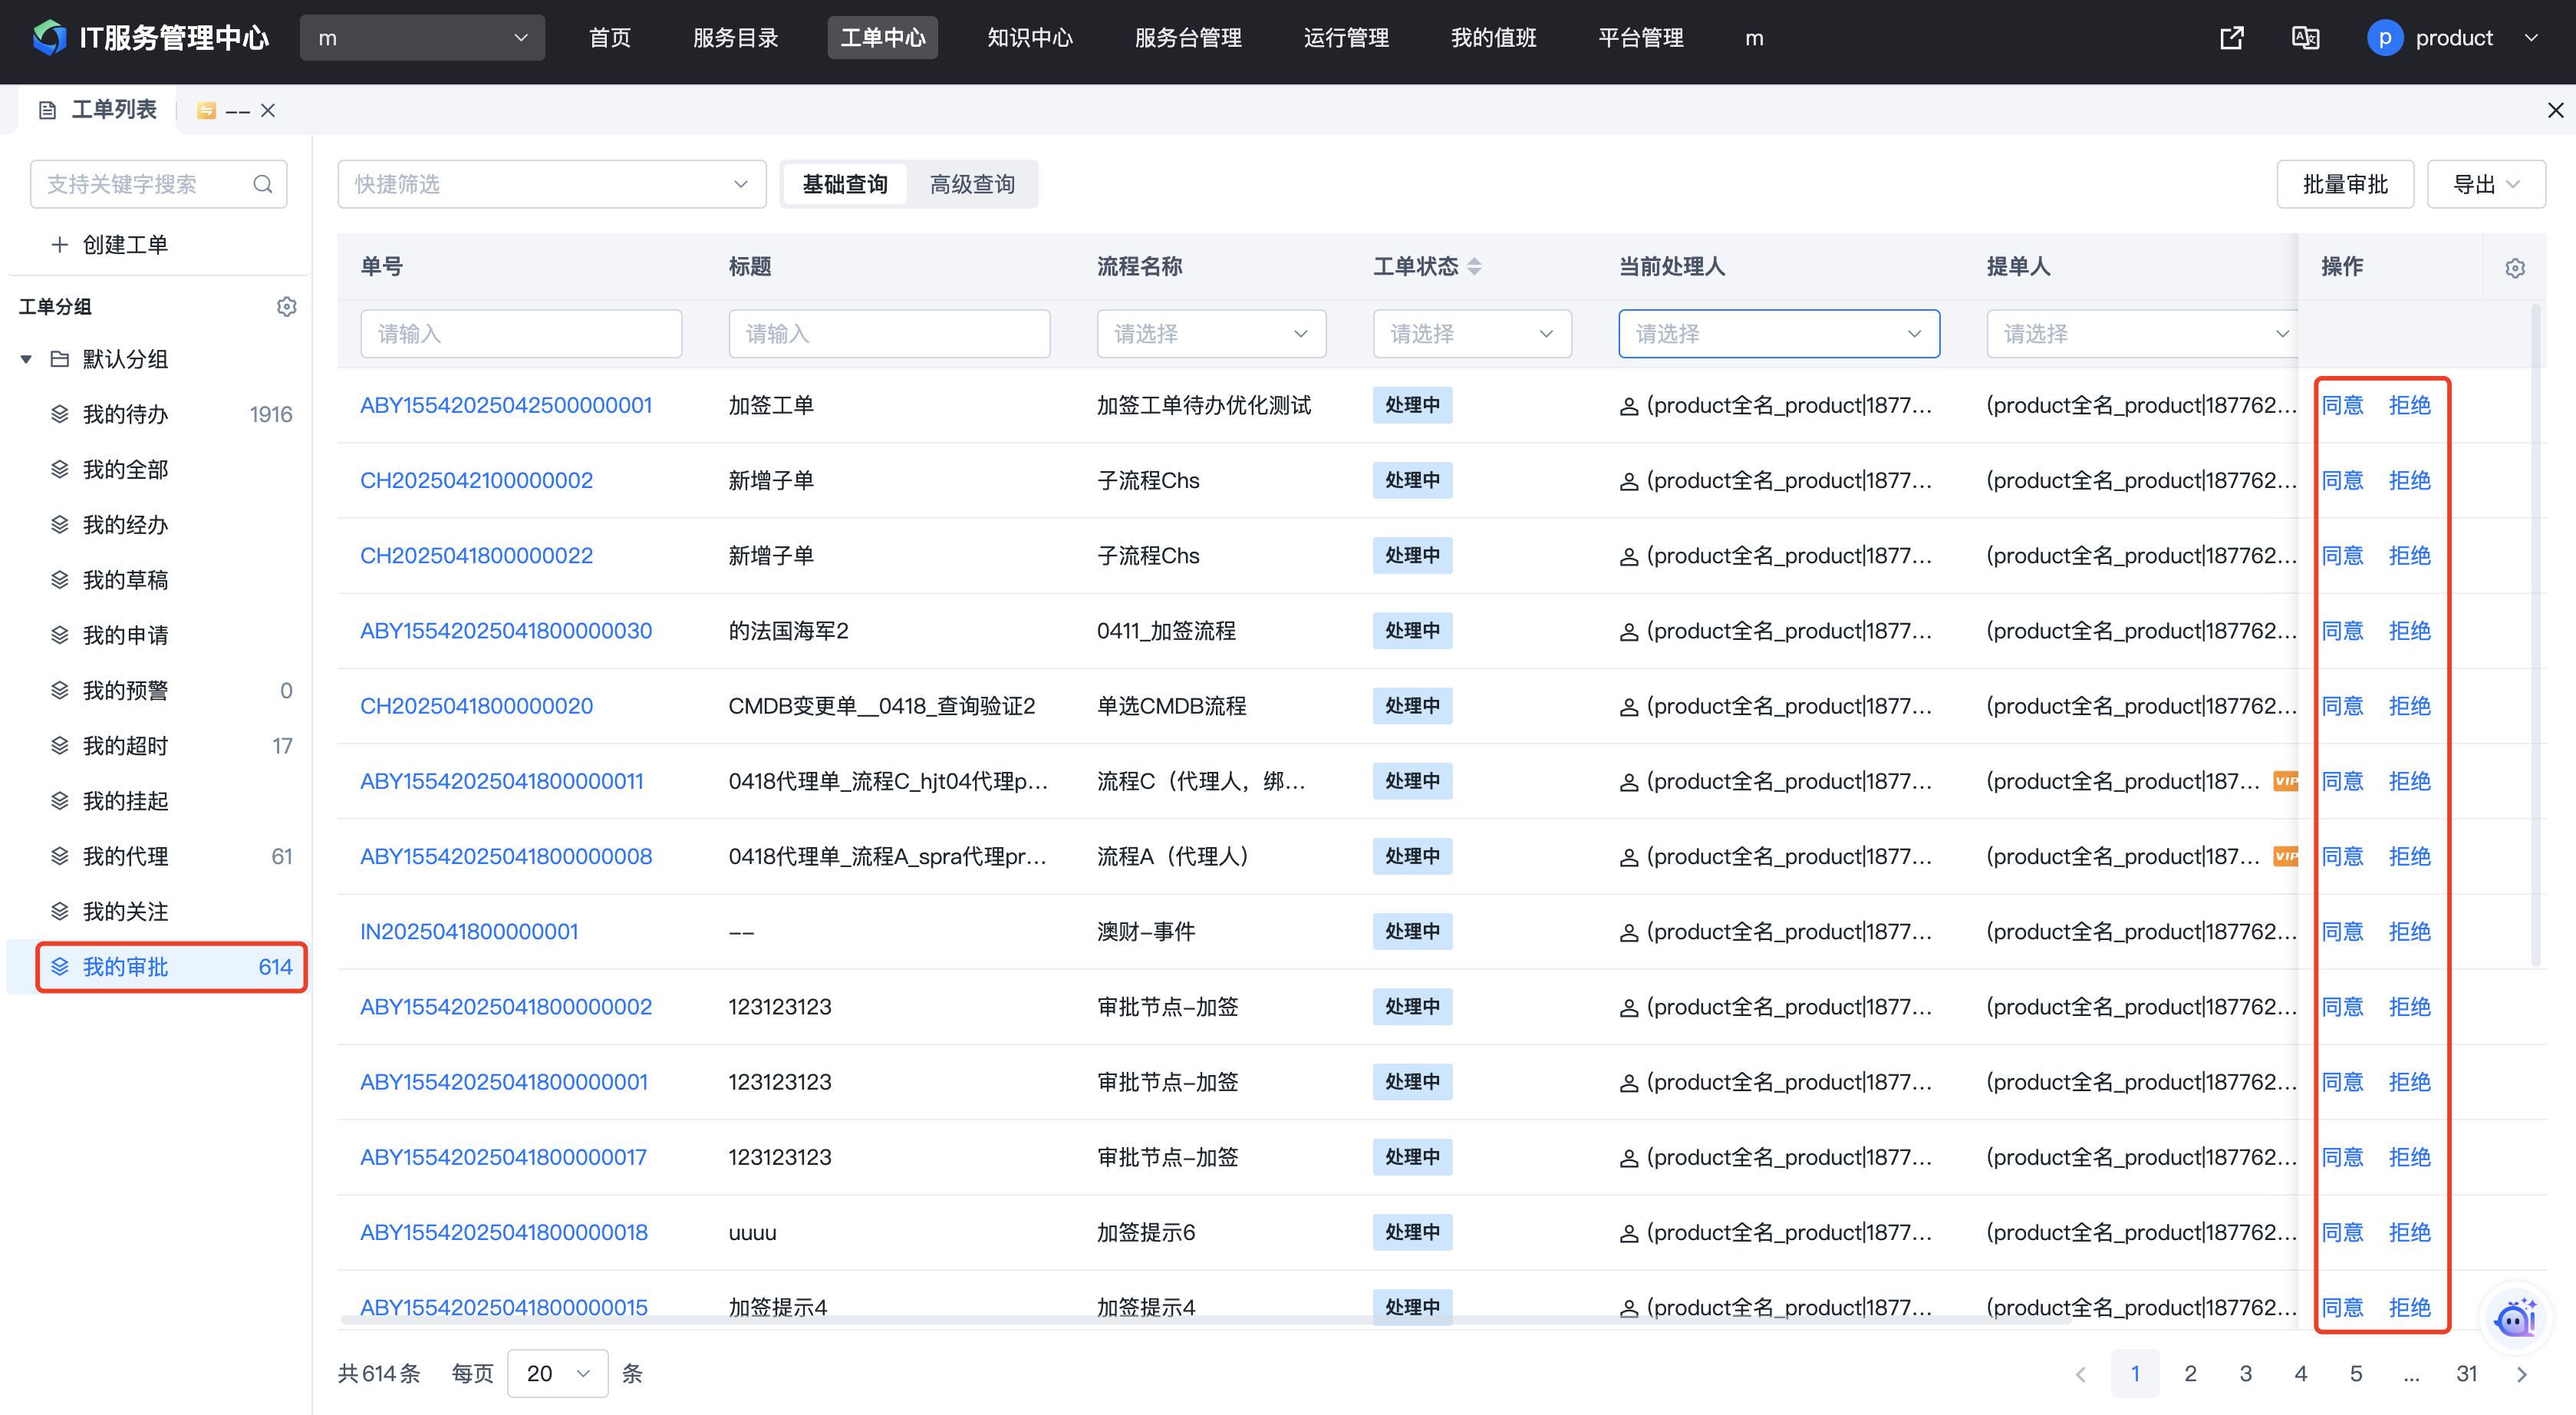
1.5.3. Quick Approval
The "My Approvals" ticket group contains all tickets at approval nodes pending the current user's action. You can directly click the "Approve" or "Reject" button in the list for quick approval.
Click the button, fill in the approval comments, and submit.
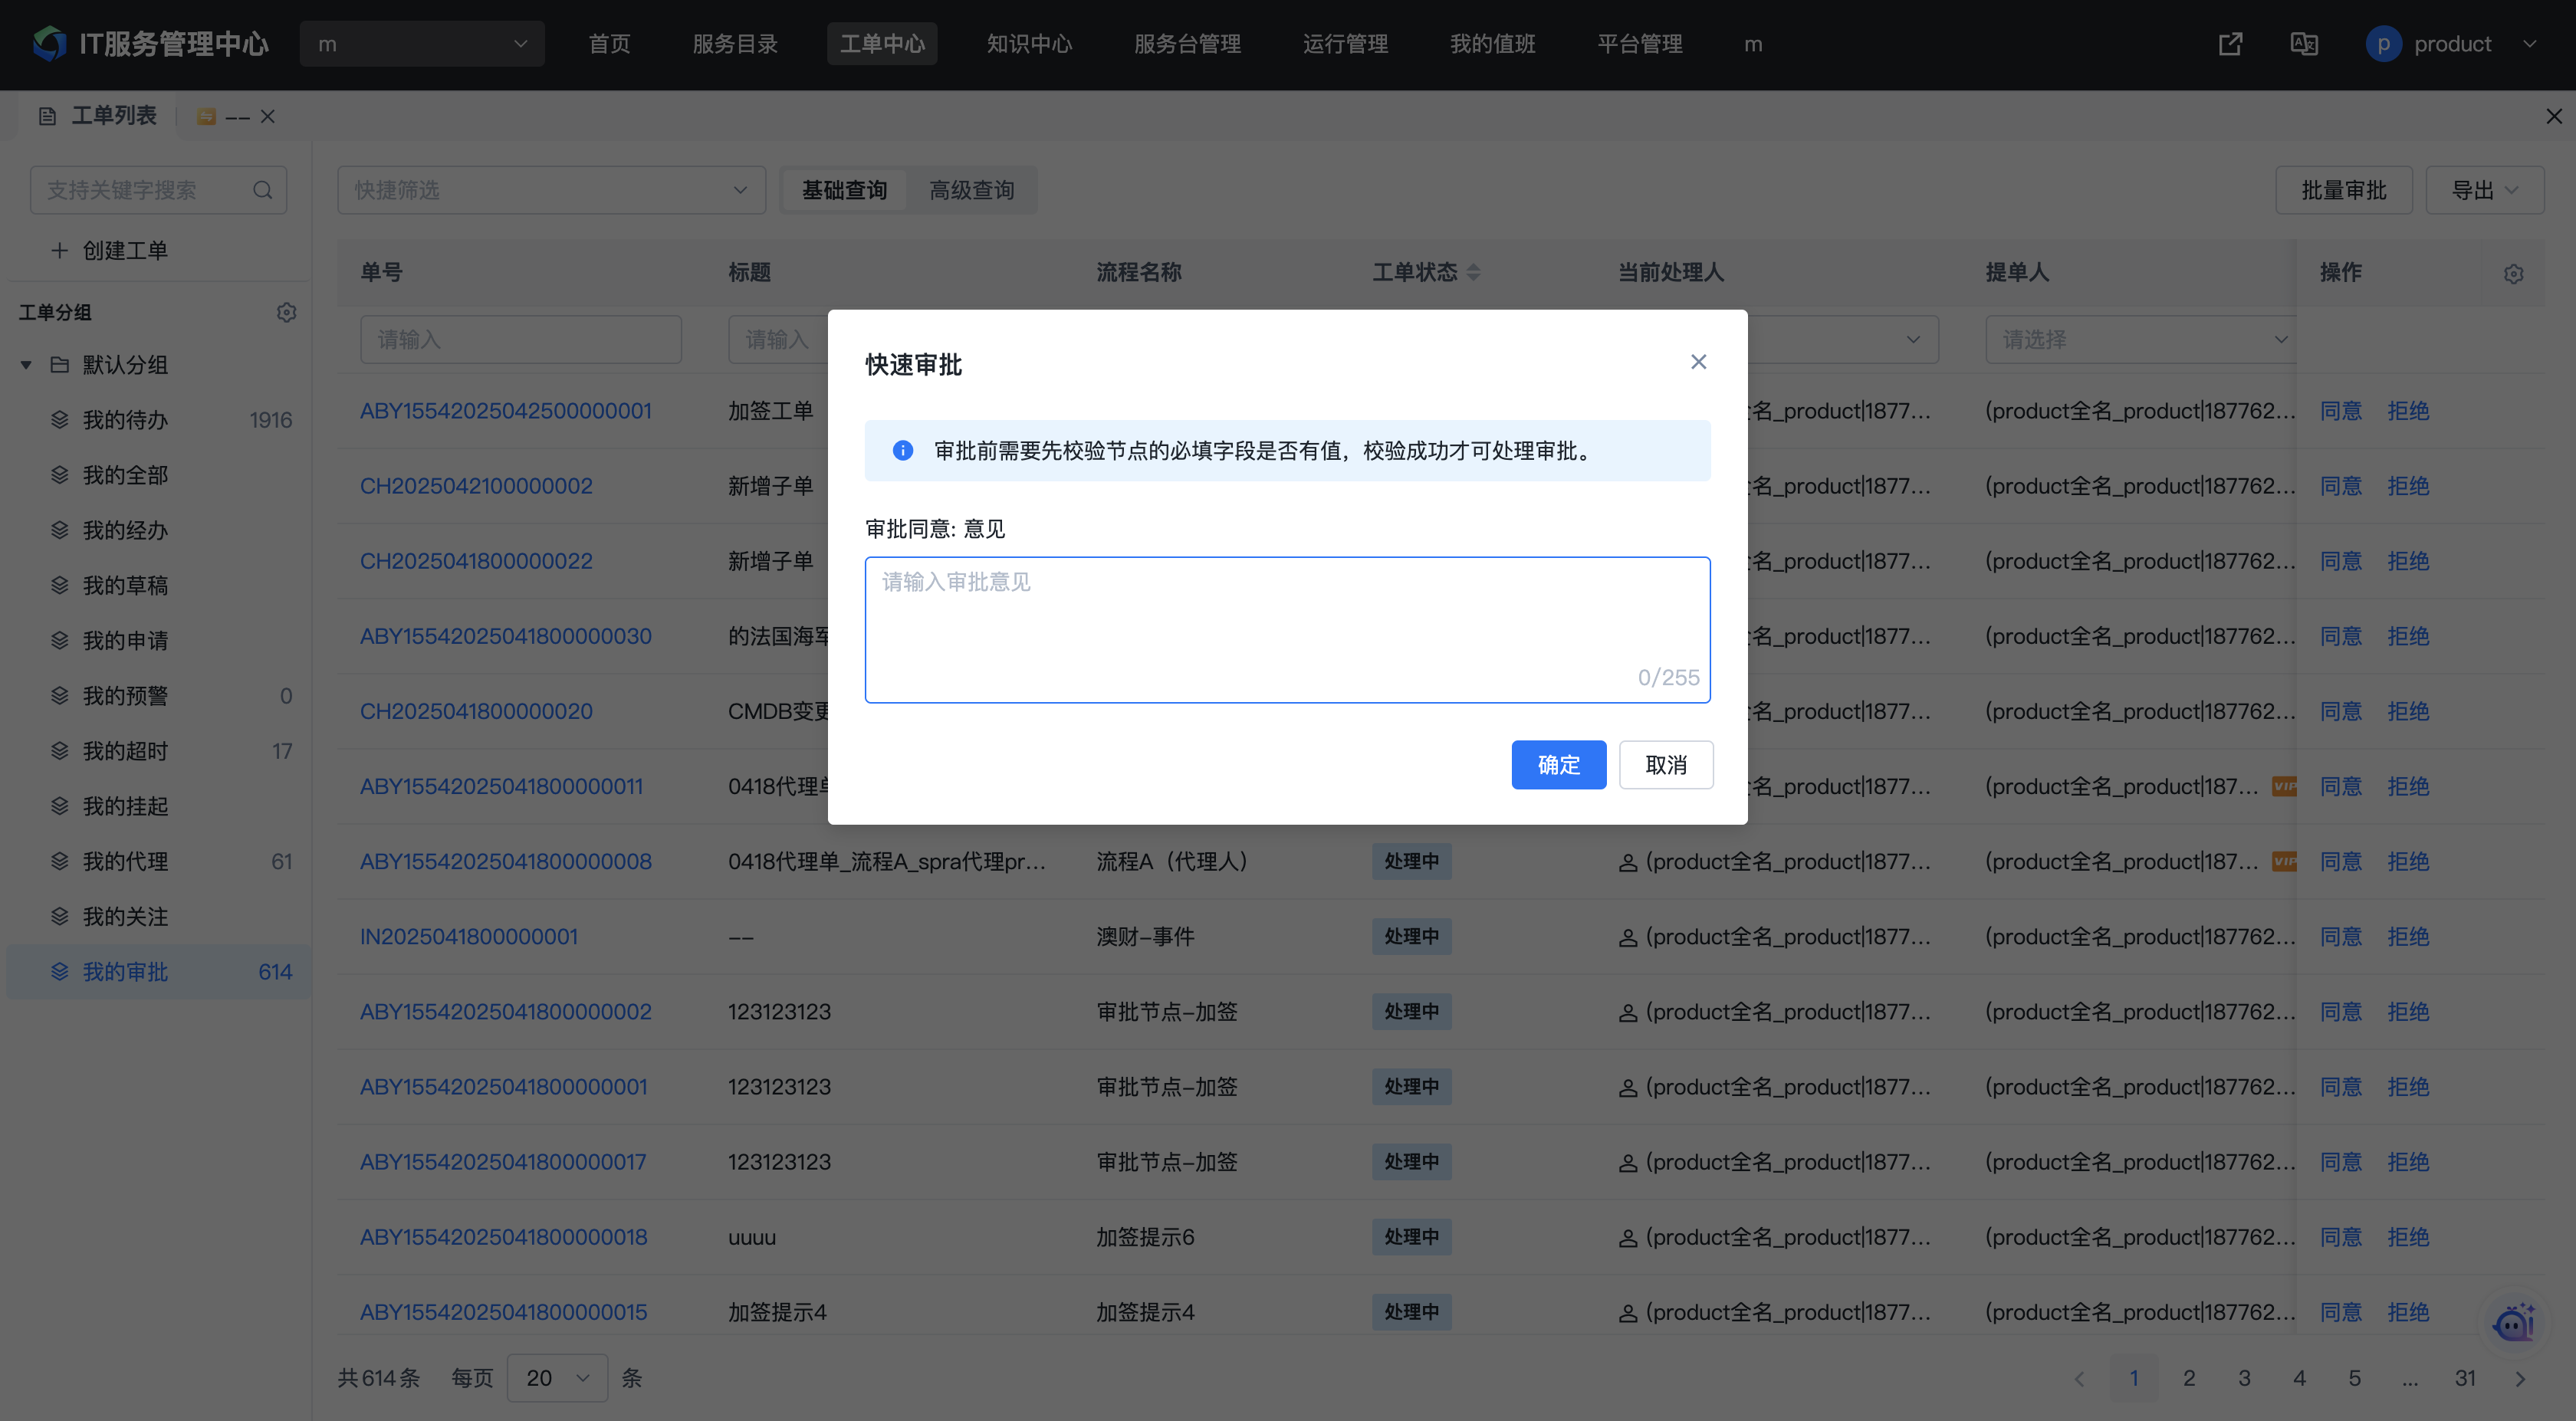
Batch approval is also supported, following the same steps as the batch processing feature above.
1.6. Other Ticket Operations
1.6.1. Querying Tickets
Ticket querying supports two methods: basic query and advanced query.
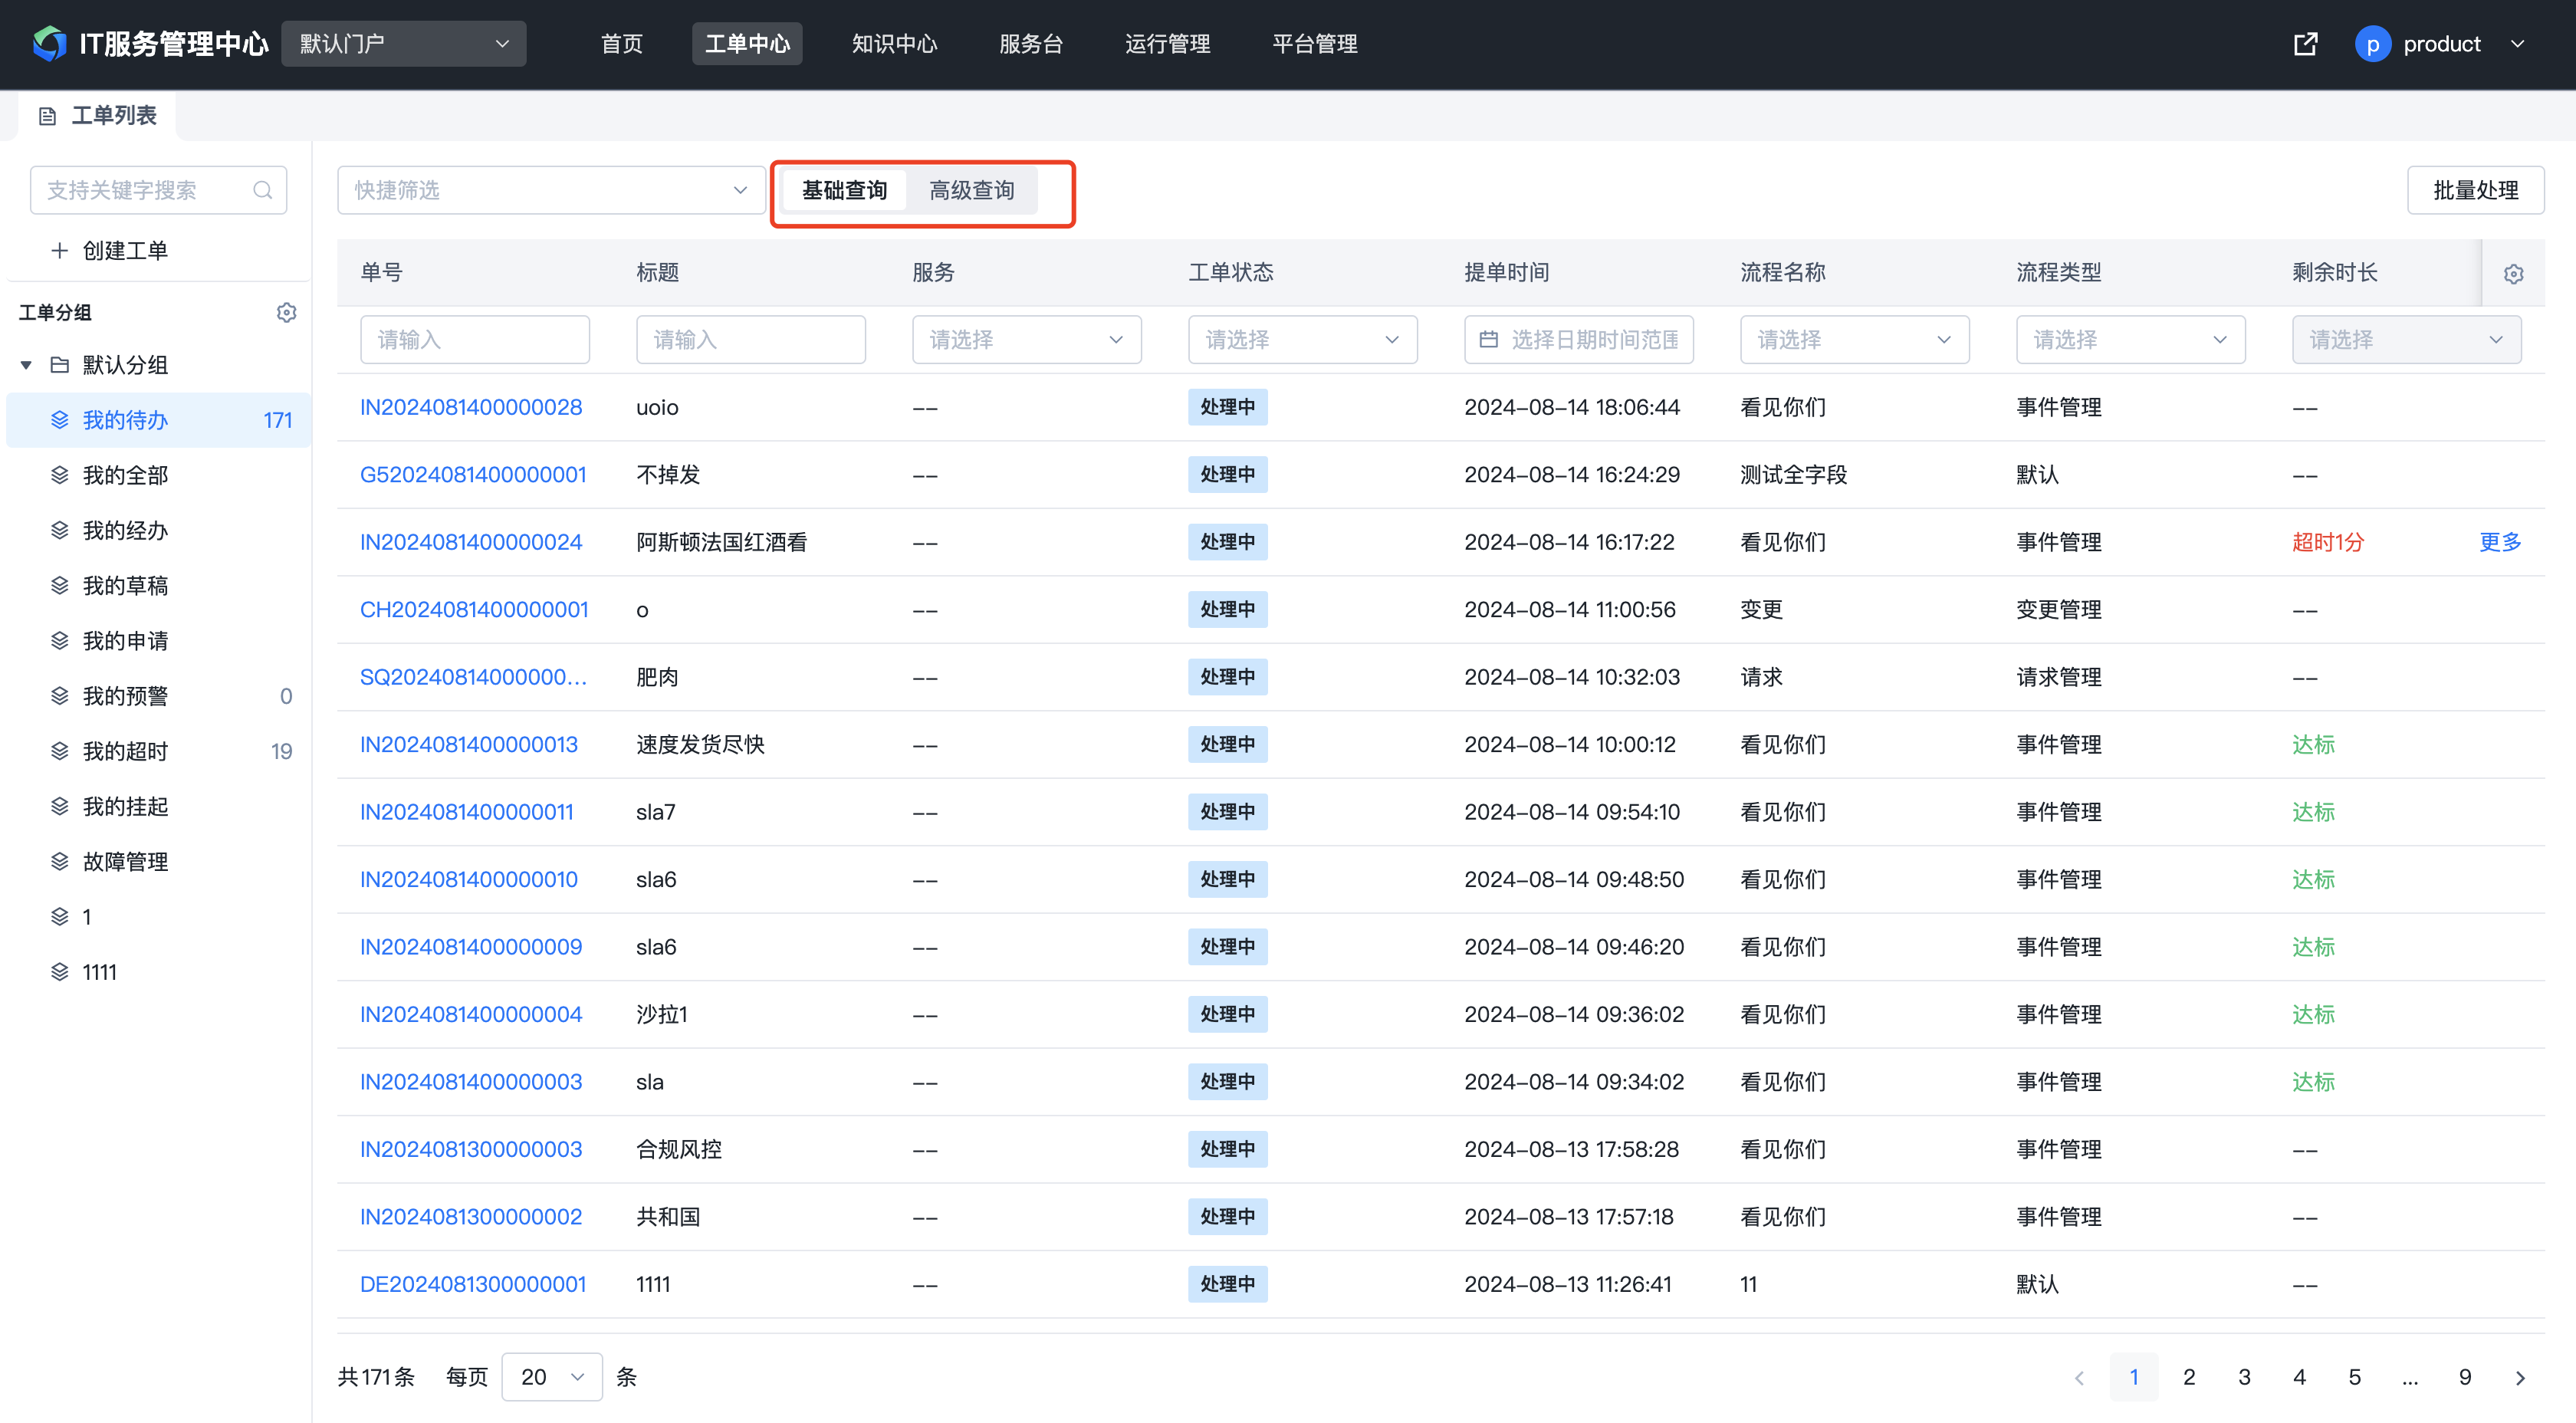
1.6.1.1. Basic Query
In the ticket list, click "Basic Query" to perform a basic query on tickets. If the desired query field is not in the list, you can configure the list fields to display it.
1.6.1.2. Advanced Query
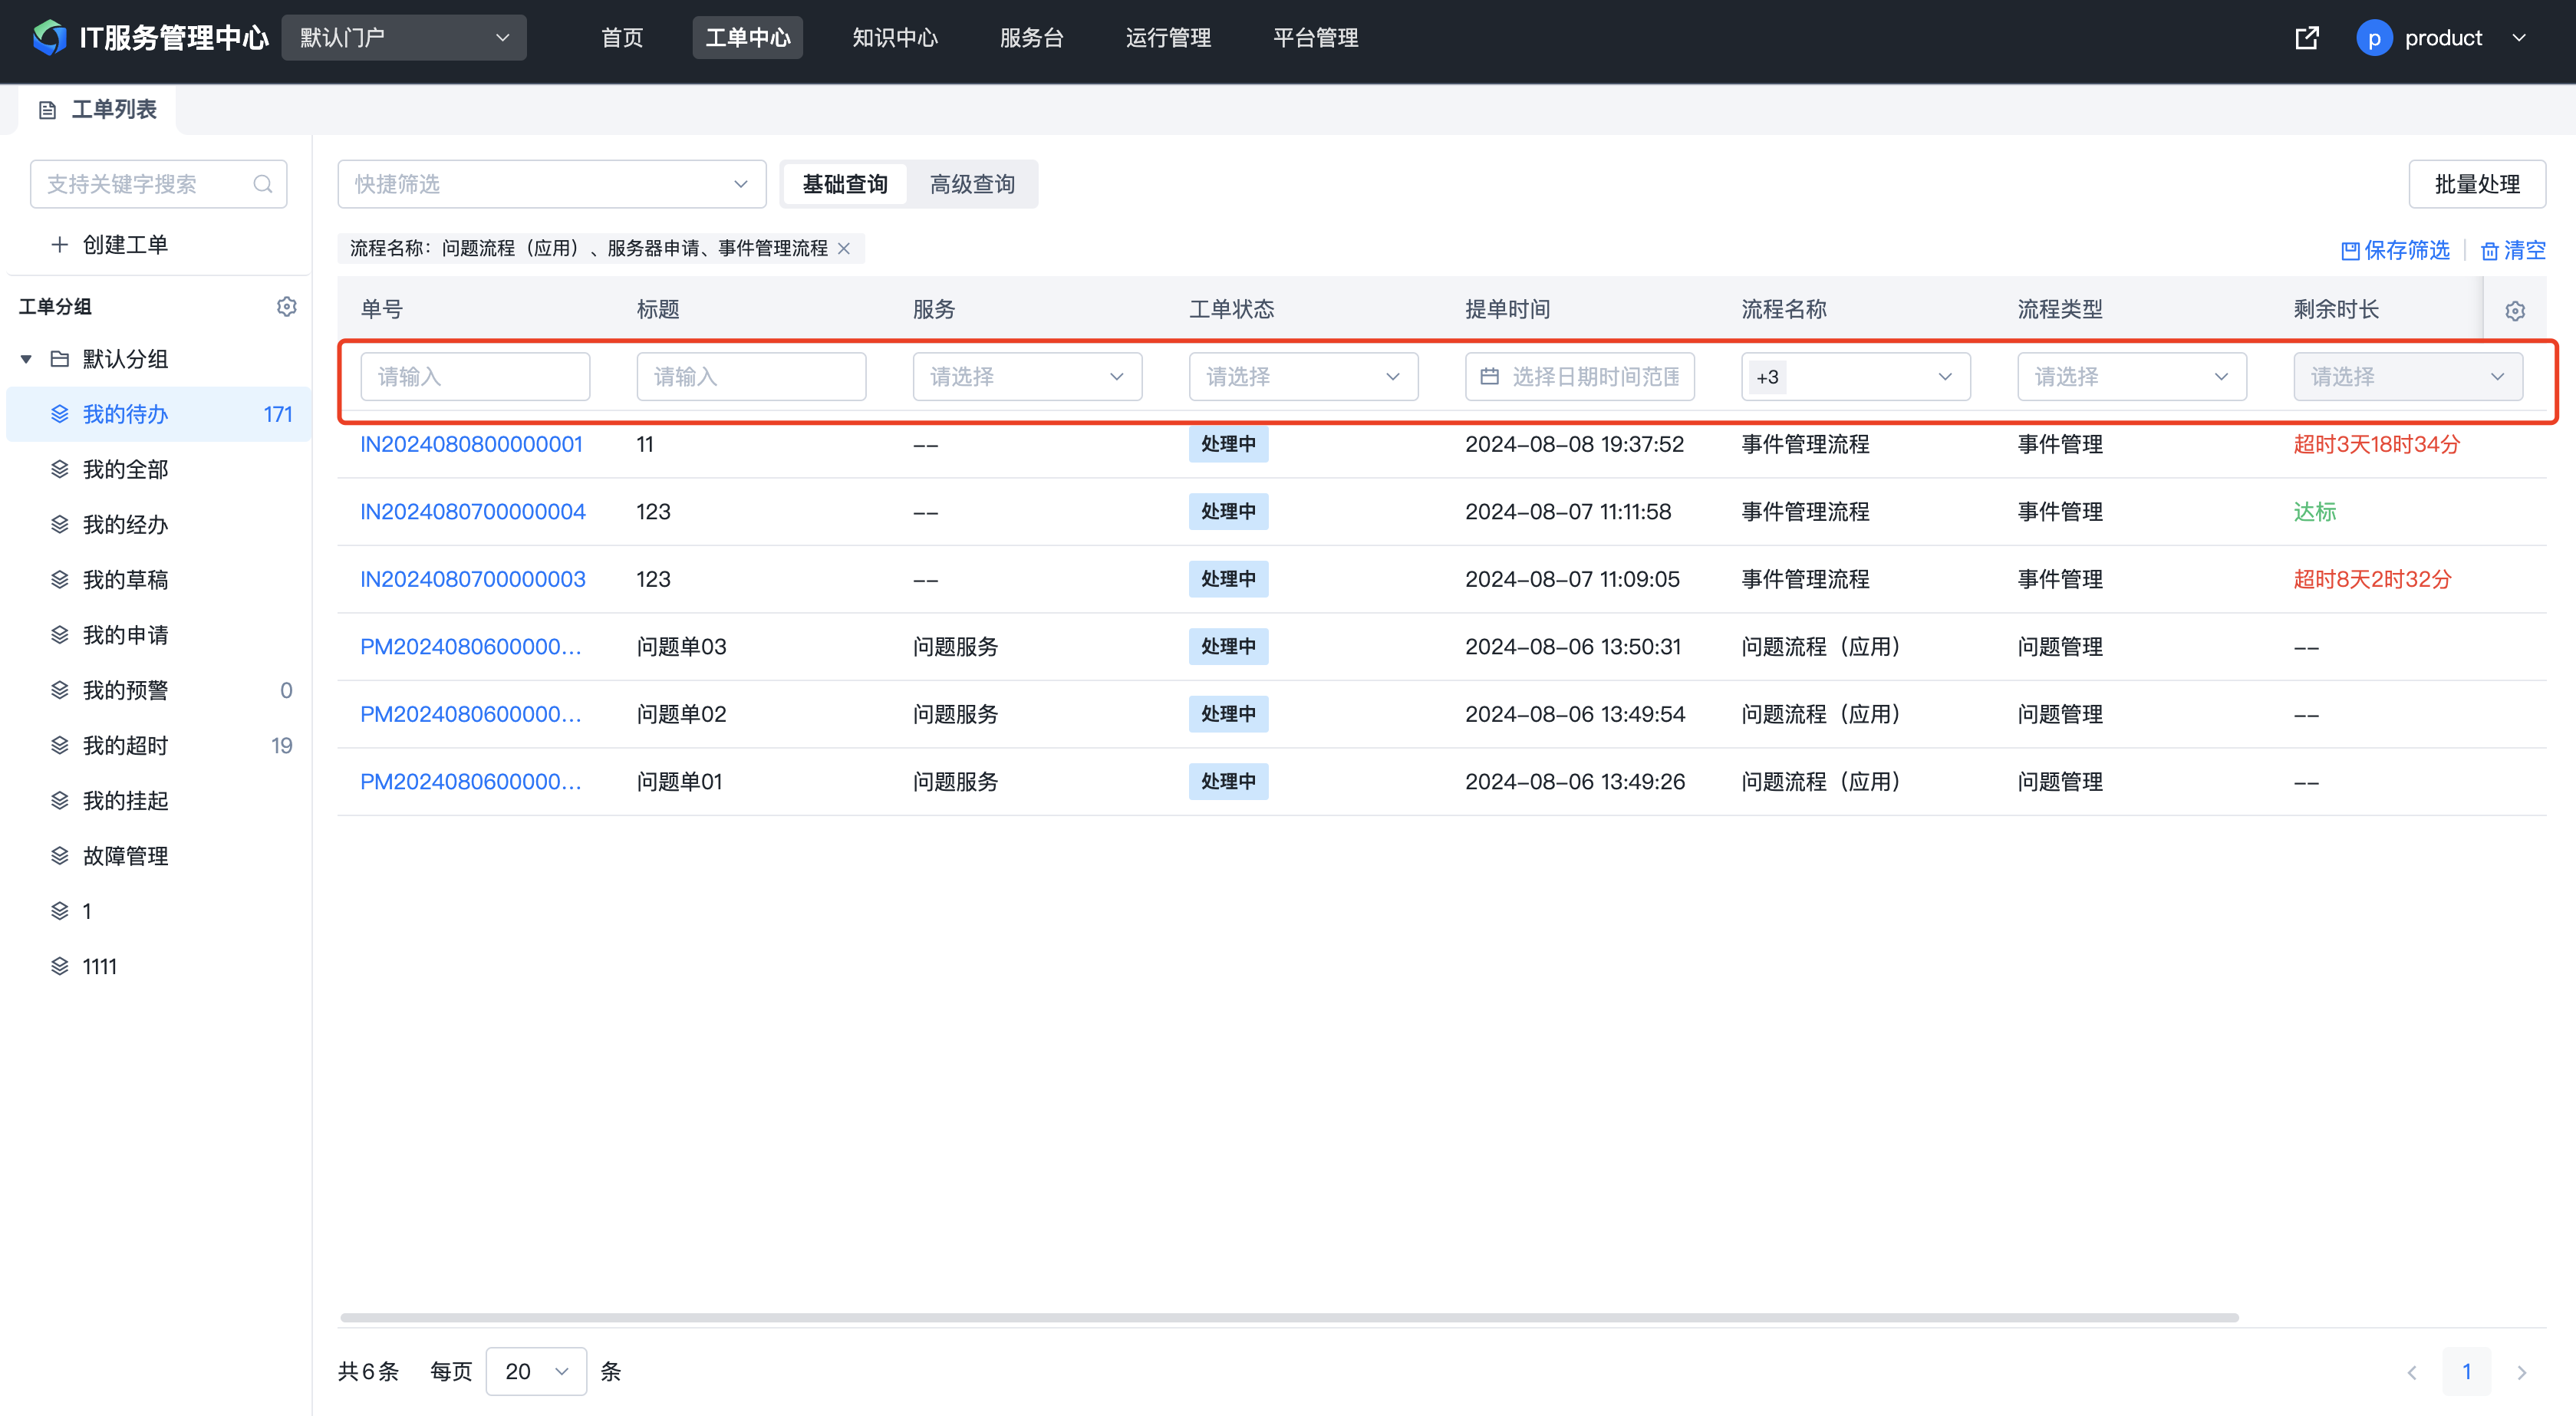
In the ticket list, click "Advanced Query" to perform an advanced query on tickets, supporting combined condition queries.
- When the filter scope is unrestricted: Only system fields can be selected as query conditions.
- When the filter scope is a single workflow or a single form model: You can select custom fields defined in the workflow or model for querying.
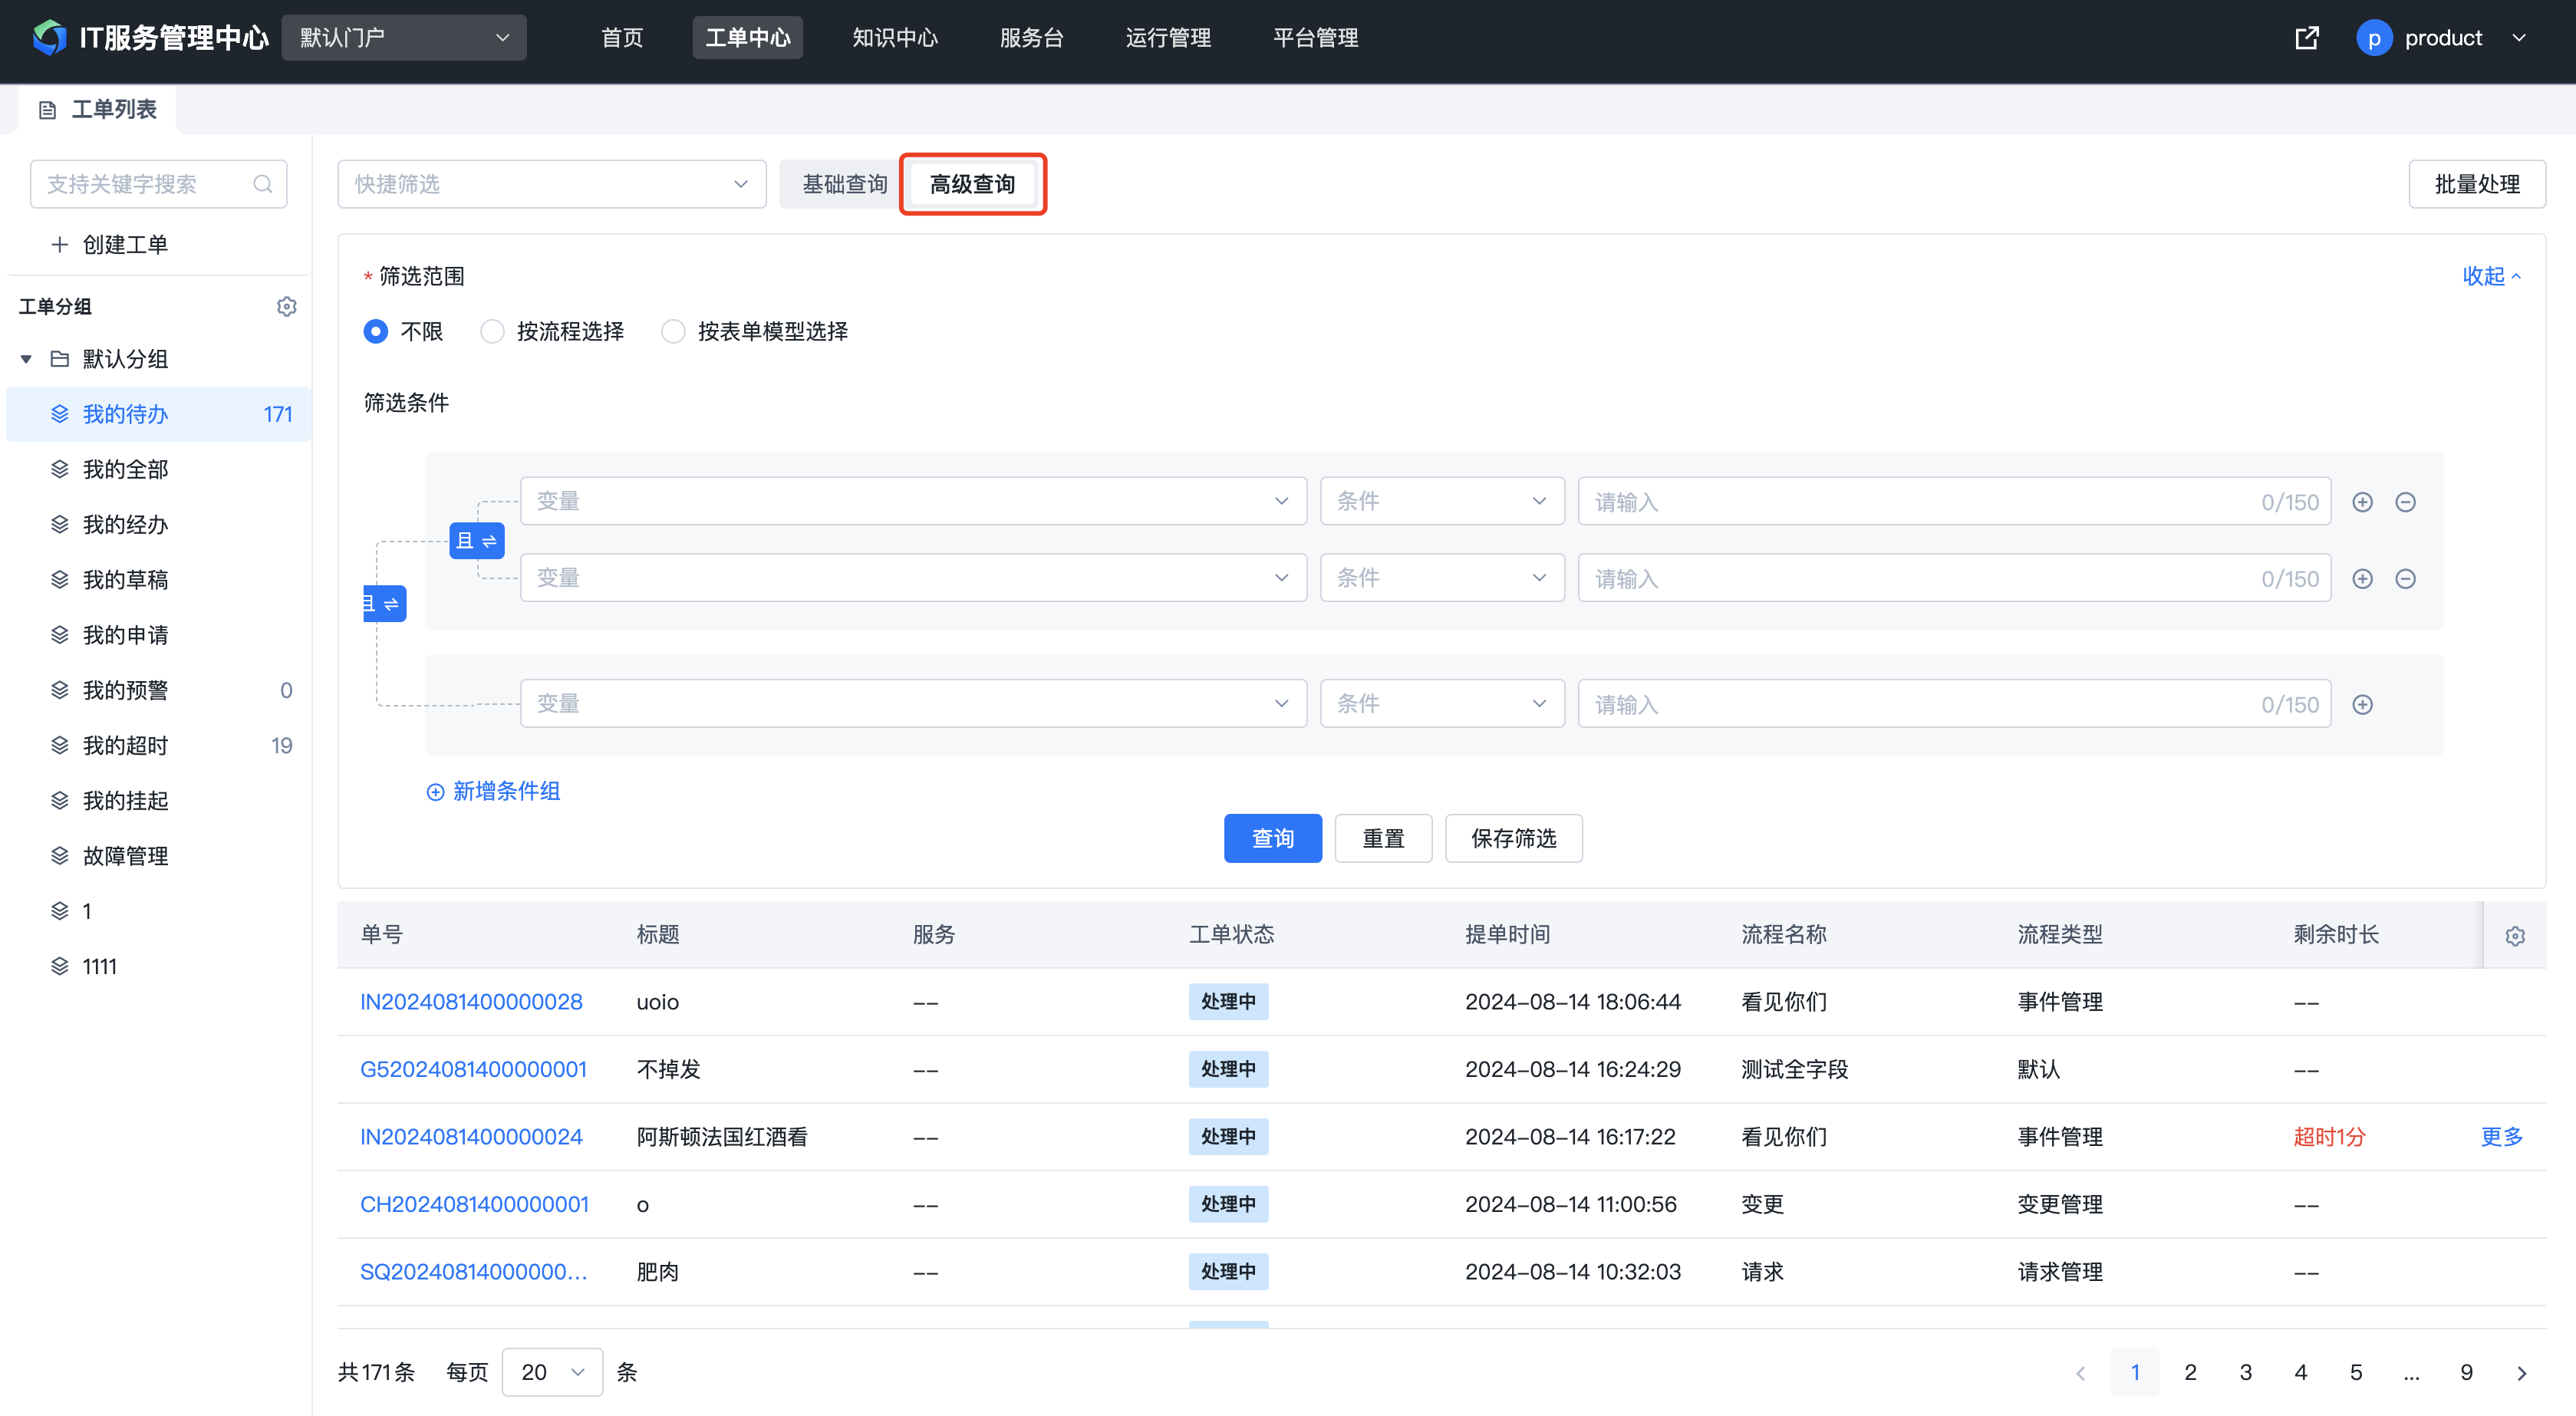
1.6.1.3. Saving Query Conditions
Frequently used query conditions can be saved for quick filtering next time, improving ticket query efficiency.

In the upper left corner of the ticket list, you can select saved filter conditions for quick querying.

1.6.2. Customizing List Display Fields
If the fields you need to view are not displayed in the ticket list, you can click the button on the right side of the list to customize the displayed fields. You can also drag the icon in front of selected fields to reorder them.

Built-in groups can only select basic fields. For custom groups scoped to a single workflow or a single form model, you can select custom fields defined in the workflow or model.
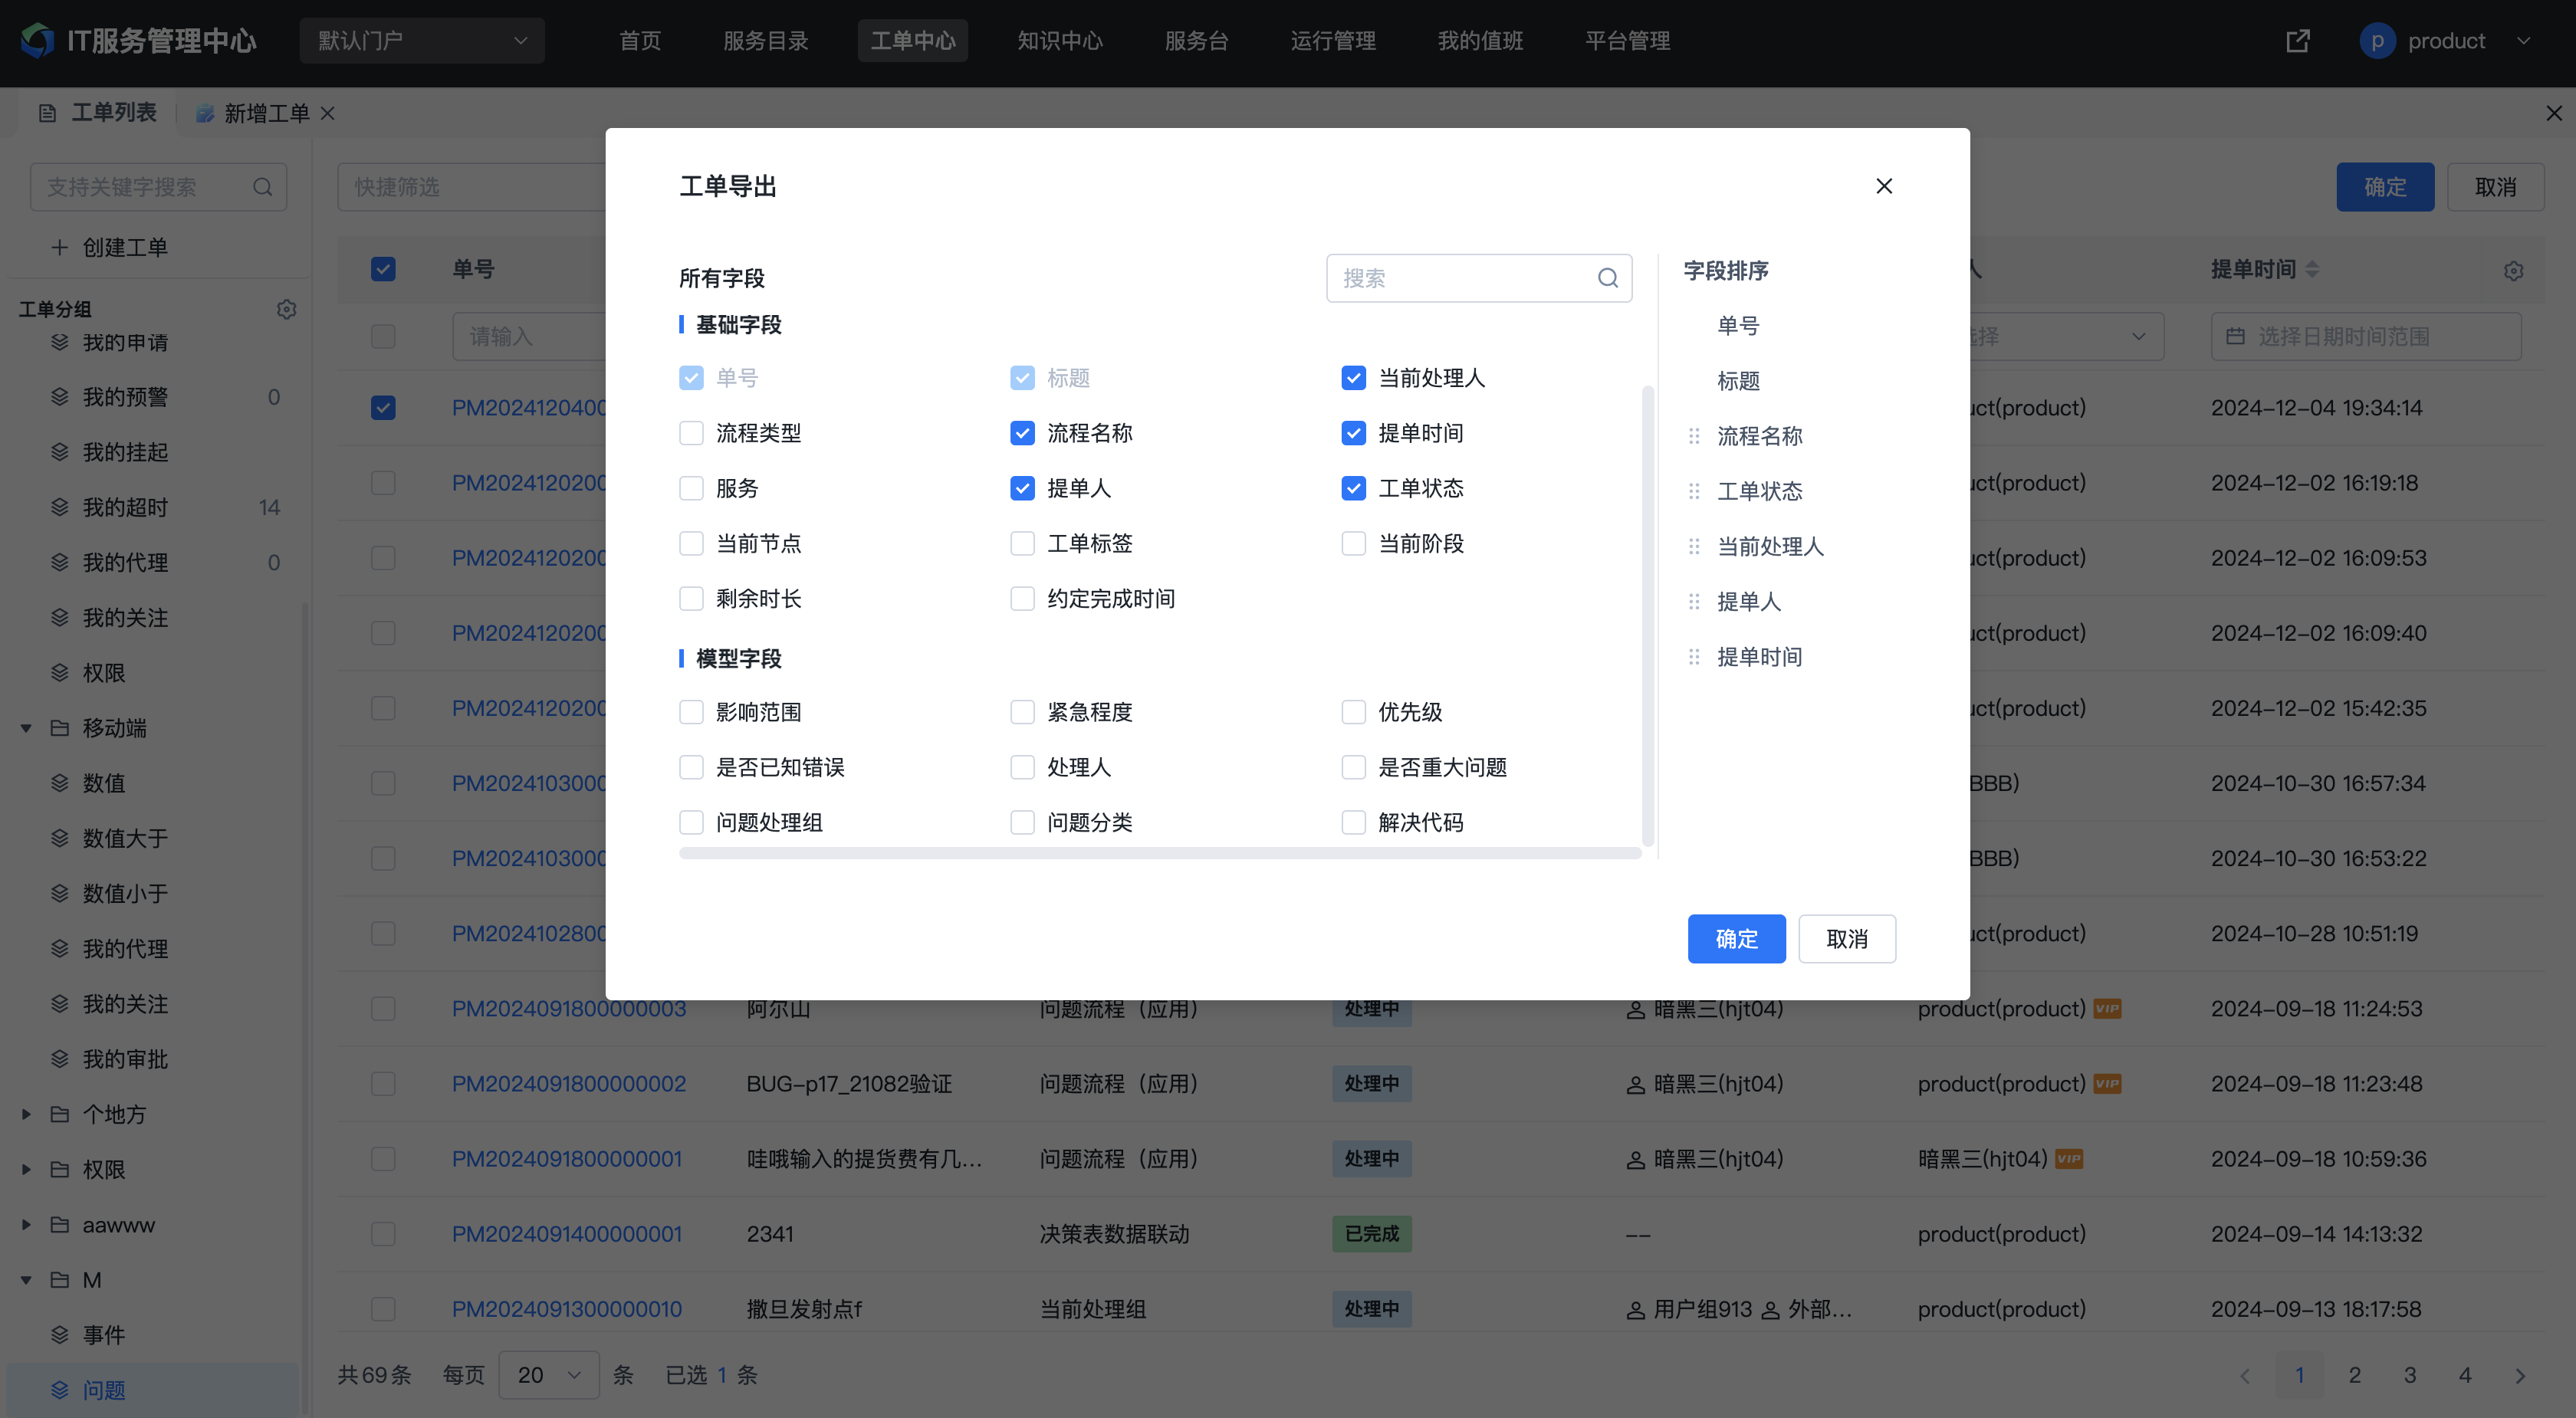

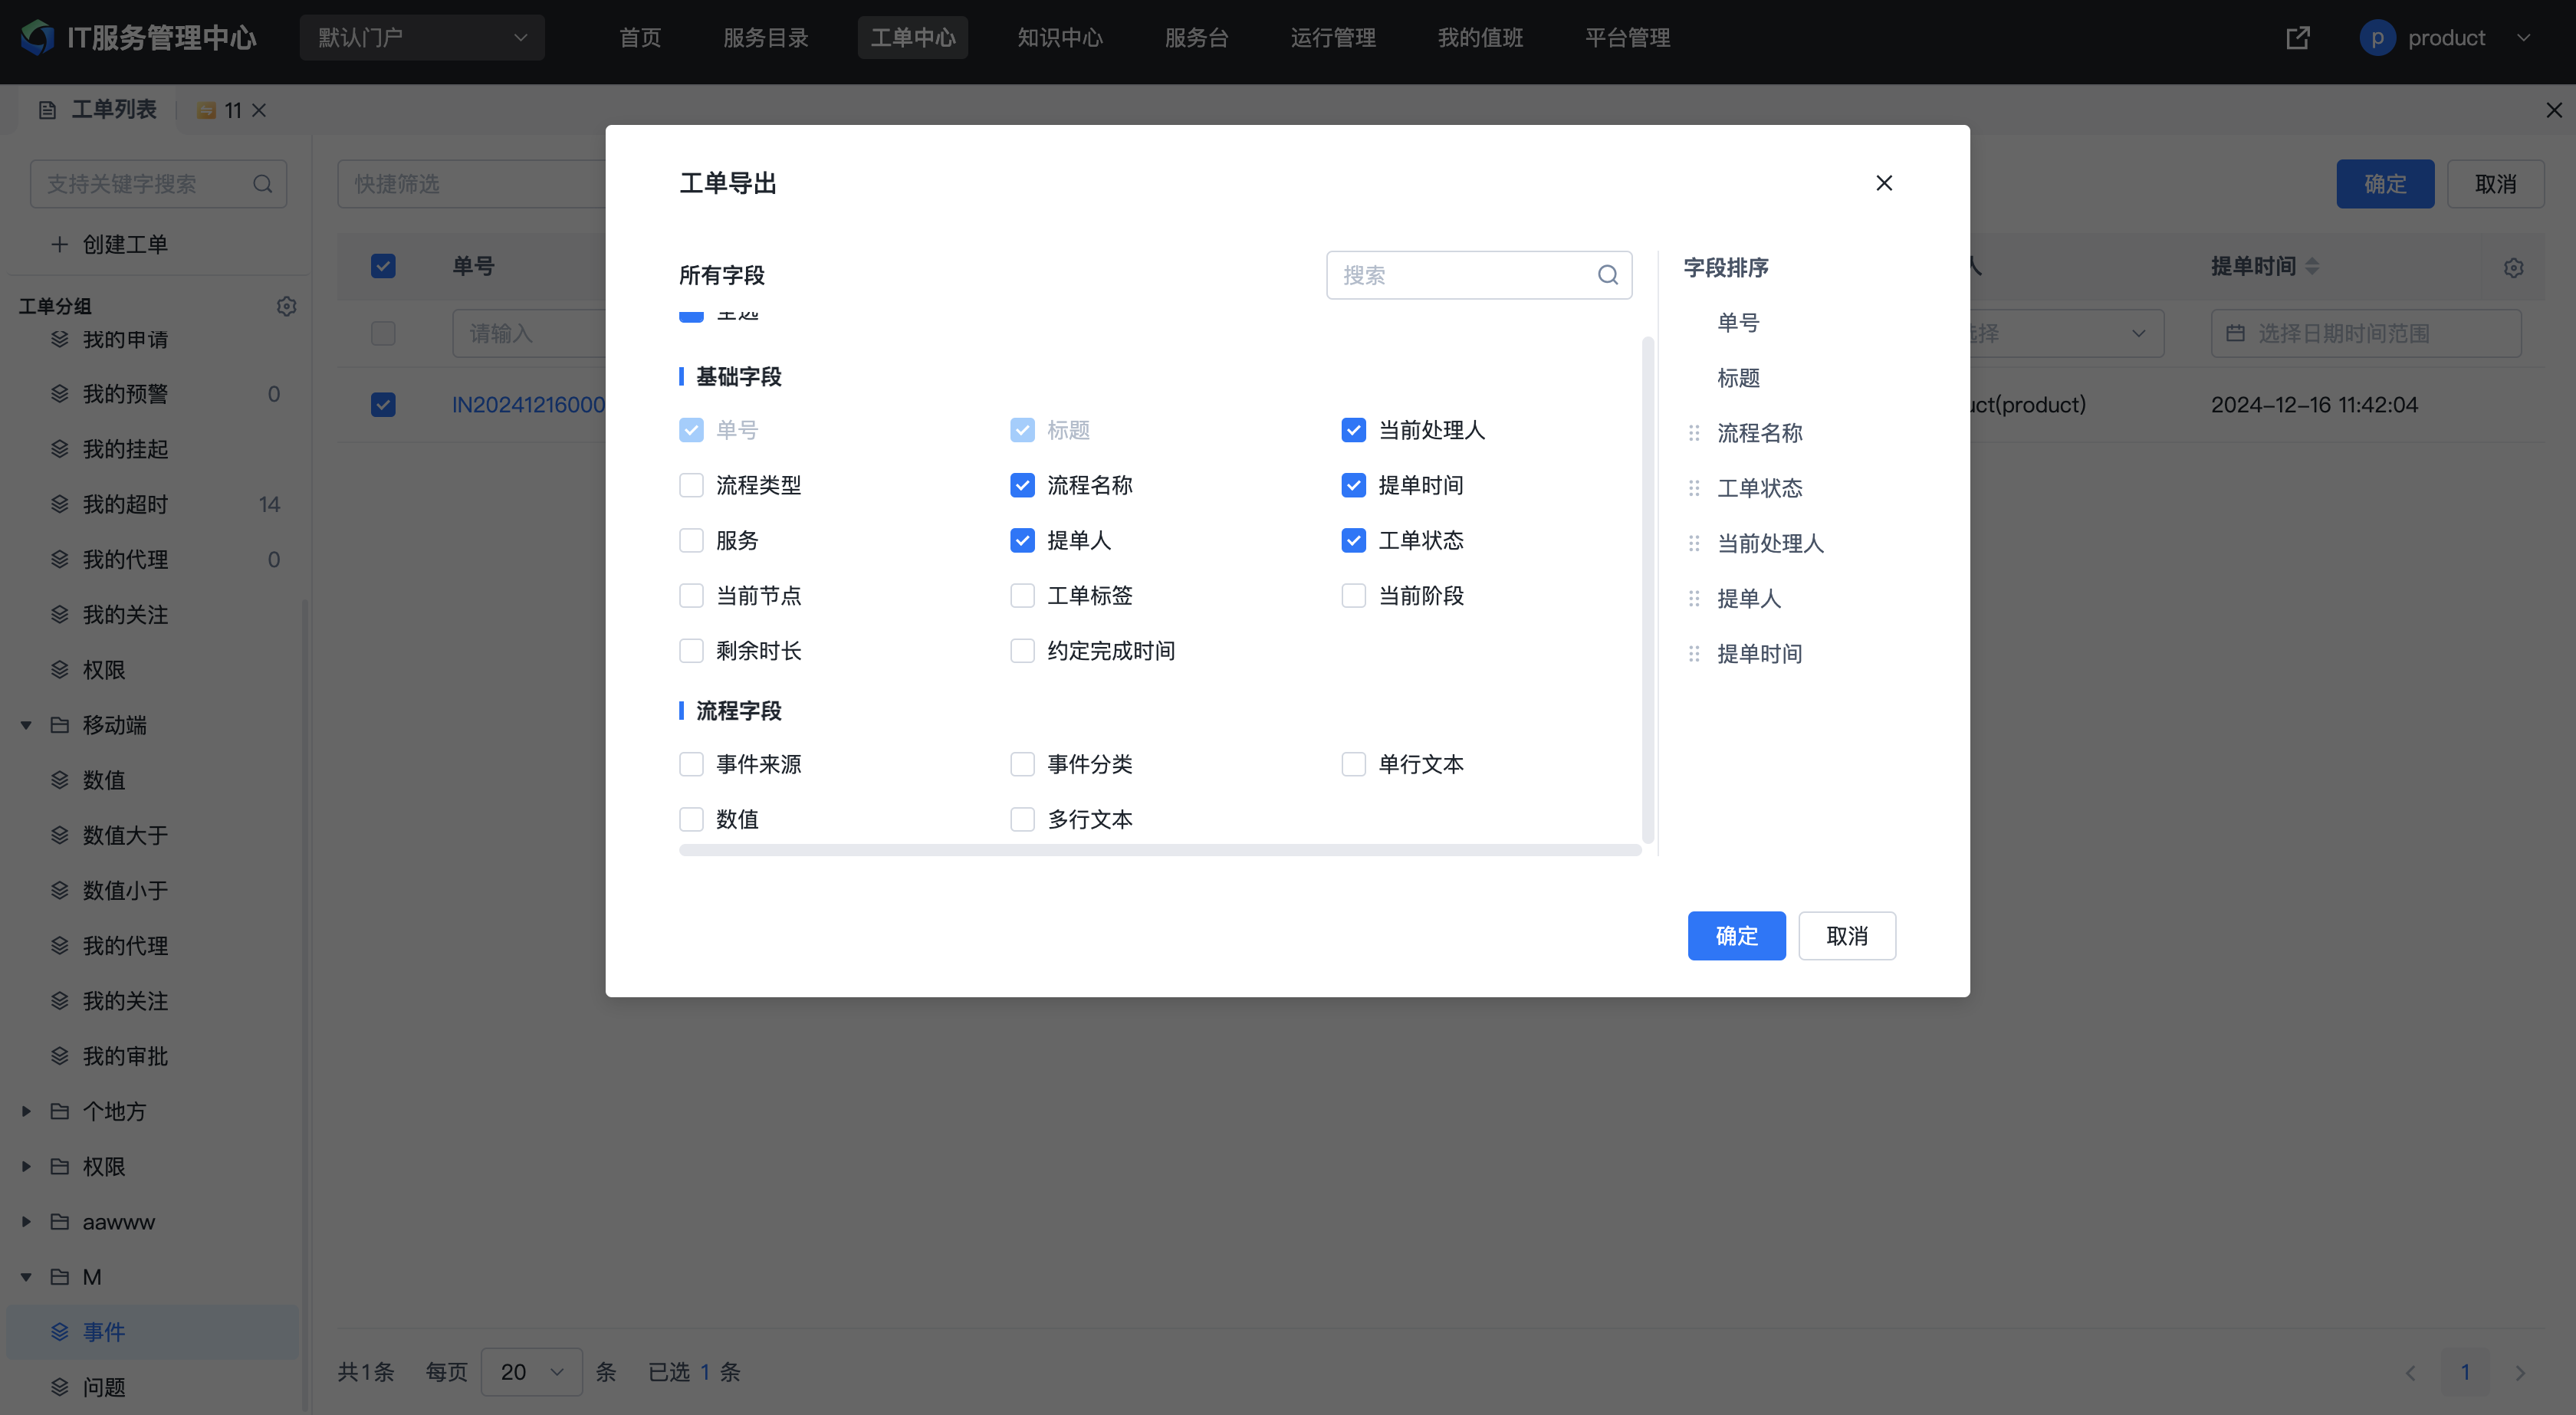
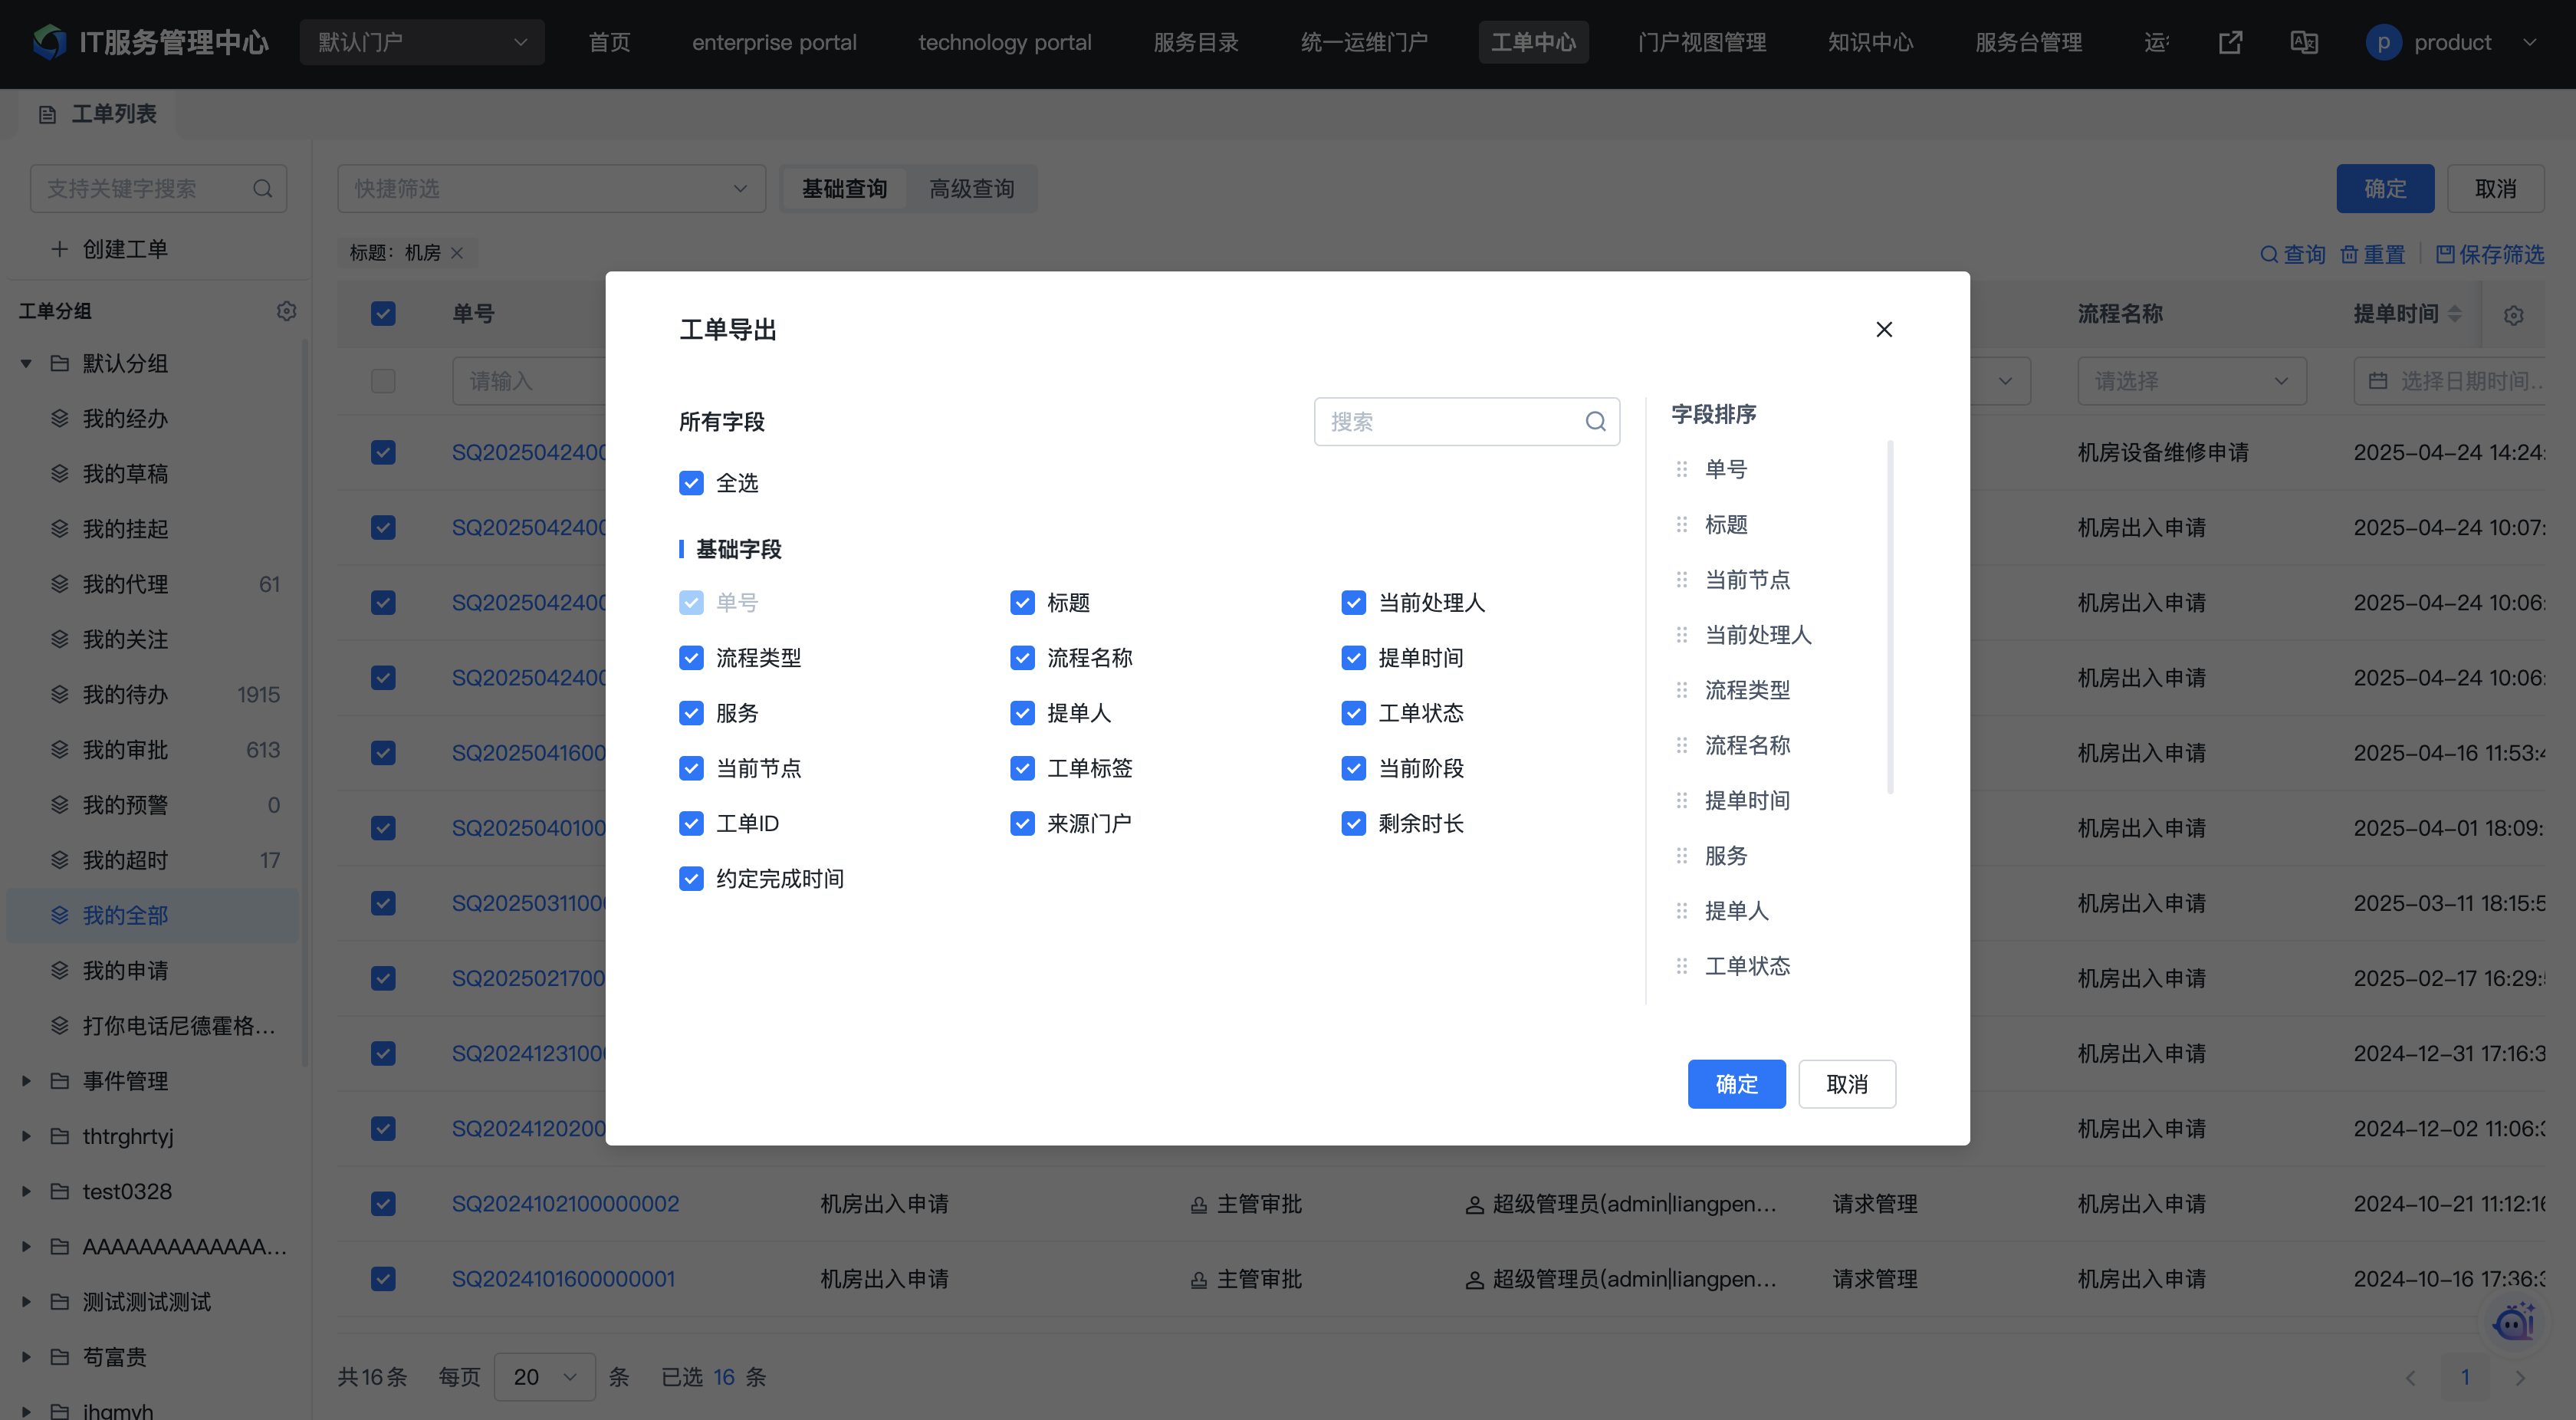
1.6.3. Ticket Export
Ticket export refers to exporting ticket data as an Excel file, supporting the export of both system fields and form fields. Built-in groups can only select basic fields. For custom groups scoped to a single workflow or a single form model, you can select custom fields defined in the workflow or model. For details, refer to the previous section "Customizing List Display Fields."
Click the "Export" button in the upper right corner of the list.
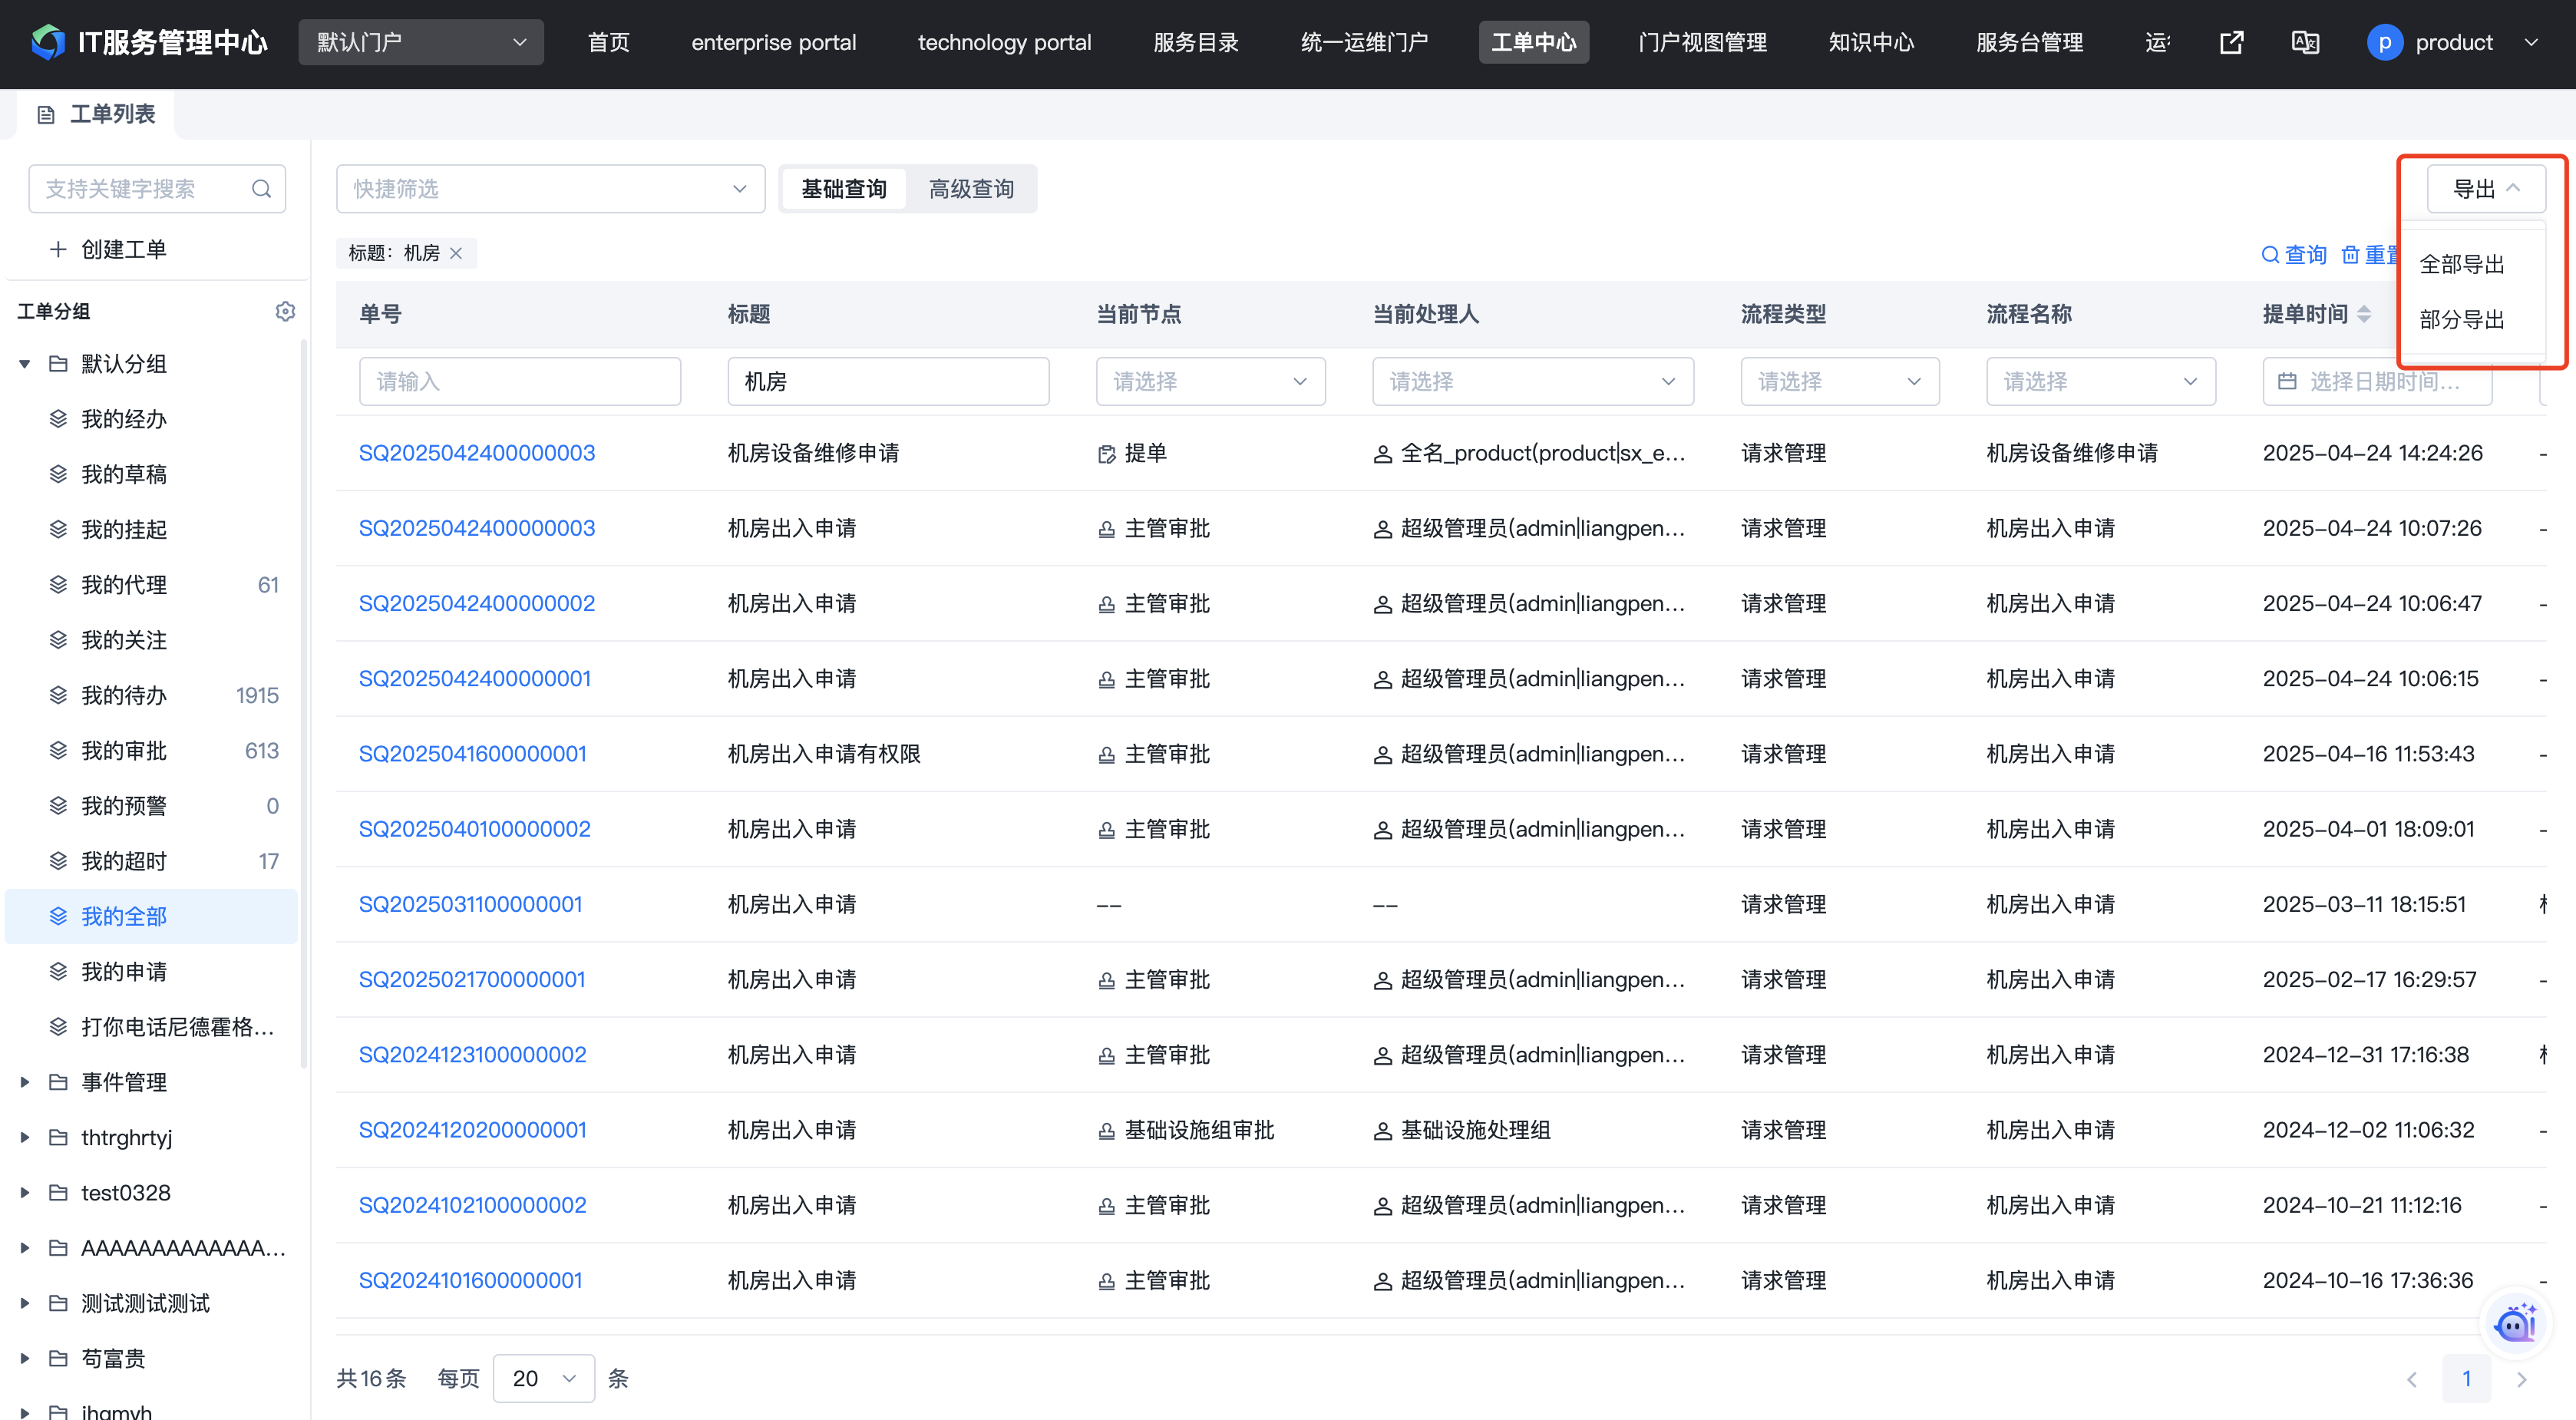
Select the tickets to export and click Confirm.
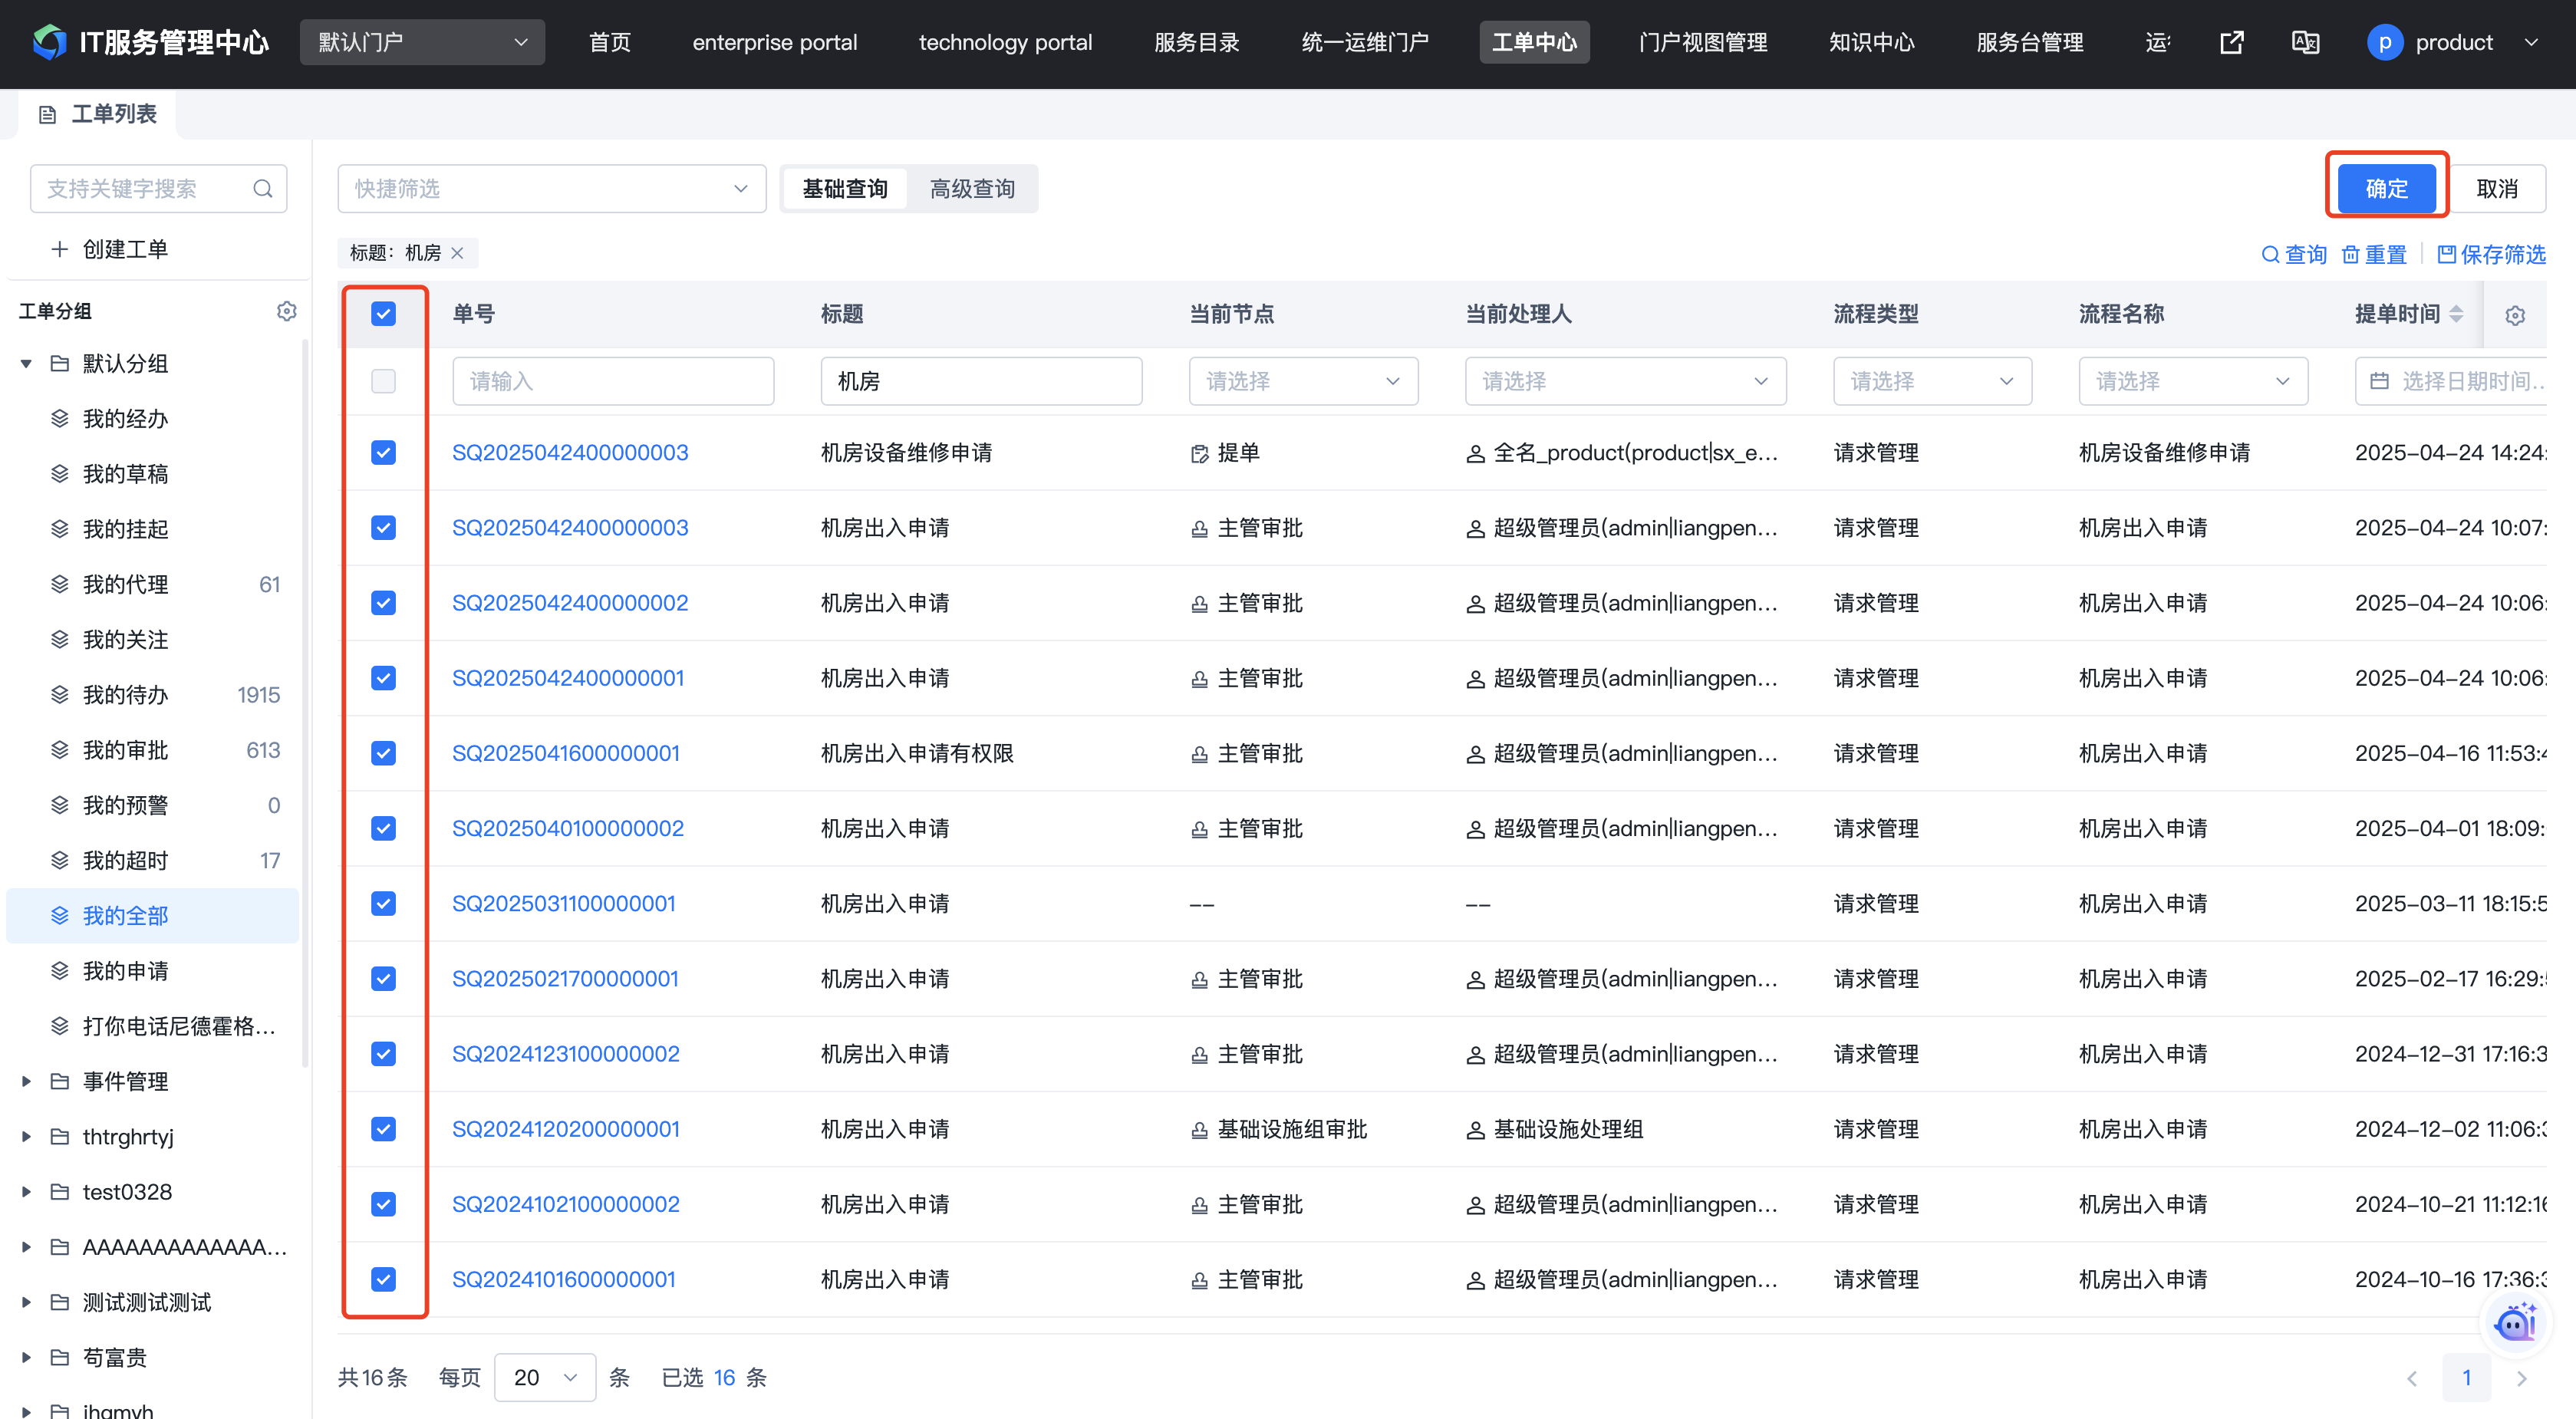
Select the fields to export, drag fields on the right side to reorder them, and confirm to export.
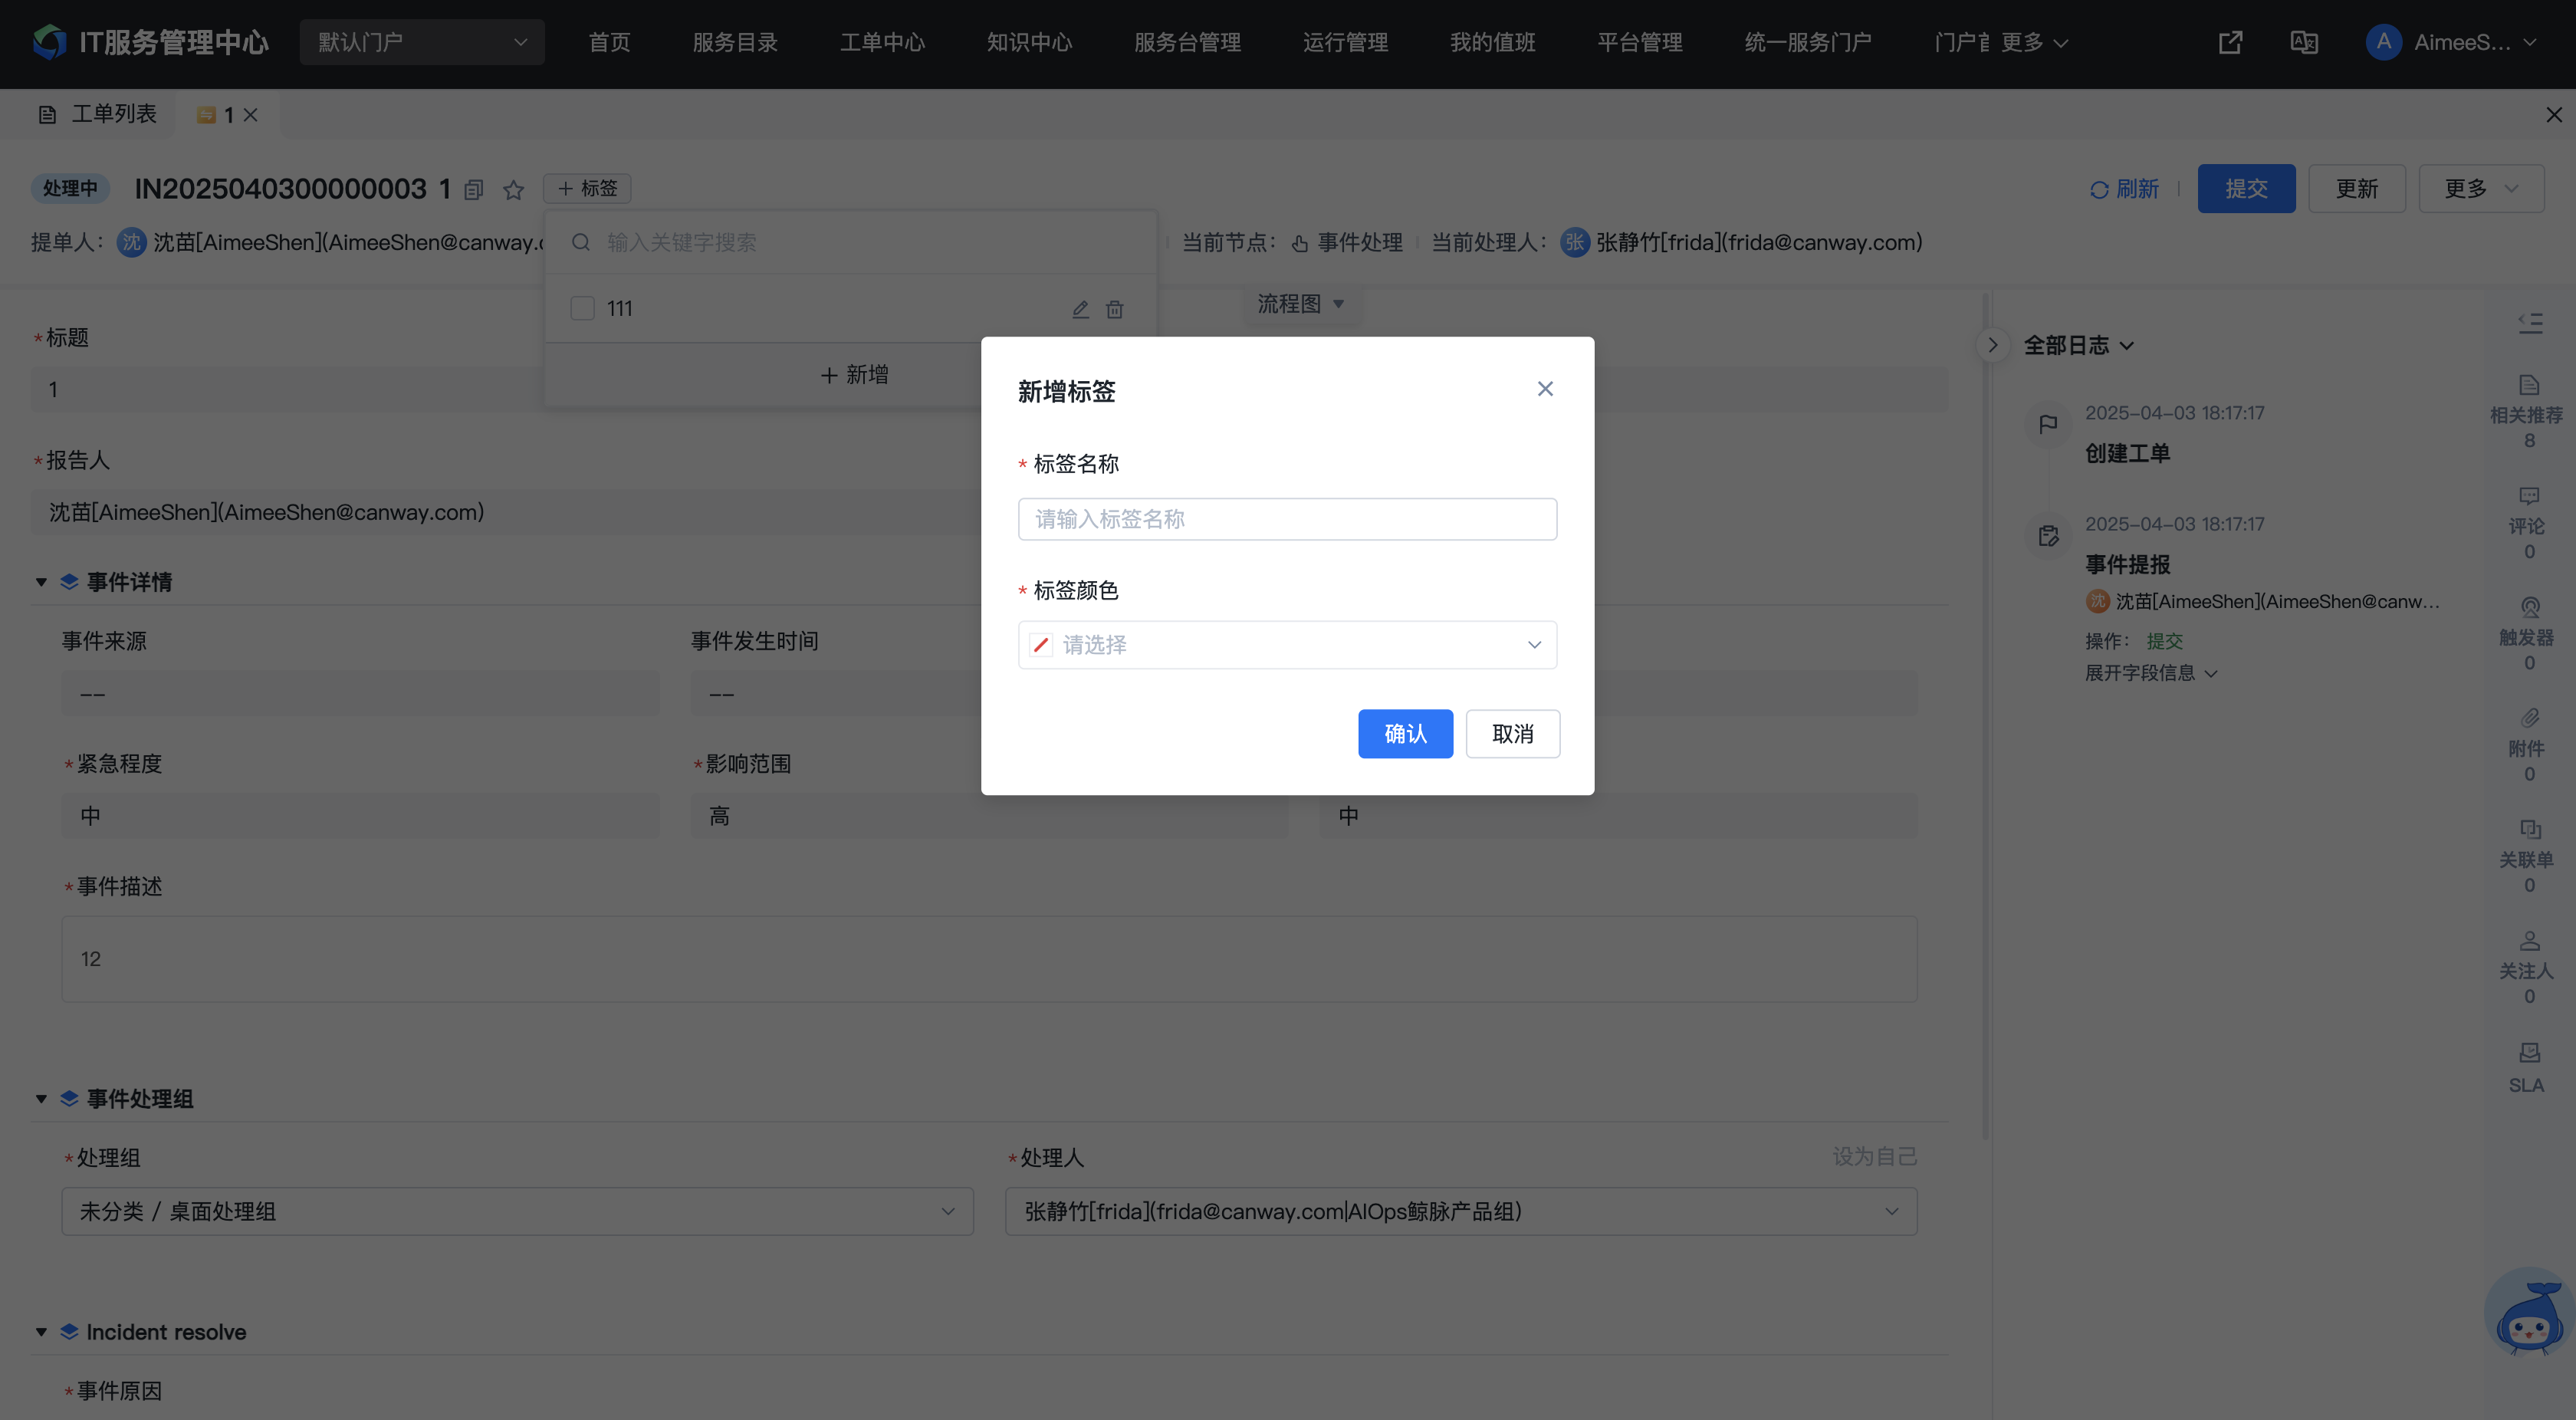
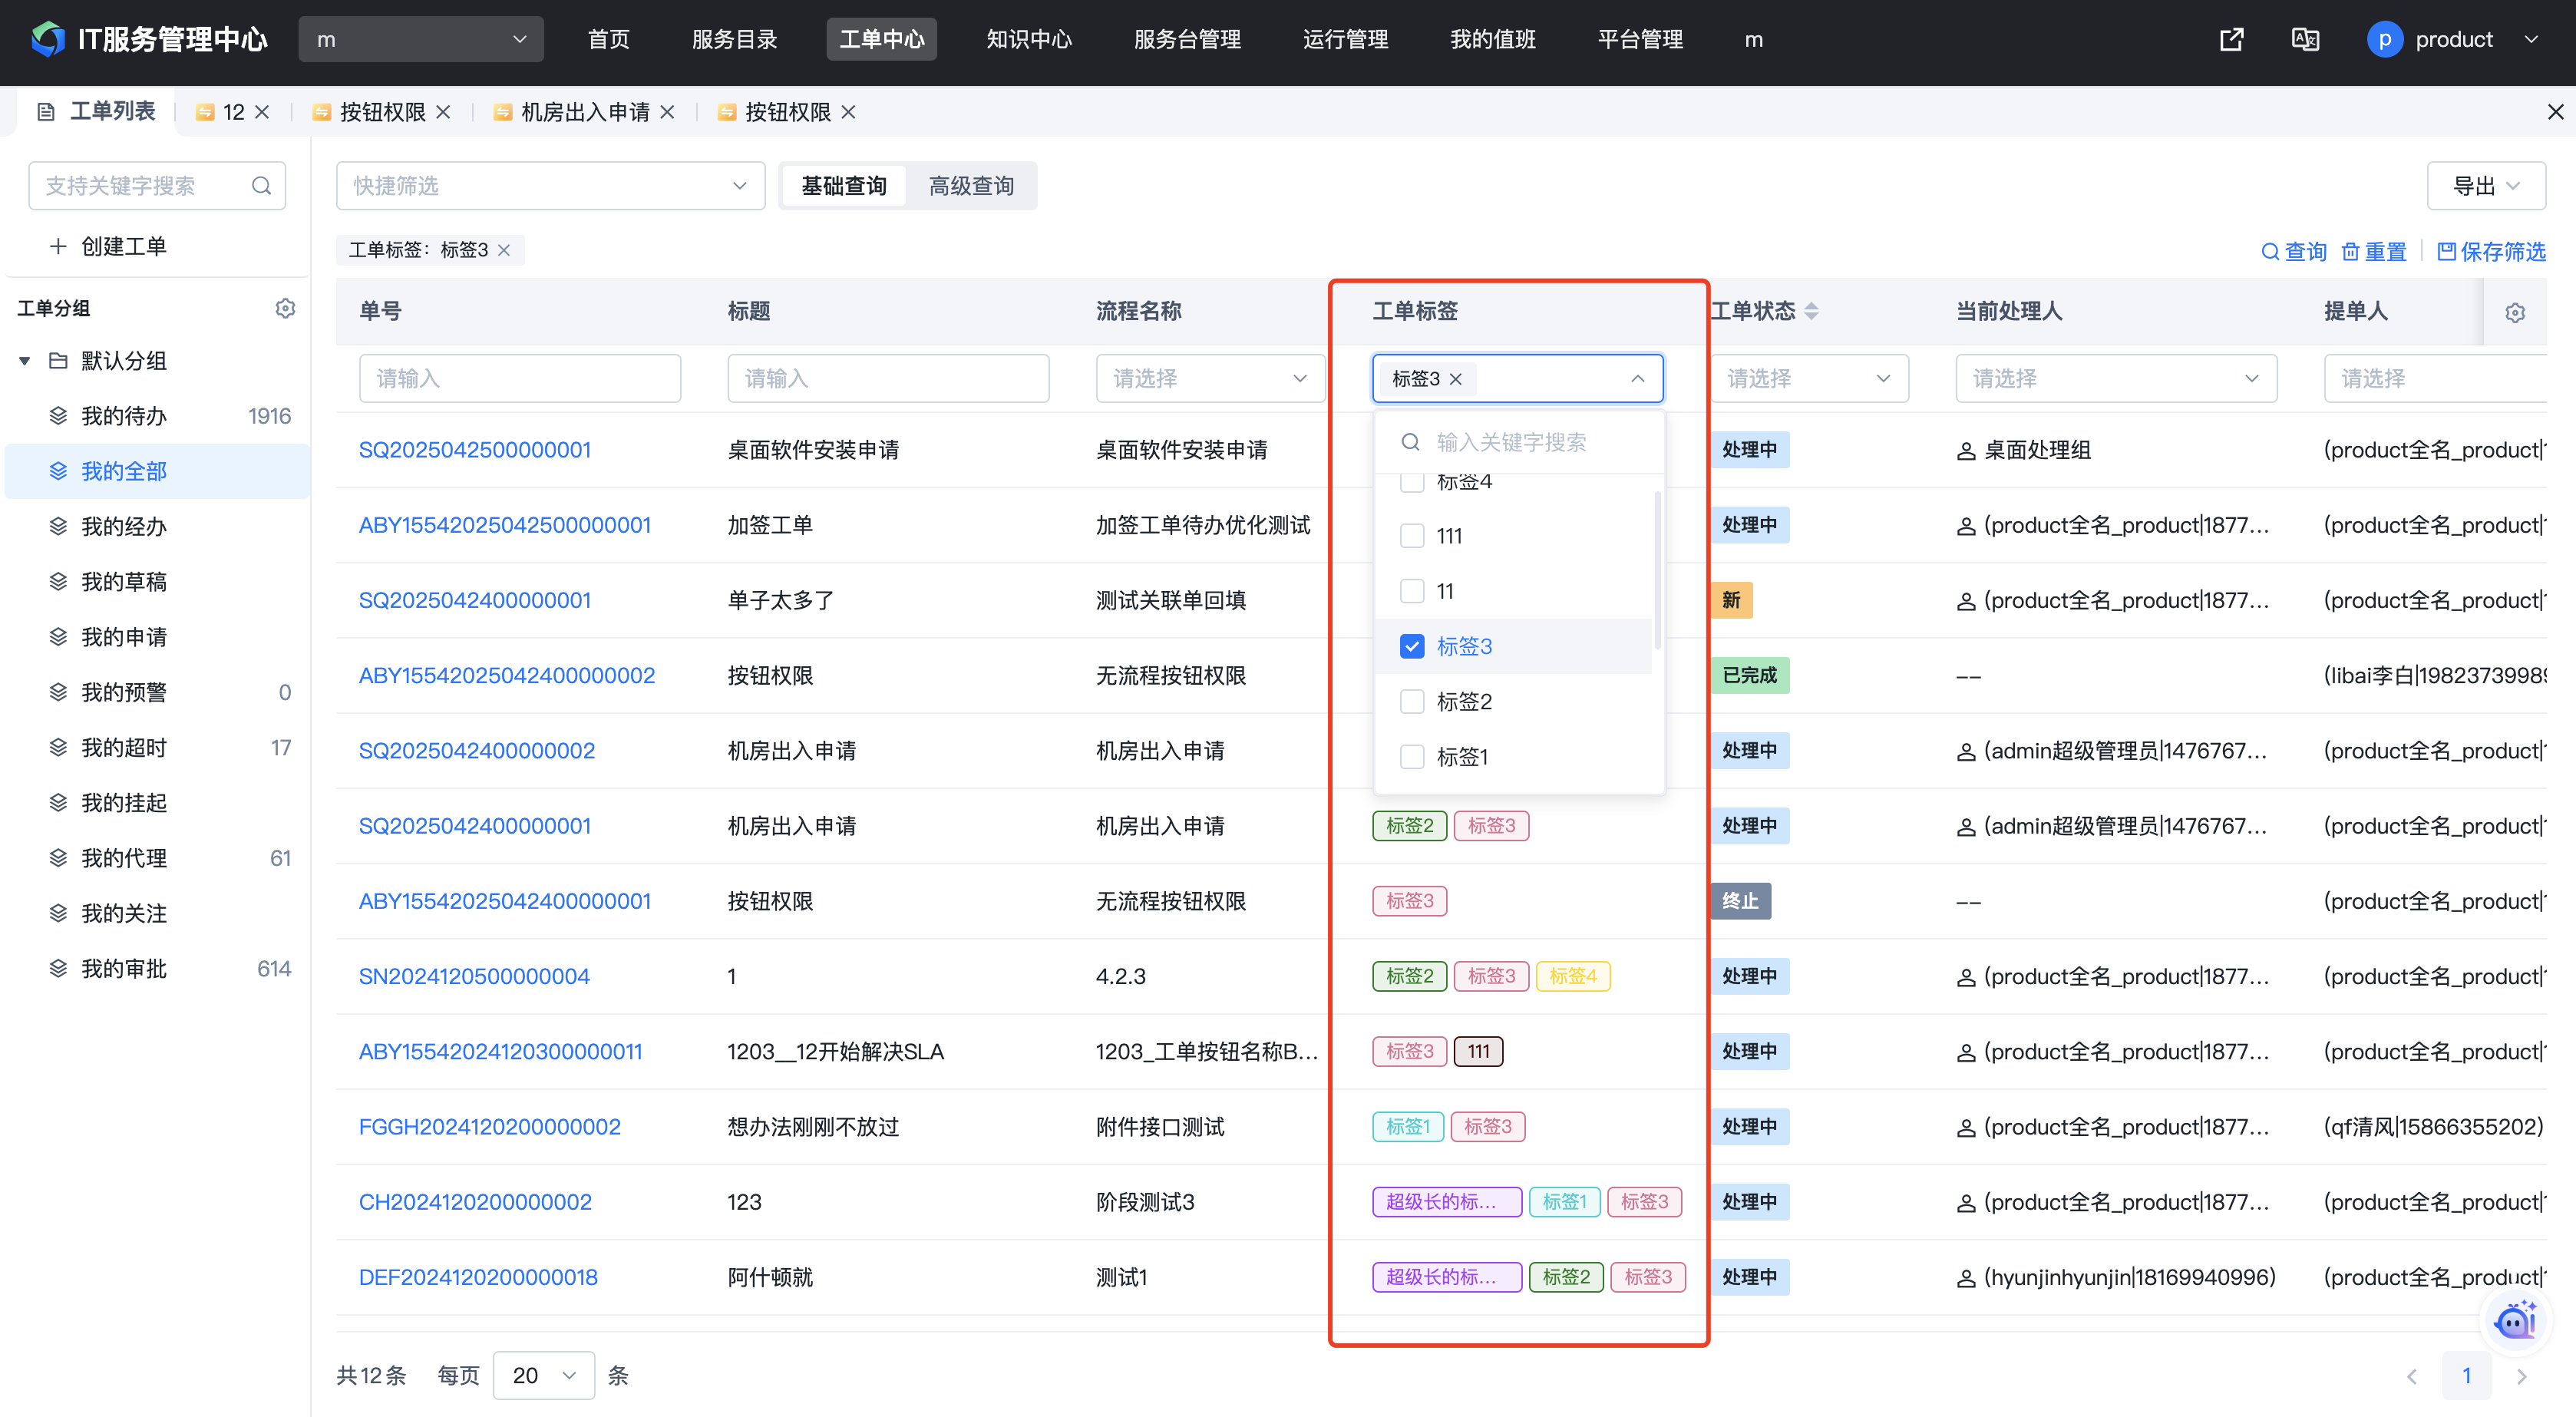
1.6.4. Ticket Tags
Ticket tags are used to label and categorize tickets for easier subsequent querying and statistics.
Next to the ticket title in the ticket detail page, you can add tags to the ticket. All users with ticket viewing permission can add tags, and added tags are visible to everyone without user-level isolation.
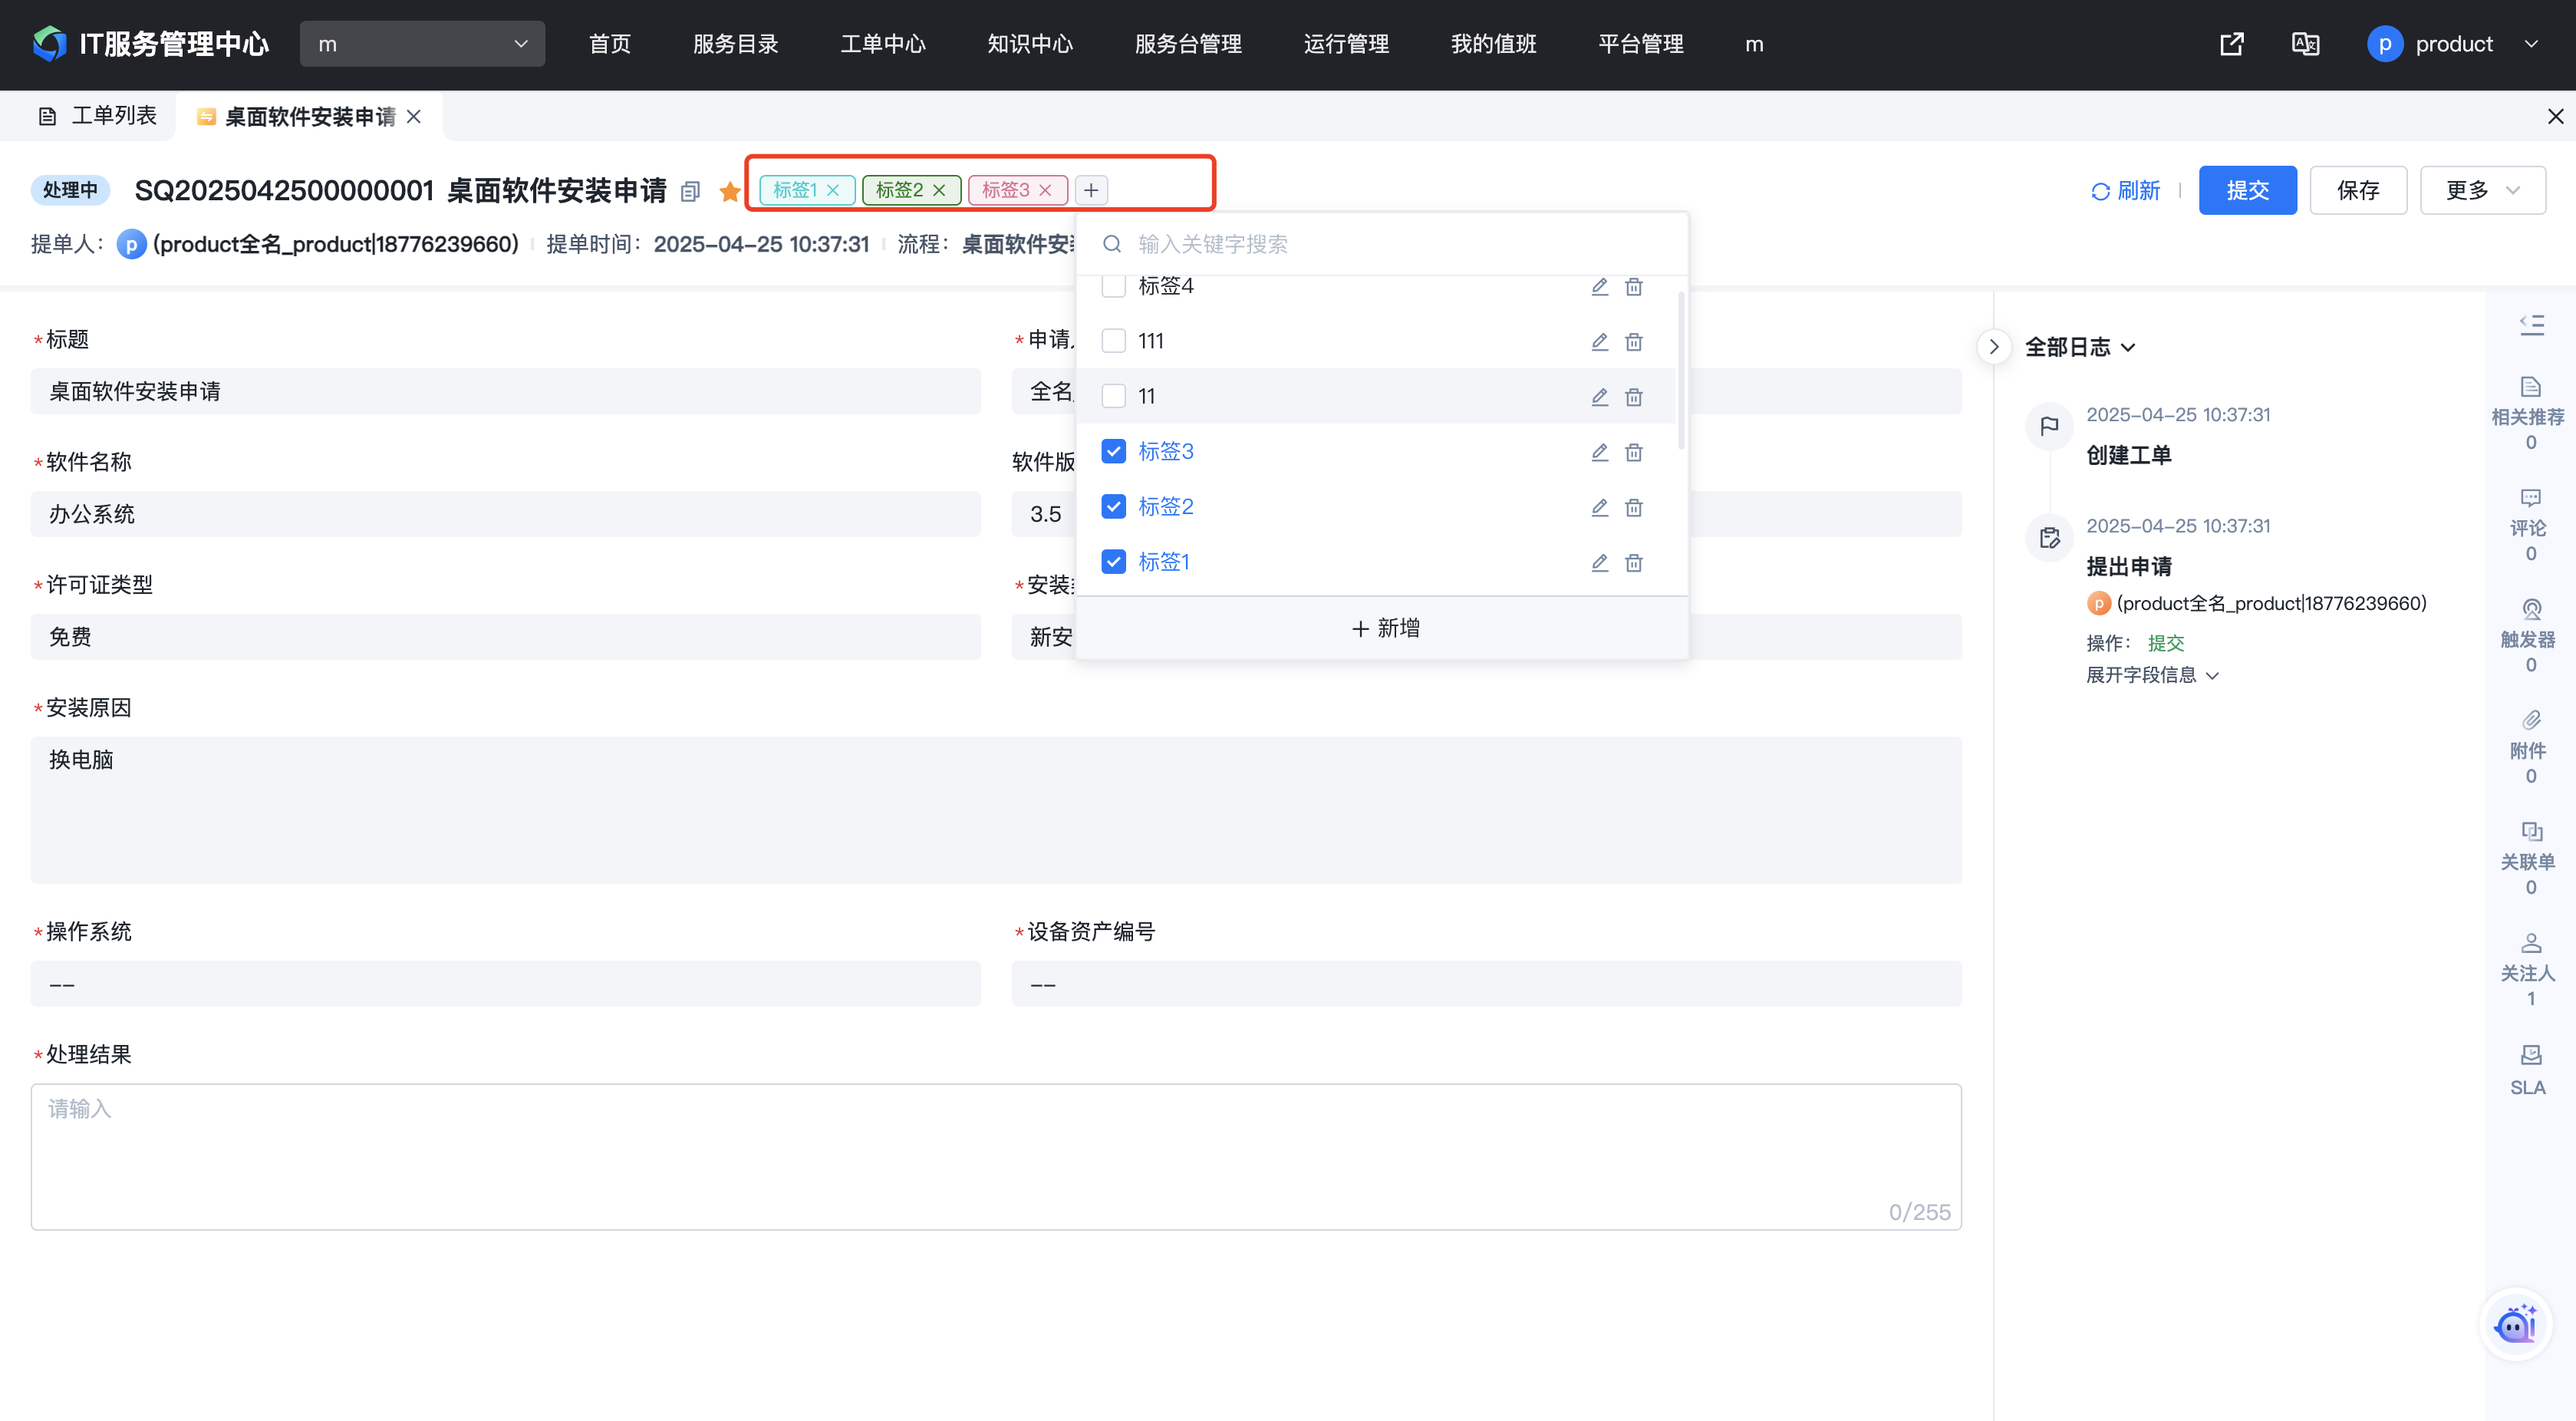
Add a new tag
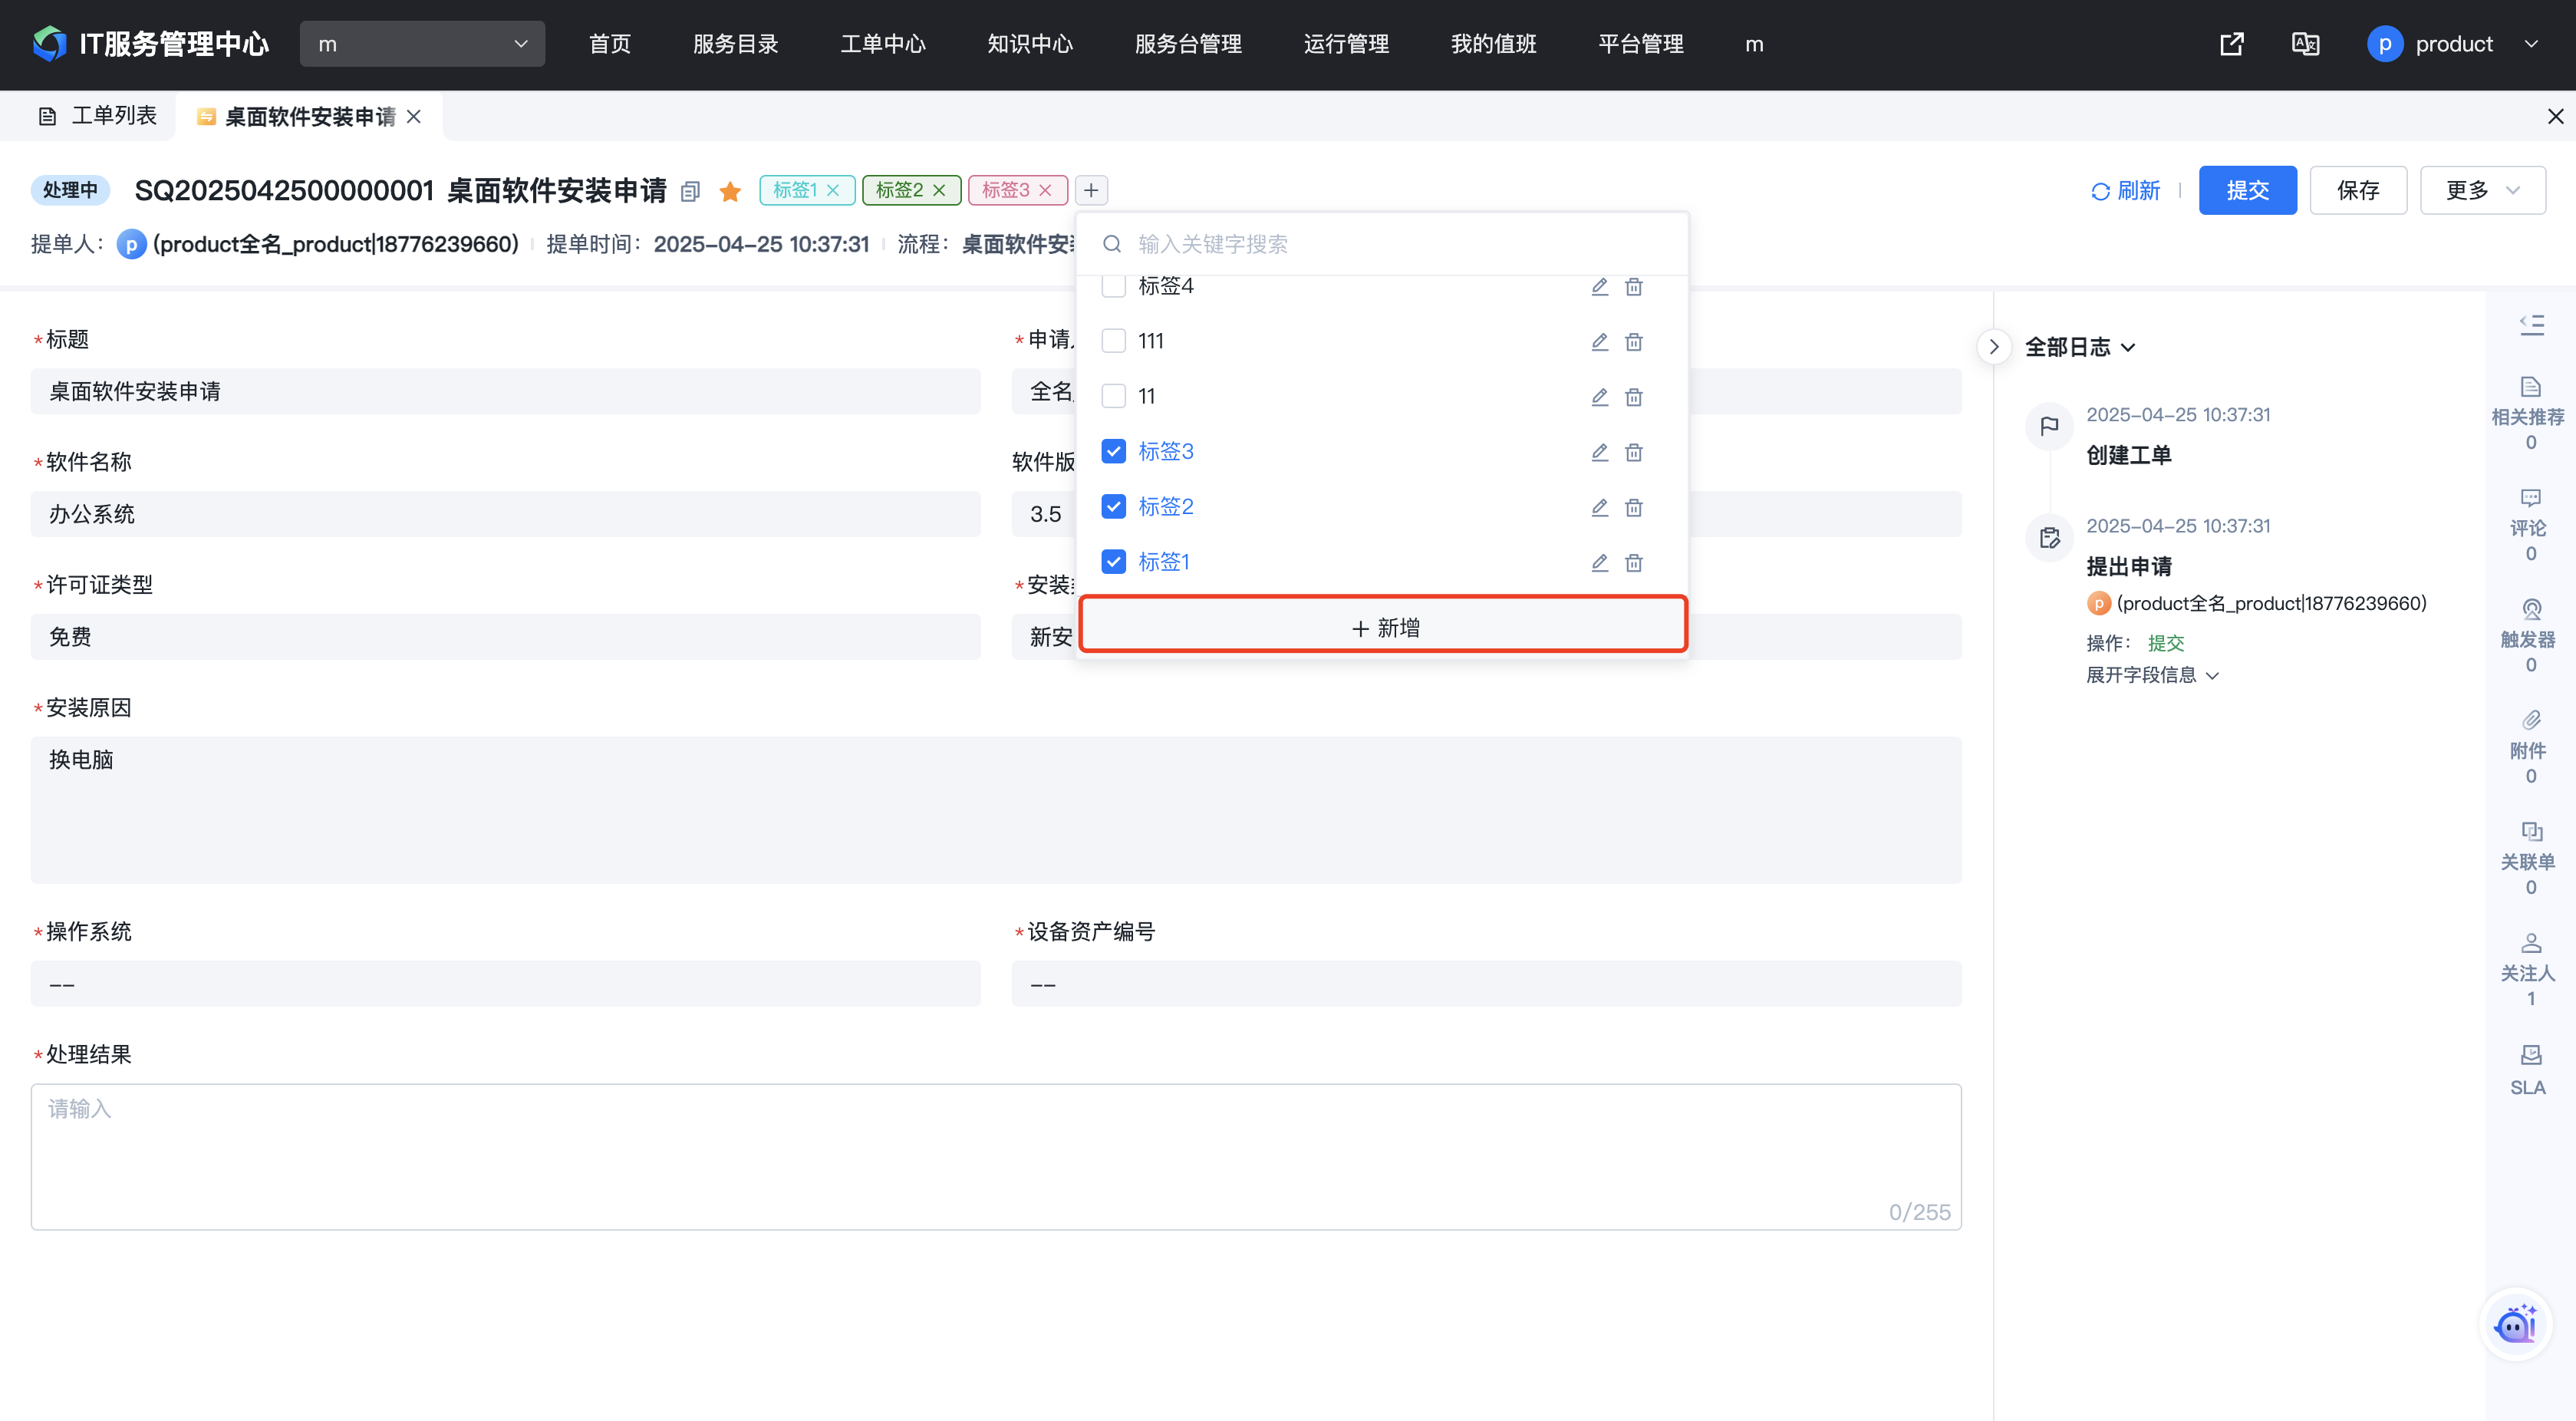
Tag search: Tickets with tags can be queried by tags in the ticket list.
2. Platform Management
2.1. Form Management
2.1.1. Form Model
2.1.1.1. Overview
The form model is a critical step in workflow design and serves as the foundation for all subsequent steps. Defining a clear form model not only improves the efficiency of workflow configuration and reduces repetitive work across various feature configurations, but also facilitates subsequent data analysis. Only with a correct structure can reusability and extensibility be ensured.
A form model is a base table for a specific business scenario. Before designing a workflow, you can create a form model and configure the common fields for a particular business category. When creating workflows later, you only need to select this model to use the fields already defined in it, eliminating the need to recreate fields.
Additionally, many subsequent feature configurations may depend on the fields in this business model. For example, SLA configuration requires conditions based on fields in the form model.
2.1.1.2. Configuring a Form Model
Configuration Steps:
- On the form model list page, click the "Add" button in the upper right corner to enter the form model configuration page.

- On the form model configuration page, enter the form model name and description, then click "Add Field" to configure the form model fields. Save when the configuration is complete.

2.2. Workflow Management
Workflow administrators can define and manage workflows uniformly in the Workflow Management module. This module provides a visual form and workflow design engine, enabling non-technical personnel to easily design business forms and workflows through drag-and-drop based on business logic. Advanced automation scenarios can be implemented through the Trigger module, and the Status Management module allows customization of ticket status transition logic.
Workflow Management includes the following modules: Workflow Design, Triggers, and Status Management:
- Workflow Design: Use this module to design workflow forms, workflow transitions, and other workflow configurations.
- Triggers: The Trigger module serves as an automation tool for workflows, automatically executing predefined actions when specific events occur during the ticket lifecycle.
- Status Management: The Status Management module provides built-in basic statuses and flexible customization capabilities, supporting the definition of ticket status transition logic based on specific business scenarios.

2.2.1. Workflow Design
2.2.1.1. Overview
The Workflow Design module provides a visual form and workflow design engine, enabling non-technical personnel to easily design business forms and workflows through drag-and-drop based on business logic.
On the workflow design list page, click the "Add" button in the upper right corner. After filling in the basic workflow information, you can enter a specific workflow design page. The workflow type and form model cannot be changed after setting, so please ensure they are configured correctly.

A specific workflow design typically includes three steps: form design, workflow definition, and other workflow configurations. Details are provided below.
2.2.1.2. Form Design
Form design is the first step in a specific workflow design. You can use the form designer to plan and design the overall business form before proceeding to the next step of workflow design.
2.2.1.2.1. Form Designer Overview
After filling in the basic workflow information when creating a workflow, you enter the form design page. The form designer layout is as follows:
- Field Library: The field library provides various field types needed for form design. When a form model is selected during workflow creation, you can also see the existing fields from the form model in the scenario fields and drag them directly for use.
- Canvas Area: The canvas area is used to drag and arrange the layout of form fields to meet business scenario requirements. Drag fields from the left field library into the center canvas area for arrangement.
- Field Configuration: Select a specific field in the canvas, and the right-side field configuration area shows the supported property configurations for that field. You can configure properties such as name, placeholder text, description, default value, and more.
- Toolbar: The form designer toolbar supports undo and redo operations.

The general steps for form design are:
- Add form fields
- Adjust form layout
- Set field properties
- Configure UI linkage rules (optional)
- Configure data linkage rules (optional)
- Set form styles (optional)
- Preview the form for confirmation
- Save and proceed to workflow design
2.2.1.2.2. Form Field Descriptions
The fields currently available in the field library are:
1.Field Types
These are the primitive field types available for form design, including:
- Basic Fields: Single-line Text, Multi-line Text, Number, Radio Button, Checkbox, Single-select Dropdown, Multi-select Dropdown, Single-select Cascade, Multi-select Cascade, Date, Date Time, Time Range, Rich Text, Single-select Person, Multi-select Person
- Advanced Fields: Group, Sub-form, Task, Tab, Attachment, Single-select User Group, Multi-select User Group, Single-select CMDB Field, Multi-select CMDB Field, Calculated Field
- Custom Fields: When the provided field types do not meet requirements, additional field types can be added through the extension development framework.
2.Scenario Fields
Fields related to specific business scenarios, including:
- Built-in Scenario Fields: Title (the title field is displayed on the form by default and cannot be deleted)
- Form Model Fields: Fields contained in the form model selected when creating the workflow, such as Incident Category, Incident Time, etc. in the Incident Management form model.
Drag fields from the left field library to add them to the center canvas area. Select a specific field in the canvas, and the right-side field configuration area shows the supported property configurations. You can configure properties such as name, placeholder text, description, default value, and more.

2.2.1.2.3. Special Field Usage Instructions
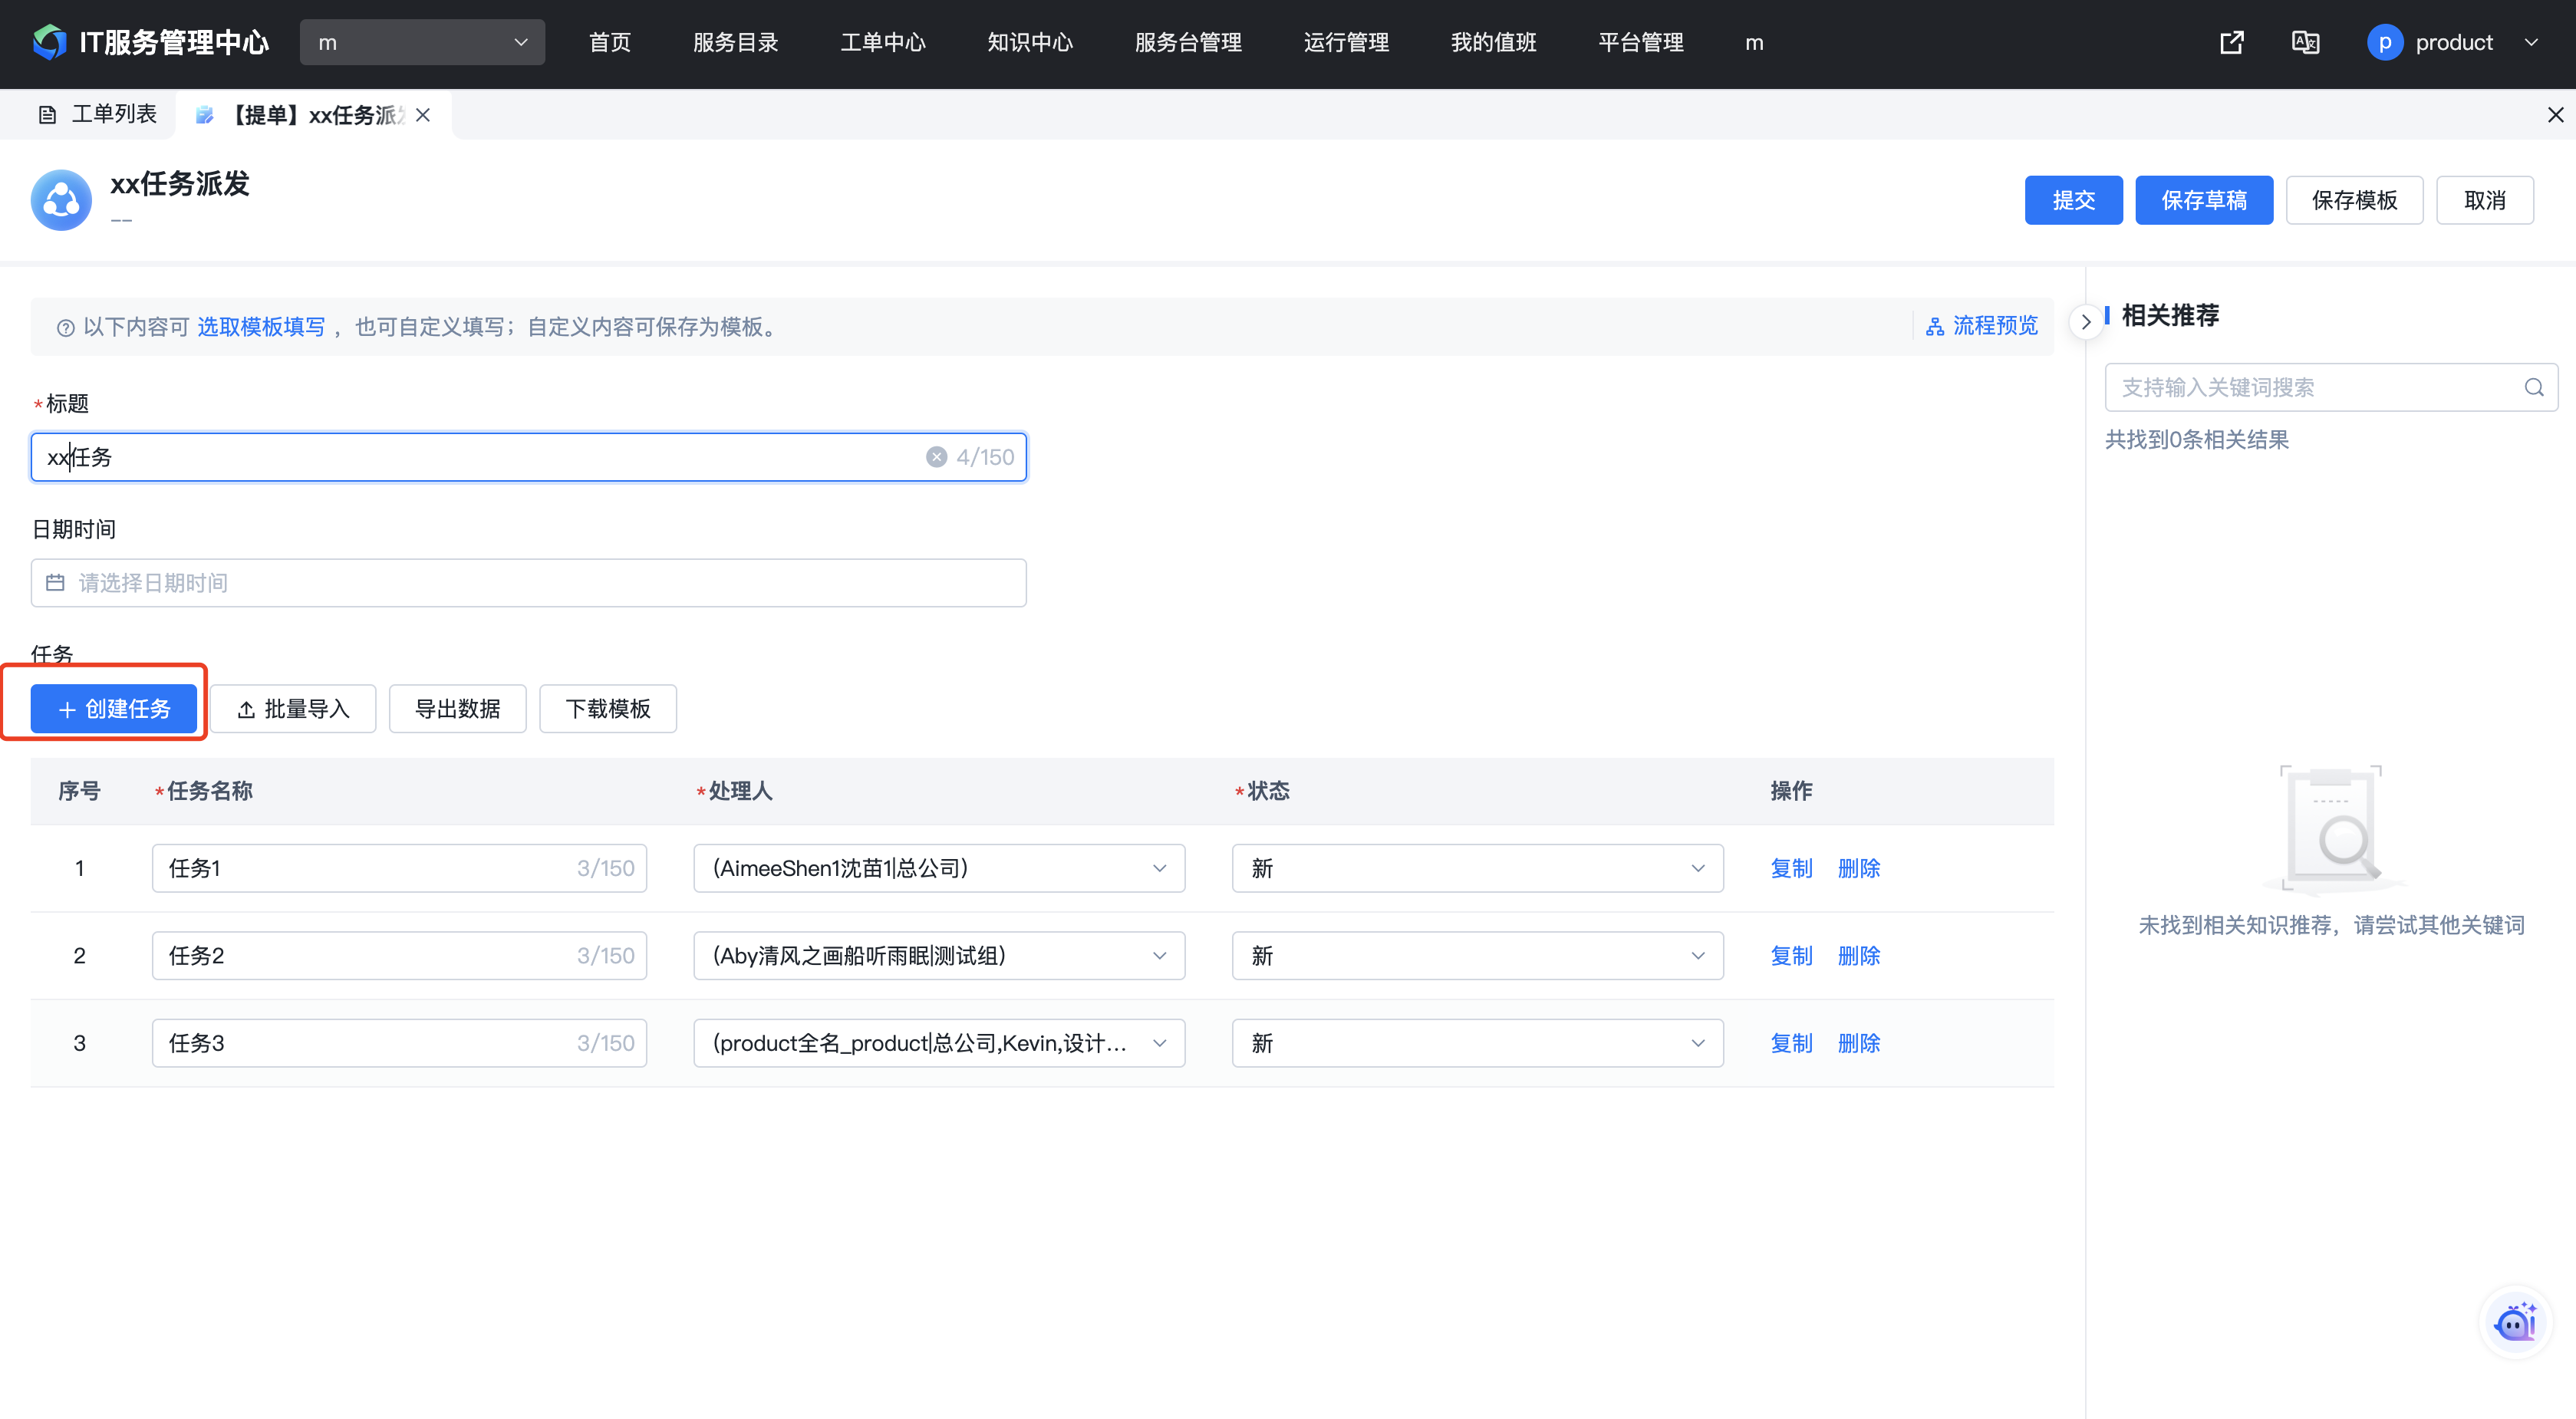
1.Task Field
Scenario: Used to implement task to-do creation scenarios during workflow processing, such as fault handling tasks or problem investigation tasks.
Field Configuration:
- Drag the Task field into the form. The field has built-in fields: Task Name, Assignee, and Status. If additional fields are needed, you can add them from the left field library.
The Task field, in addition to other basic configurations, has three special configuration items:
- Task Assignee Field: Binds the assignee field. Selectable field types are person type and user group type. If the built-in assignee field type does not meet the business scenario, you can add other assignee fields.
- Enter To-Do Status: Sets at which status the task enters the assignee's to-do queue.
- Clear To-Do Status: Sets at which status the task to-do is cleared.
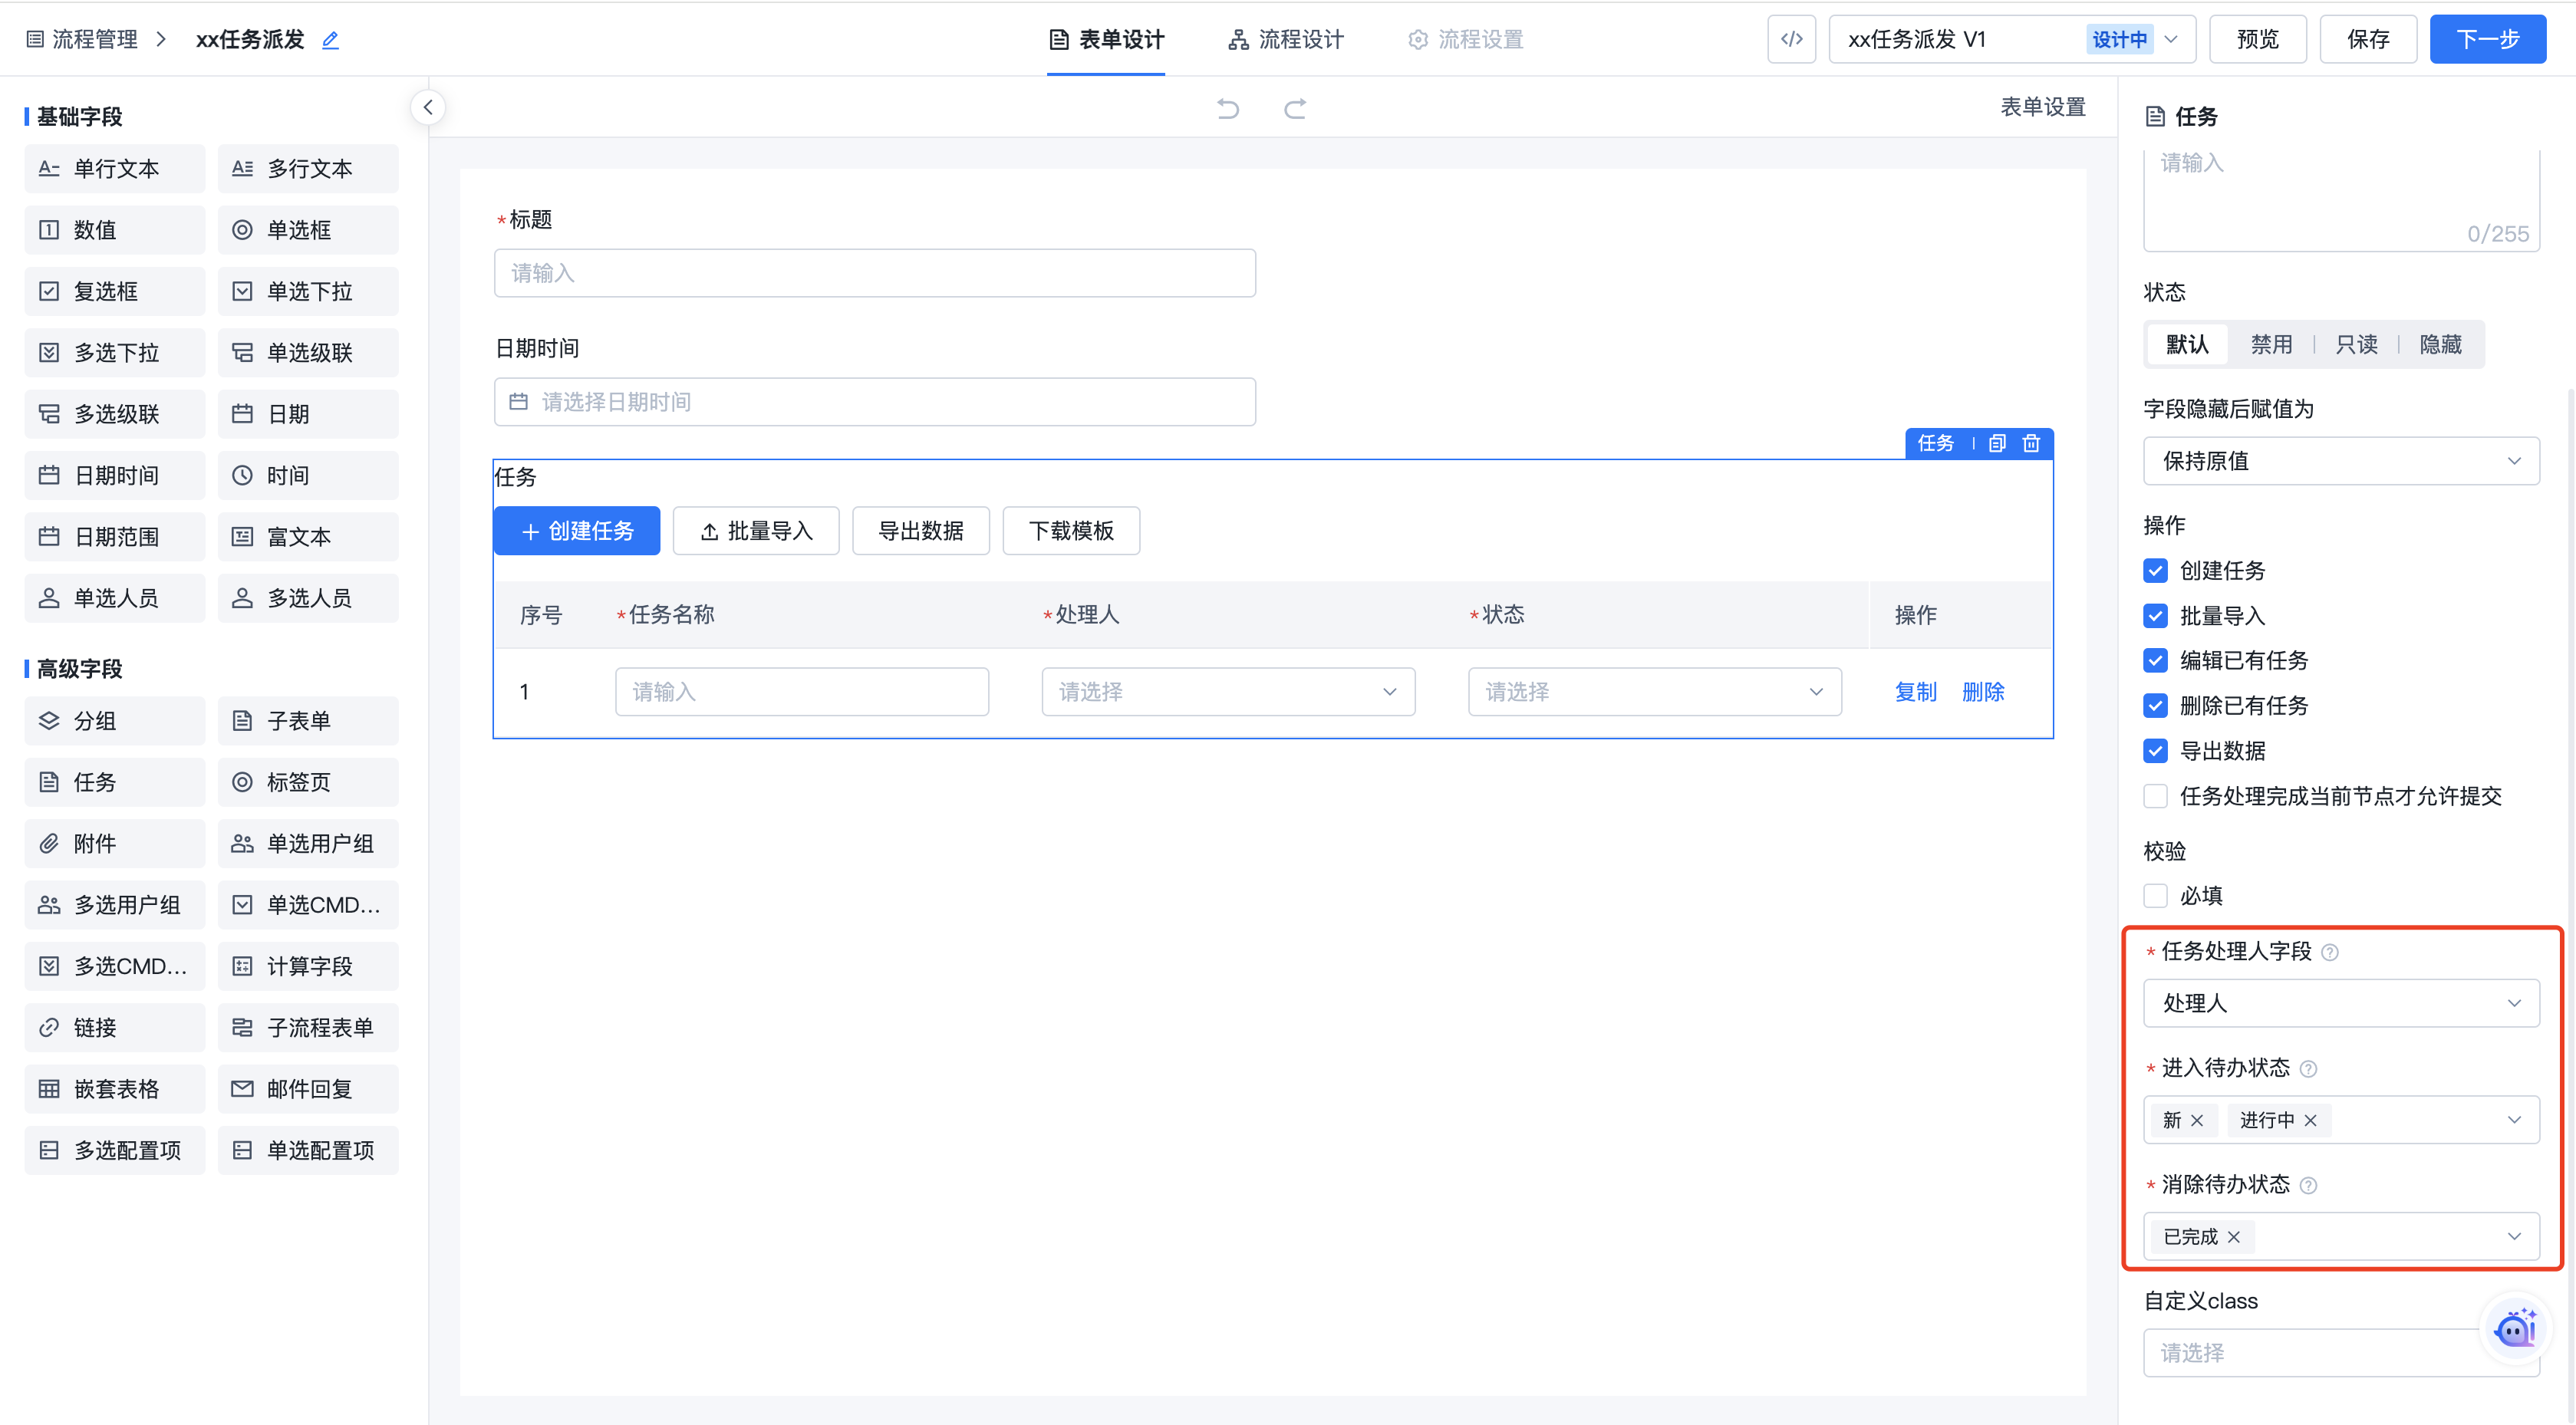
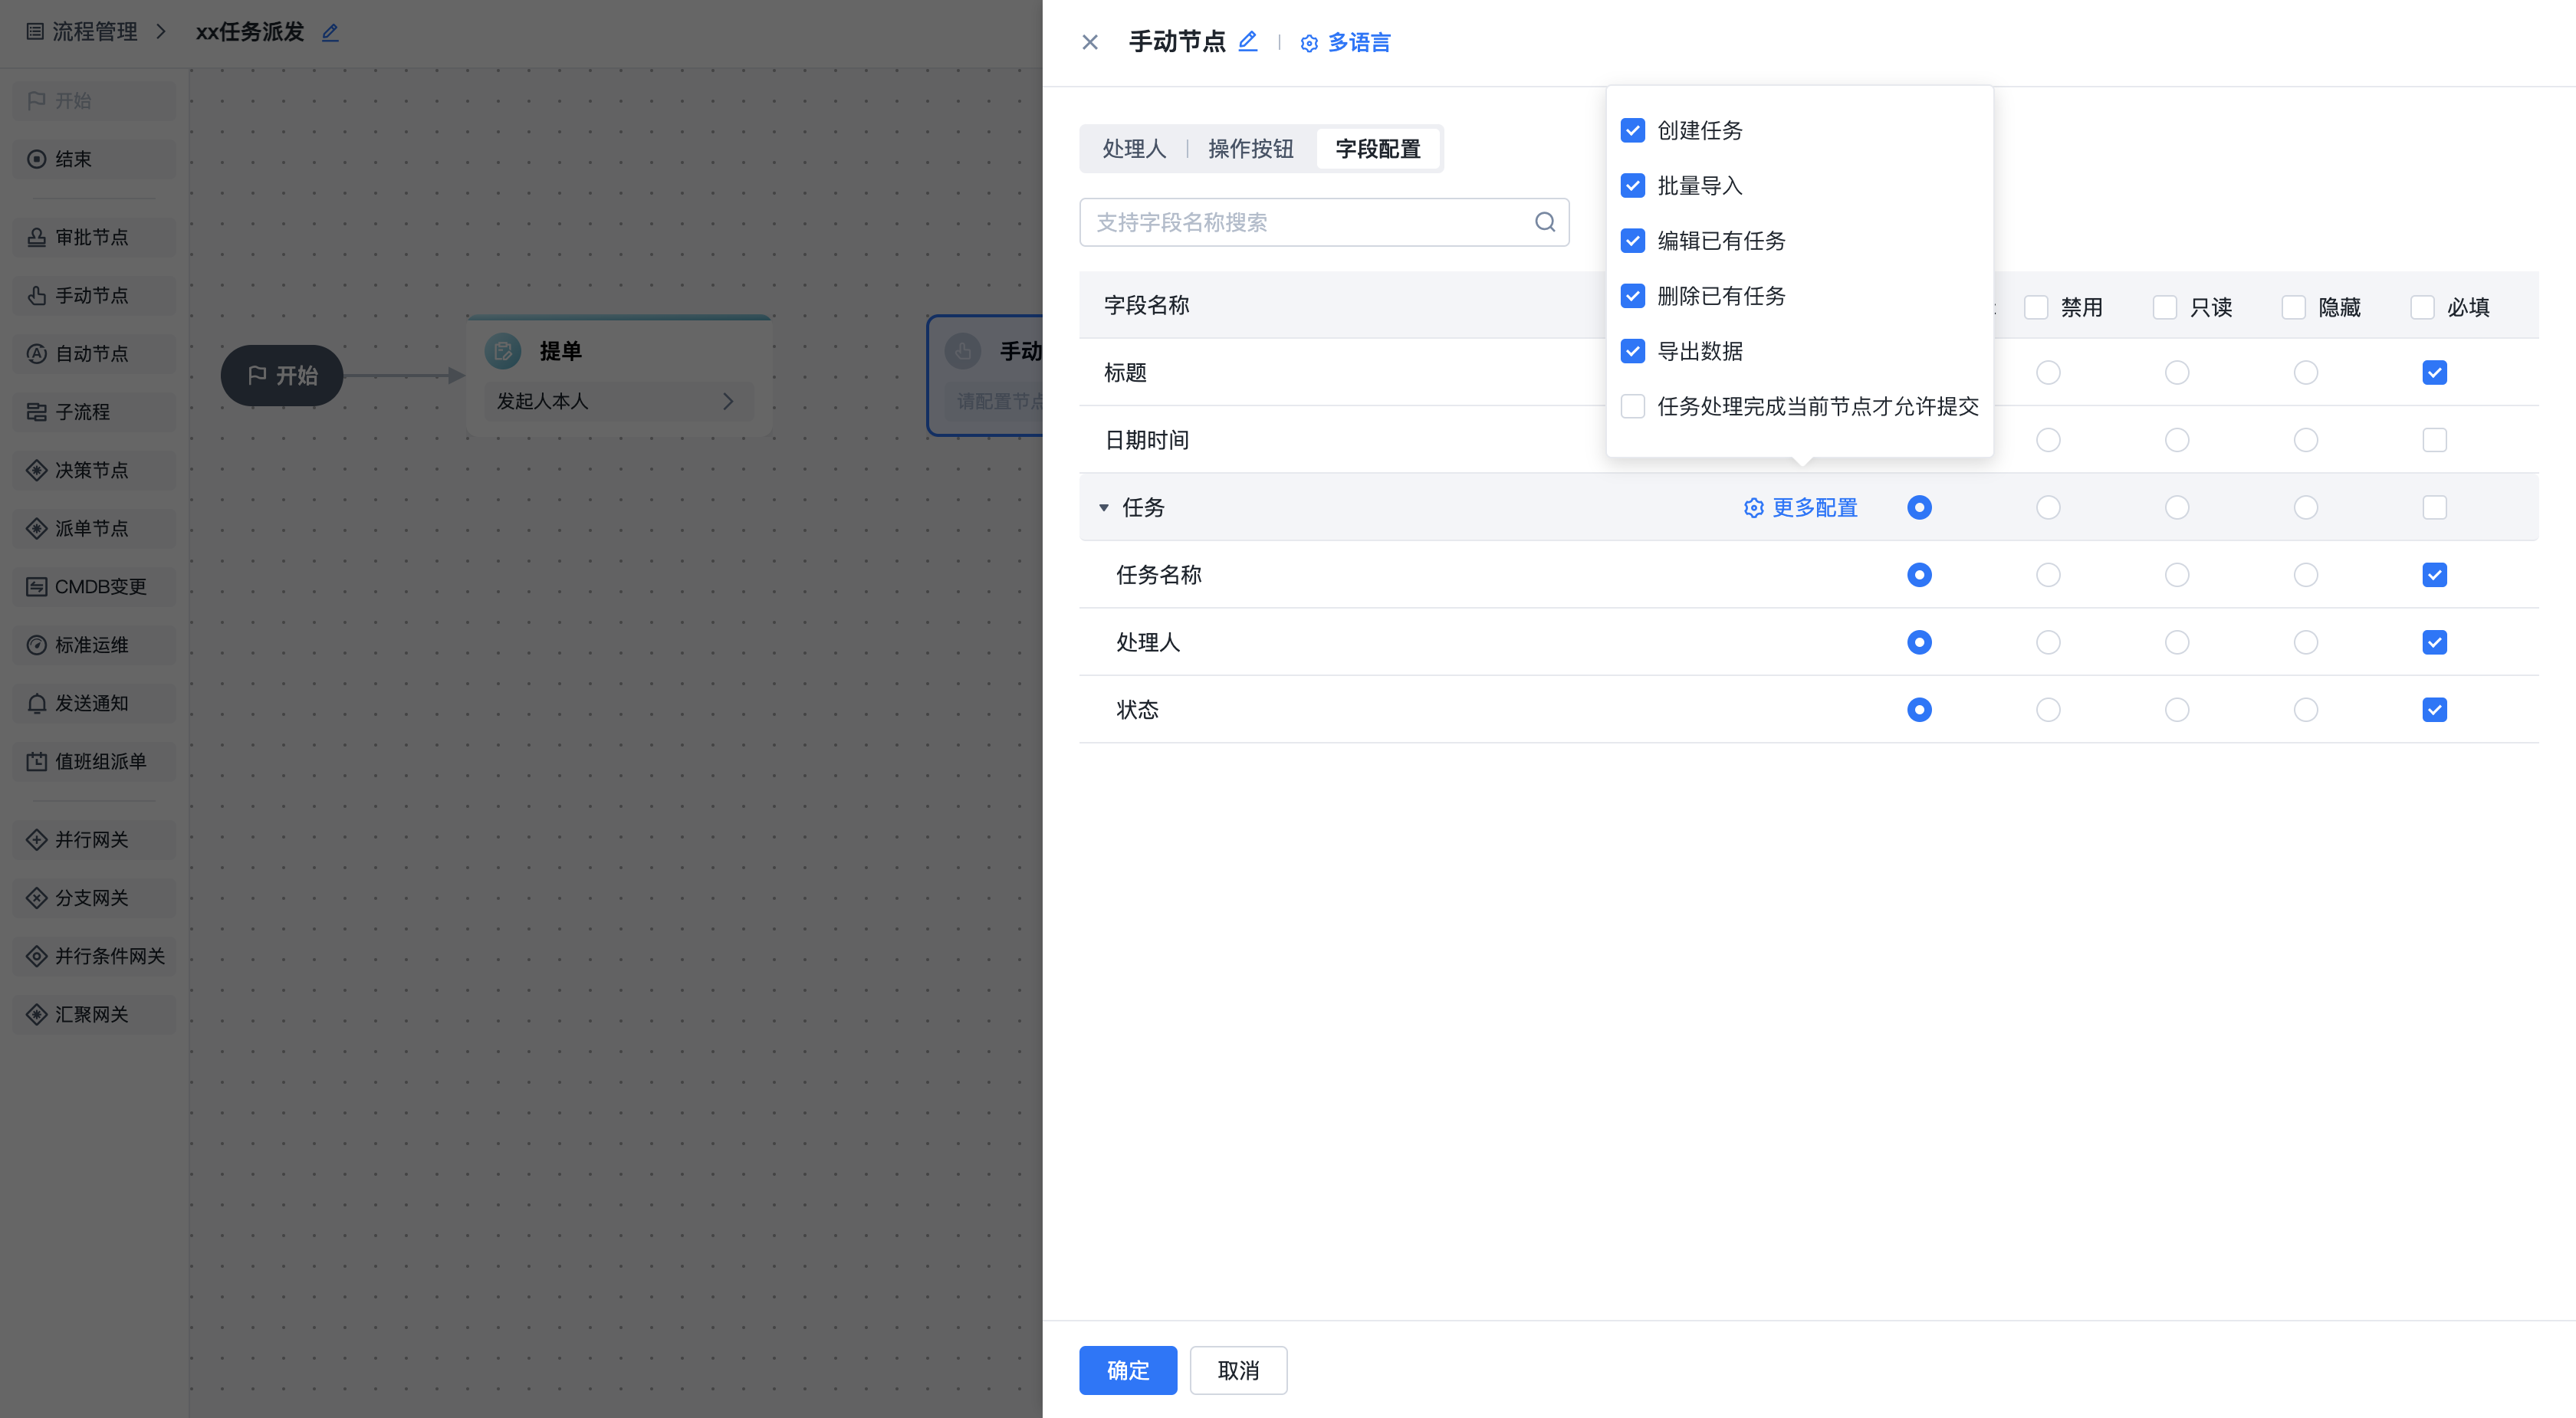
- In workflow nodes, you can configure the state of each field in the task field for each node, and select whether the node supports related operations:
- Create Task: When checked, new tasks can be created.
- Batch Import: When checked, tasks can be batch imported via Excel.
- Edit Existing Tasks: When checked, information in current tasks can be edited.
- Delete Existing Tasks: When checked, existing tasks can be deleted.
- All tasks must be completed before the current node can be submitted: When checked, all tasks in the task field must be completed (i.e., not in to-do status) before the current node can be submitted and the workflow can continue.
Using the Task Field:
- Creating Tasks
Click the "Create Task" button in the upper left corner of the task field to create a task. You need to click the node's Submit button for the task creation to take effect.
- Processing Tasks
-- Task Assignee View
Task assignees can see the ticket but can only process their own tasks. They cannot modify other information in the ticket.
-- Node Assignee View
Node assignees can see the full task list and directly edit task information in the list.

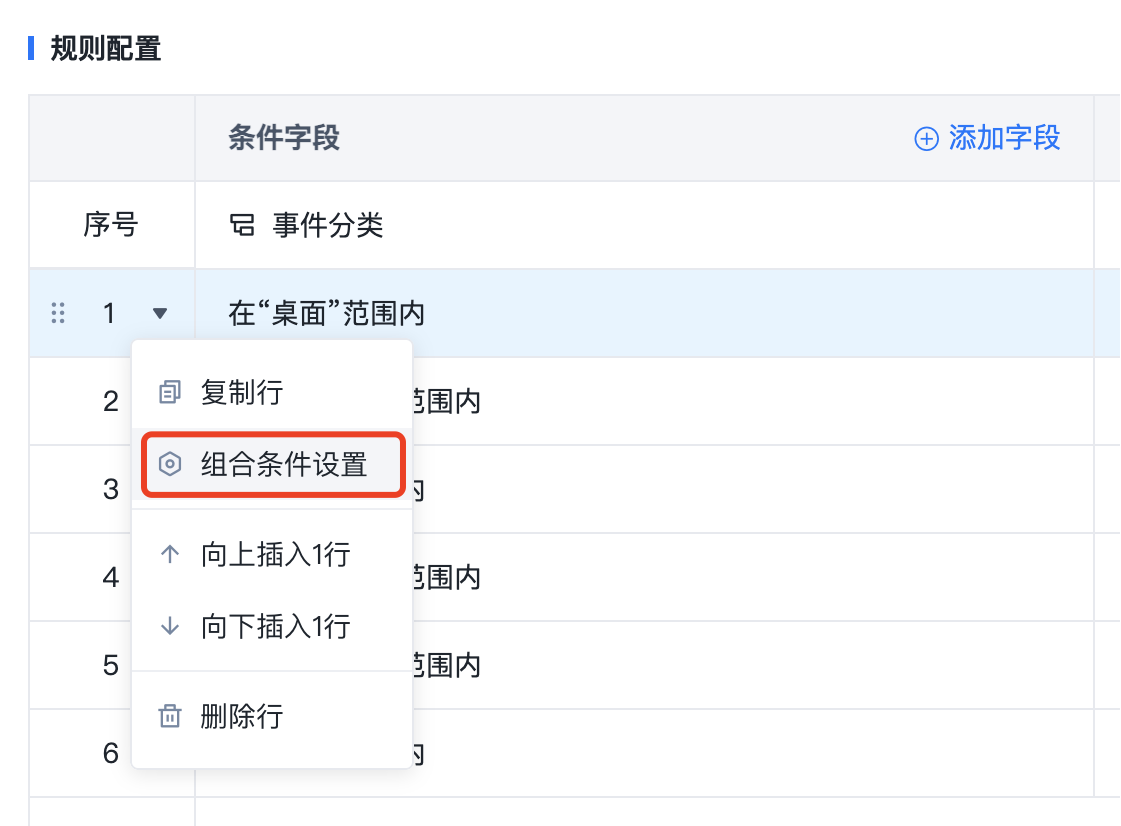
2.2.1.2.4. UI Rule Linkage Settings
UI rule linkage refers to setting field matching conditions (equals, not equals, contains, does not contain, etc.) to trigger changes in other fields' state properties (hidden, editable, read-only, required), thereby achieving dynamic form field linkage. For example, to configure that when "Incident Resolved" = "No", the "Unresolved Reason" becomes required, you can use this feature.
On the form design page, click "Form Settings" in the upper right corner of the canvas, then click the "Settings" button for UI Rule Linkage on the right side to open the UI rule linkage configuration page.

On the UI rule linkage configuration page, click the "Add Rule" button in the upper left corner to add a new rule configuration. Rule configuration consists of trigger conditions and execution actions, which can be configured to trigger specific actions when certain conditions are met based on actual business scenarios.

2.2.1.2.5. Data Linkage Settings
Data linkage means that the value of a certain field in the form changes dynamically based on changes to other fields or variables.
On the form design page, click "Form Settings" in the upper right corner of the canvas, then click the "Settings" button for Data Linkage on the right side to open the data linkage configuration page.

On the data linkage configuration page, click the "Add Rule" button in the upper left corner to add a new rule configuration.

There are three types of data linkage rule configurations:
- Data Table Linkage Configuration
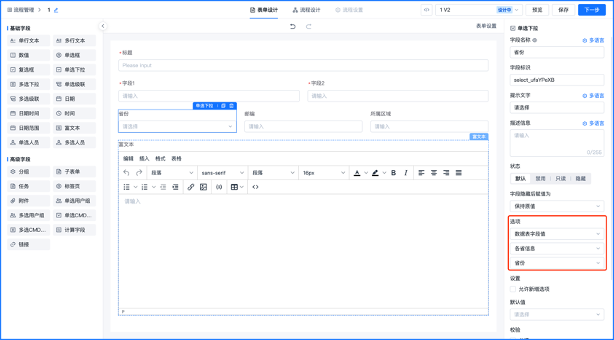
Applicable Scenario: When you need to automatically look up related information based on the values entered in certain form fields.
Scenario Example: In the following form, after selecting a province, the corresponding postal code and region should be automatically populated.

Configuration Steps:
Step 1: First, maintain a province information data table as follows (for specific data table creation steps, see the introduction to the Platform Management / Integration Center / Data Tables module):

Step 2: Go to the data linkage configuration page in the form designer and add a data linkage rule.
- Data Source: Select "Data Table" and choose the target data table.
- Condition Input: Set the mapping relationship for query conditions (Note: Only fields of the same type can be mapped. Therefore, you should first select the data table field, then select the input variable. Variables are filtered by type.)
- Data Table Field: Select the field in the data table to be used as the query condition.
- Input Variable: A variable related to the current ticket, including form fields and system variables. Select one to map with the data table query field (note that only fields of the same type can be mapped, so select the data table field first).
In this scenario, the query is based on the "Province" field, so the input variable is configured as the "Province" form field mapped to the "Province" field in the data table. (Note: Since the query uses keys for matching, the province data sources for both must come from the same data dictionary.)
- Trigger Linkage: Set which form fields should be queried from the data table and configure the mapping relationships.
In this scenario, "Postal Code" and "Region" need to be queried, so these two form fields are mapped to the corresponding fields in the data table.

2.Decision Table Linkage Configuration
Applicable Scenario: When a form field's value can be automatically derived based on certain business rule logic. For example, automatically determining the priority based on urgency and impact scope, or automatically assigning a handling group and handler based on incident classification.
Scenario Example: In the incident management workflow, after selecting an incident classification, the handling group and handler should be automatically assigned.
Configuration Steps:
Step 1: First, maintain an incident assignment strategy decision table as follows (for specific decision table creation steps, see the introduction to the Platform Management / Rule Management / Decision Tables module):

Step 2: Go to the data linkage configuration page in the form designer and add a data linkage rule.
- Data Source: Select "Decision Table" and choose the target decision table.
- The configuration for condition input and trigger linkage is the same as the data table linkage configuration. The specific configuration for this example is shown below:

3.Action Linkage Configuration
Applicable Scenario: When the data source for data linkage comes from an external system, you can integrate the corresponding API through the Action Management module and configure it via action linkage.
Scenario Example: In the incident management form, after selecting a reporter, the phone number and email can be automatically retrieved from the platform's user management API.

Configuration Steps:
Step 1: First, integrate the corresponding API in the Action Management module (for specific action creation steps, see the introduction to the Platform Management / Integration Center / Action Management module):

Step 2: Go to the data linkage configuration page in the form designer and add a data linkage rule.
- Data Source: Select "Action" and choose the target action.
- Condition Input: Configure the input parameter mapping for the action. You can provide custom input values or reference variables, including form fields or system variables.
- Trigger Linkage: Configuration is the same as data table linkage, except the mapping is from the API's return parameters.

2.2.1.6. Form Style Settings
Form style design allows configuration personnel to set the title alignment for the ticket form and provides custom styling capabilities for writing CSS to personalize field properties such as size and color.
On the form design page, click "Form Settings" in the upper right corner of the canvas. The right-side form settings panel shows title alignment and custom style settings.

1.Title Alignment Settings
Title alignment offers three options: top alignment, left alignment, and right alignment. The effects are as follows:
- Top alignment
- Left alignment

- Right alignment

2.Custom Style Settings
- Configuring Styles
Click "Edit Custom Styles" to add styles.

Custom style settings are written in CSS. The system automatically extracts the class names you write and makes them available for selection. Style priority depends on the written CSS code.

- Applying Styles
Select a configured style in the "Custom Class" option under form settings to apply it to the entire form. Set a "Custom Class" in a specific field's property configuration to apply it to a single field.
The system automatically extracts the class names configured in the form style sheet for selection.

2.2.1.2.7. Form Validation Settings
When designing forms, it is often necessary to validate user-entered data. In addition to basic validation settings available in individual field configurations (such as required, numeric range, time range, character count, format/regex, etc.), the product provides a dedicated form validation module that supports more flexible combined field condition validation and external system integration validation, ensuring data accuracy and completeness.
On the form design page, click "Form Settings" in the upper right corner of the canvas, then click the "Settings" button for Form Validation on the right side to open the form validation configuration page.
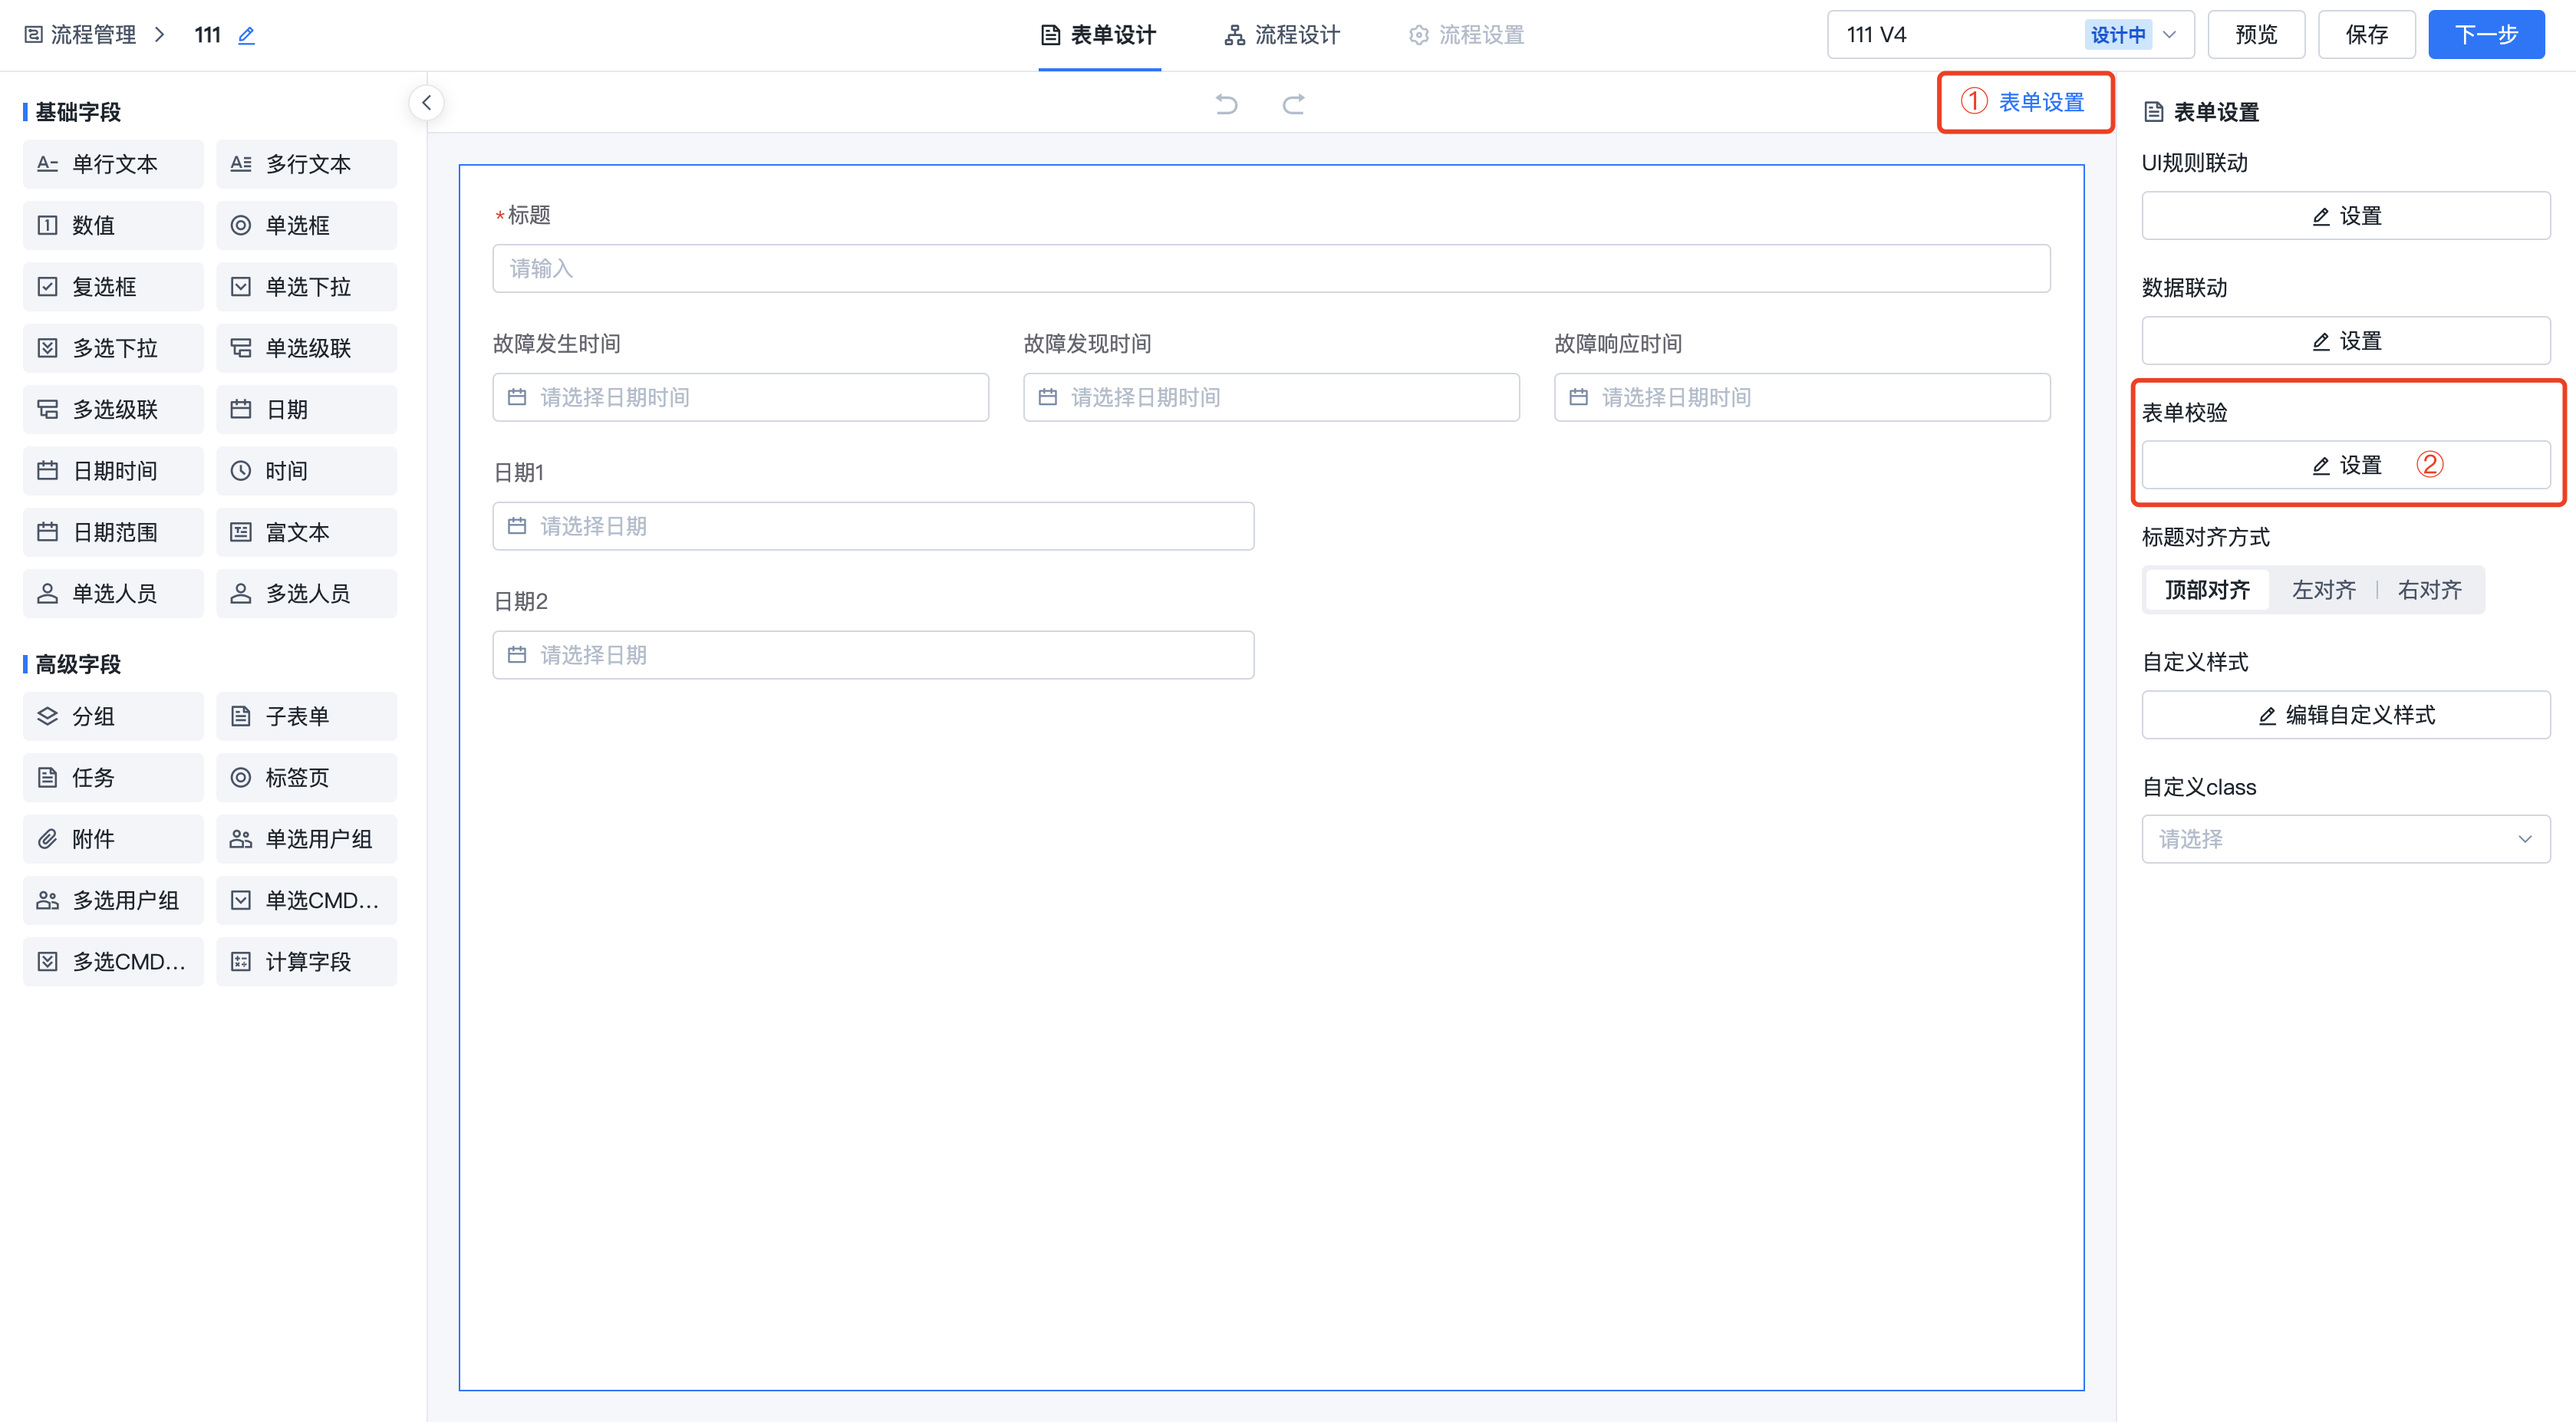
On the form validation configuration page, click the "Add Rule" button in the upper left corner to add a new rule configuration.
When validation fails, you can choose to either block submission or only show a prompt:
- Block Submission: The form cannot be submitted.
- Prompt Only: A warning is shown indicating the rule is not met, but the form can still be submitted.

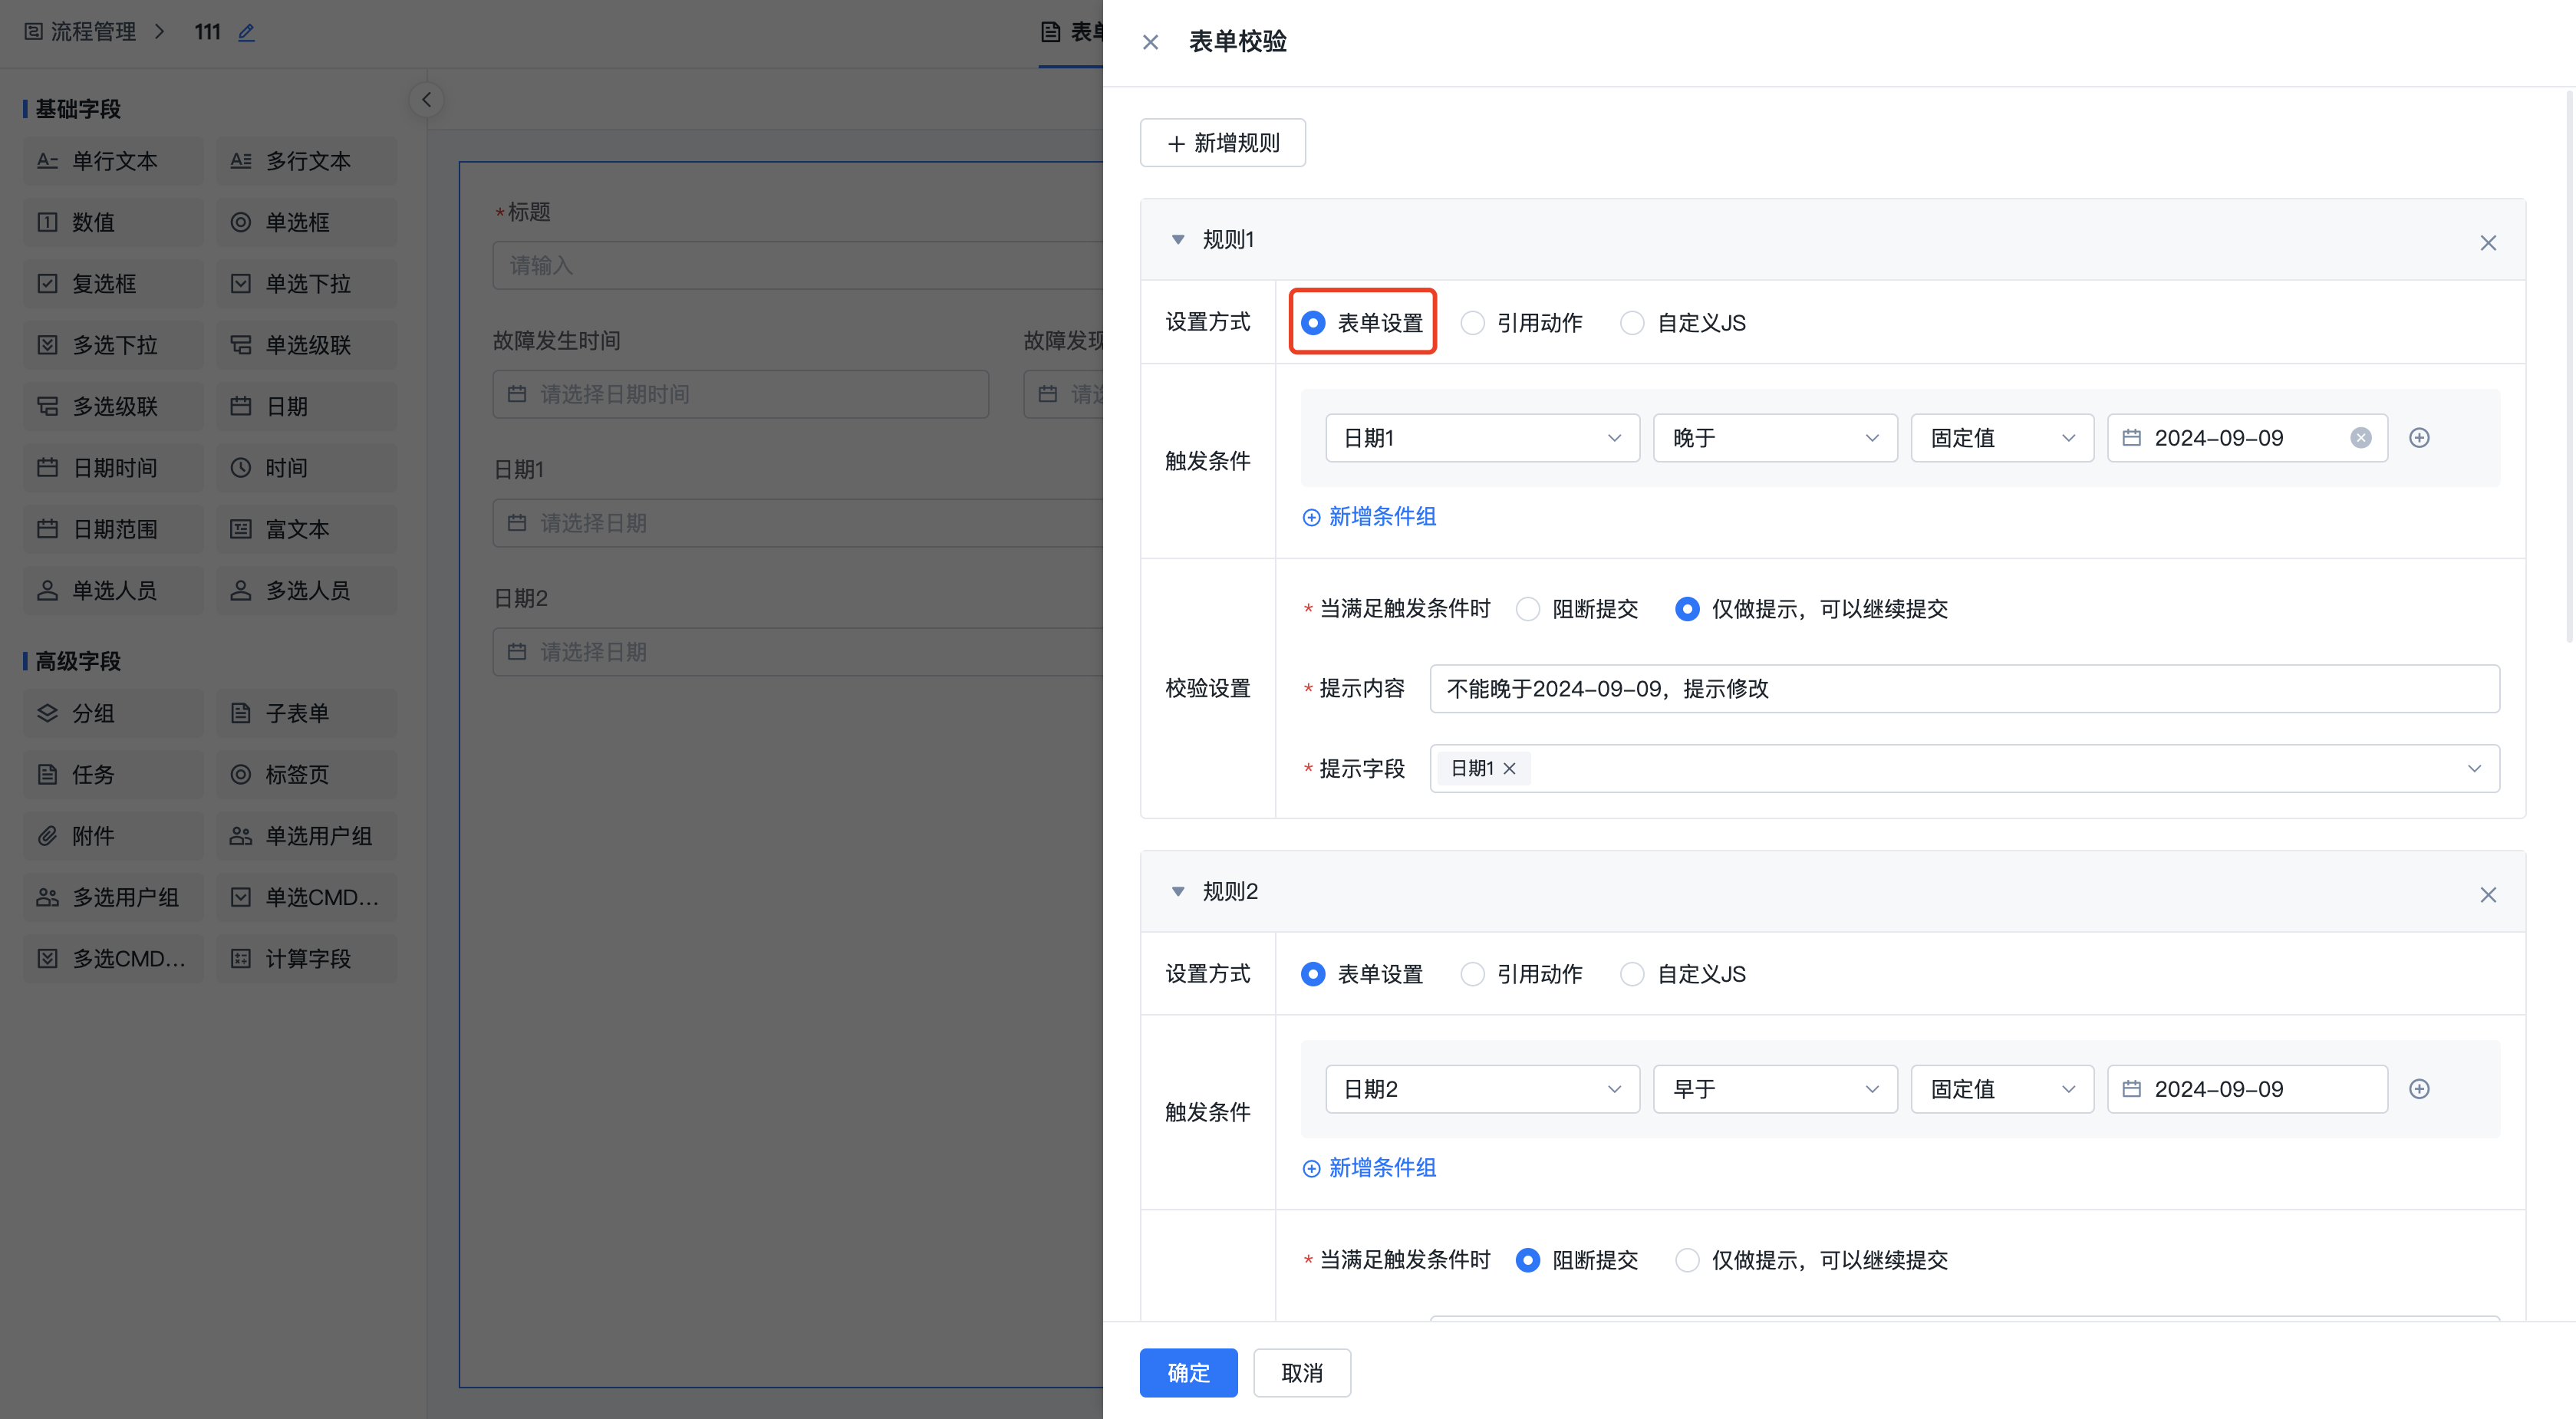
Form validation configuration supports three methods:
1.Form Settings
The form settings method uses rule condition configuration to set combined condition validation across multiple fields or system variables: for example, when "Field 1 contains xx" AND "Field 2 equals xx", a validation prompt is triggered.
Trigger Conditions:
Configure the conditions that trigger validation prompts through rule configuration.
Validation Settings:
- When trigger conditions are met:
- Block Submission: The form cannot be submitted.
- Prompt Only: Only shows a warning, but the form can still be submitted.
- Prompt Content: Set the prompt message text.
- Prompt Field: Select which field to show the prompt on.
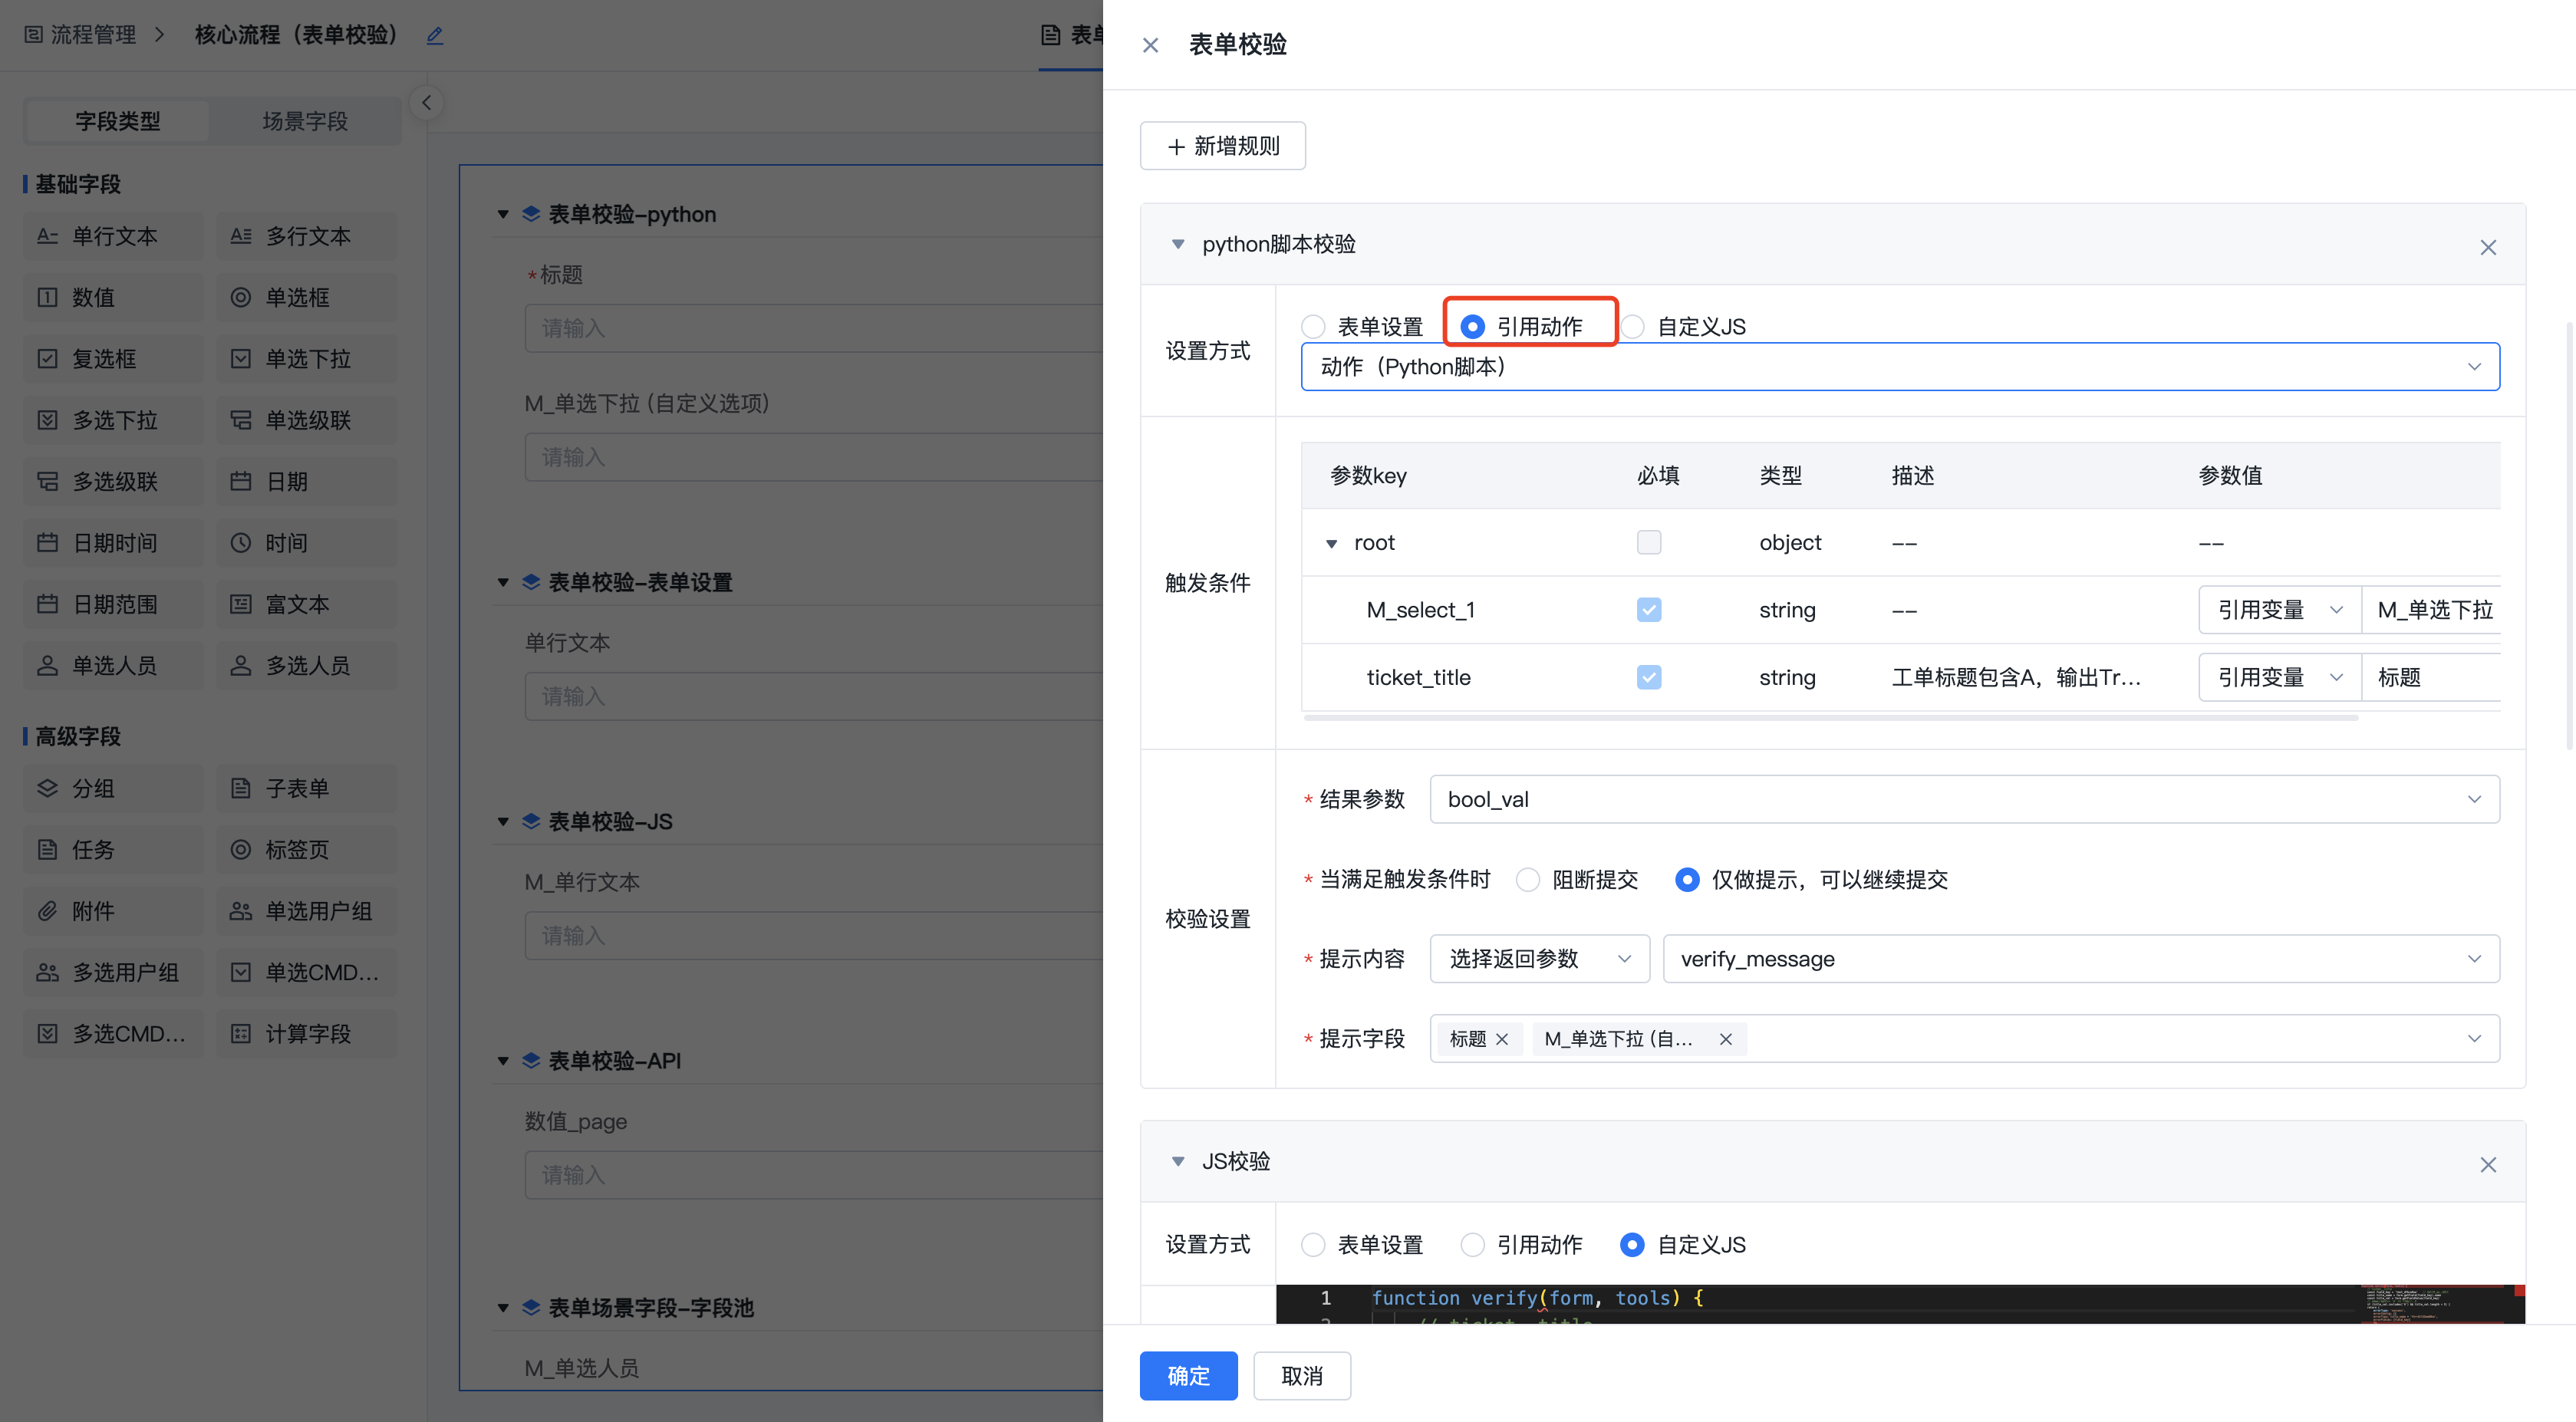
2.Reference Action
Use cases for action-based validation include:
-
Scenarios requiring joint validation with external systems: such as duplicate checking, existence verification, correctness validation, etc.
-
Satisfying complex validation scenarios through API calls.
Input Parameters:
After selecting a specific action, configure the input parameters. You can enter values directly or reference variables.
Validation Settings:
- Result Parameter: Select a return parameter as the validation result. The return values for pass and fail must be: TRUE (pass), FALSE (fail). The selectable parameter type is Boolean.
Note: If the return value is empty, it is treated as a failure. If the return value is any other value, it is treated as a pass.
- When trigger conditions are met:
- Block Submission: The form cannot be submitted.
- Prompt Only: Only shows a warning, but the form can still be submitted.
- Prompt Content: Set the prompt message text. You can enter it directly here or select a return parameter's value as the prompt content. Only string-type parameters can be selected.
- Prompt Field: Select which field to show the prompt on.
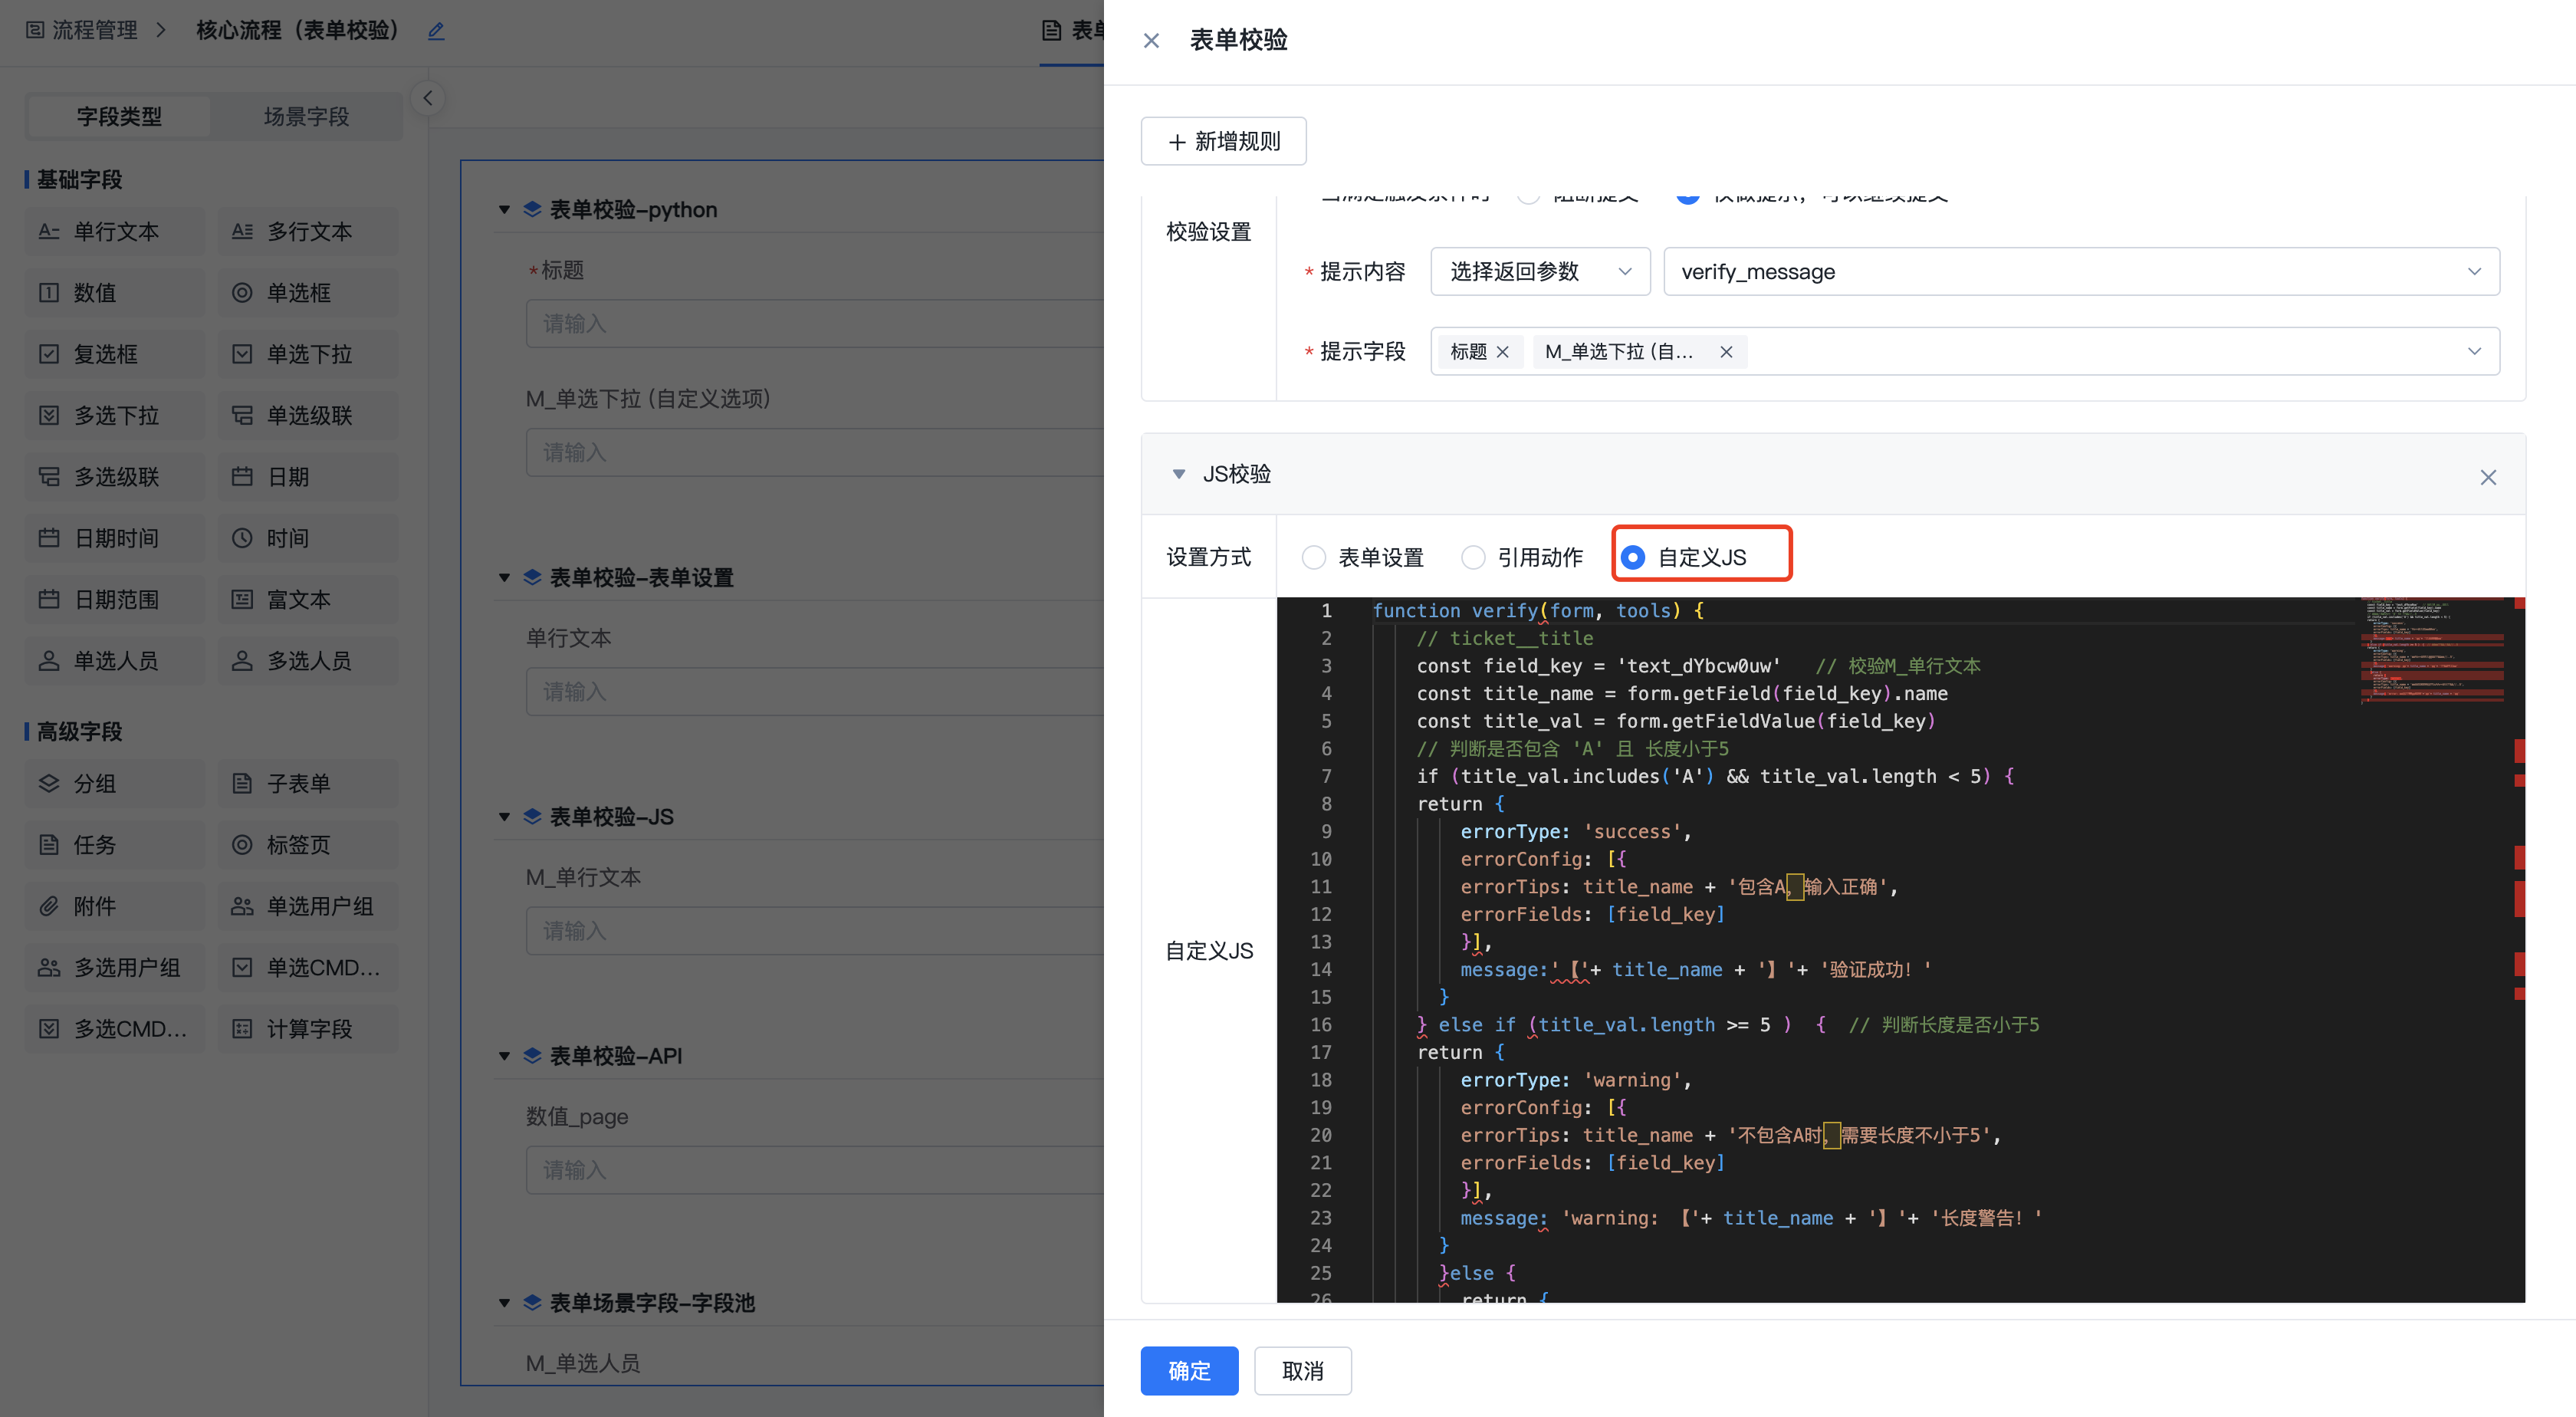
3.Custom JS
When using custom JS for validation settings, whether the validation blocks submission, the prompt content, and the prompt field are all configured within the JS script.
Detailed specifications to be supplemented.
2.2.1.2.8. Form Preview
Click the "Preview" button in the upper right to preview the currently designed form and check for configuration issues.

2.2.1.3. Workflow Design
After form design is complete, proceed to the workflow design step.
2.2.1.3.1. Workflow Design Overview
The product provides a visual workflow designer for arranging workflows by dragging and dropping nodes and gateways. After arranging the workflow, you can configure node assignees, operation buttons, and field states. The workflow designer layout is described below:
- Node Types: Currently supported types include Start/End Event, Manual Node, Approval Node, Automatic Node, Sub-process, Exclusive Gateway, Parallel Gateway, Inclusive Gateway, Converging Gateway, and Decision Node.
- Workflow Canvas: Use this area to arrange the workflow diagram and configure node assignees, operation buttons, field states, etc.
- Canvas Toolbar: Supports workflow diagram zoom in, zoom out, full screen, undo, and redo.

General steps for workflow design:
- Add nodes to the workflow canvas
- Arrange workflow connections in the canvas
- Configure node information: assignees, buttons, field states, conditional gateway conditions, etc. (different node types have different configuration items)
2.2.1.3.2. Workflow Node Introduction
| Node Name | Description |
| Start Event | The start event that initiates the workflow. A workflow diagram must contain a start event. There is only one start event per workflow. |
| End Event | The end event of the workflow. A workflow diagram must contain an end event. Multiple end events can be configured for different transition paths in a workflow. |
| Manual Node | A task node in the workflow that requires manual processing. You can configure assignees, supported operations, and field states. |
| Approval Node | A node with approval properties, with two possible outcomes: Approve and Reject. You can configure approvers, supported operations, and field states. |
| Automatic Node | An automatic node is used for tasks that do not require manual intervention and can be executed automatically by the system. Typically used for predefined, repetitive, or non-decision-requiring tasks, such as automated interaction between systems. |
| Sub-process | When a workflow is complex, it can be split into multiple sub-processes for clearer management. |
| Dispatch Node | The dispatch node is suitable for scenarios where tickets are dispatched before processing. When the workflow reaches the dispatch node, the dispatcher assigns the ticket, and then the assignee processes and submits it. |
| Standard Operations Node | The Standard Operations node integrates with the platform's Standard Operations product, allowing the execution of Standard Operations tasks when the workflow reaches a specific node. |
| Send Notification | The Send Notification node is used to configure notifications to relevant personnel at a specific stage. |
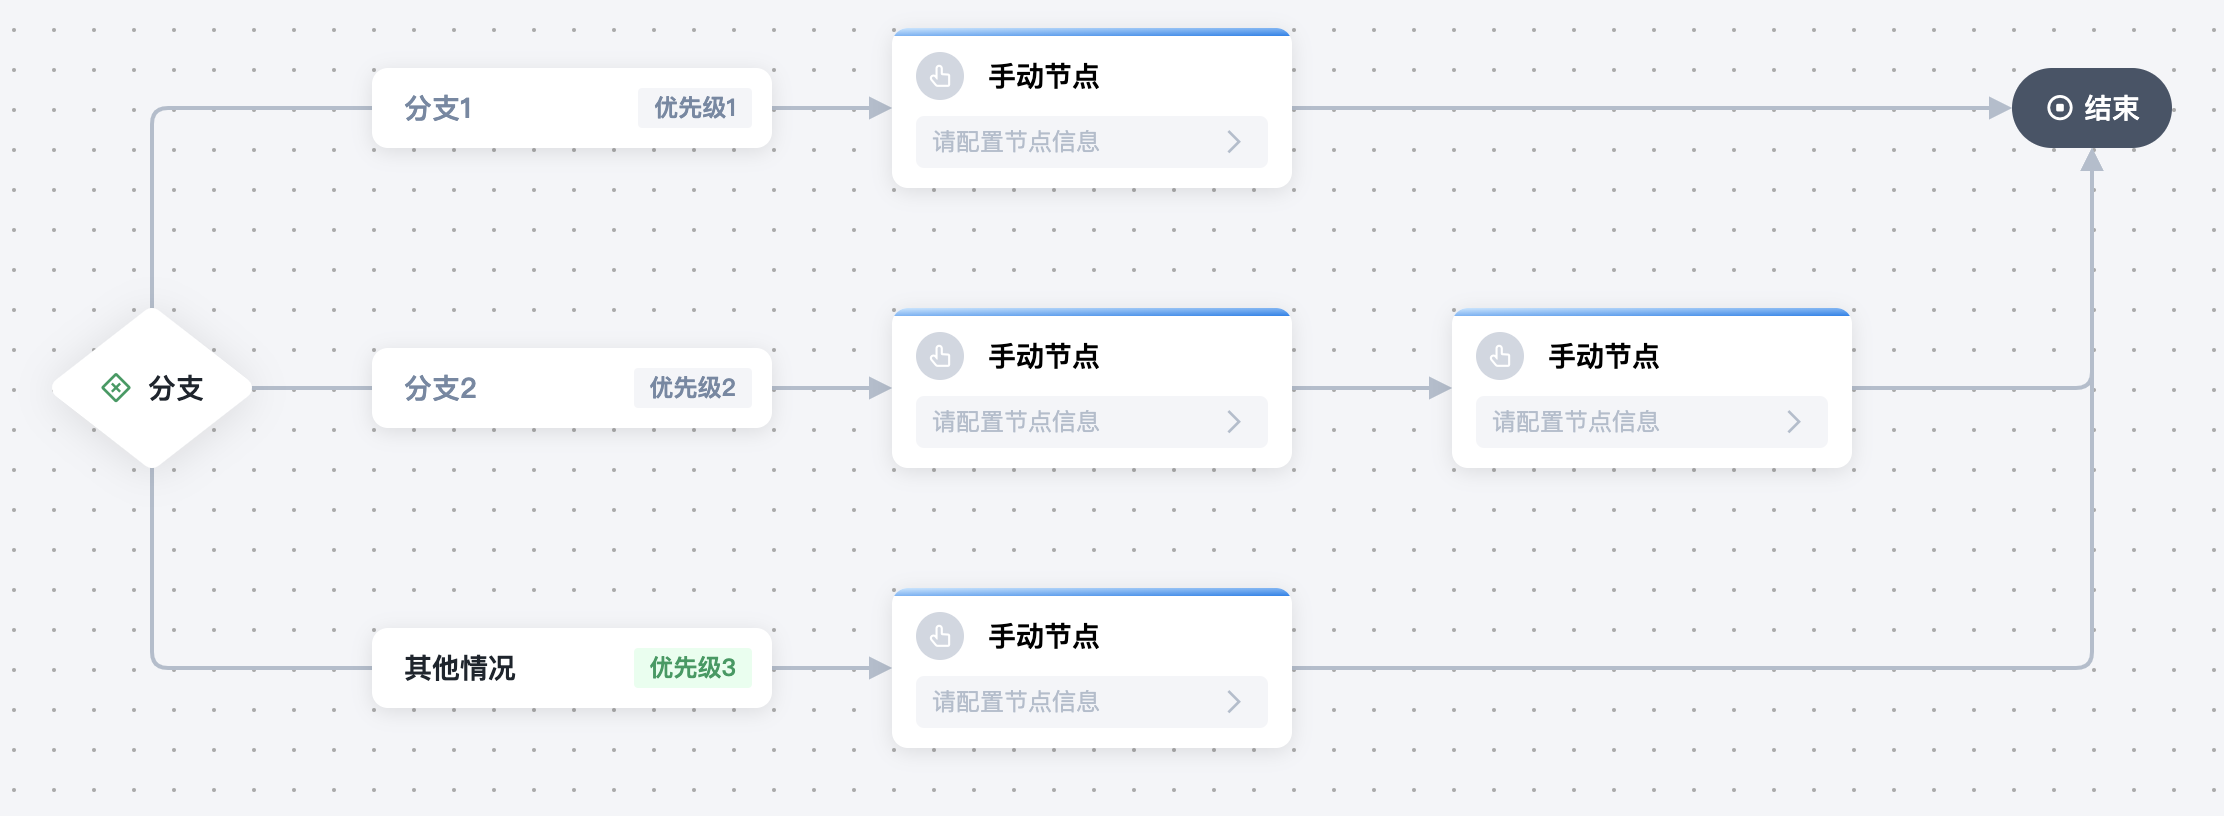
| Exclusive Gateway | Allows the workflow to choose between different paths based on certain conditions or decision points. An exclusive gateway executes only one path. When multiple path conditions are met, the branch with the highest priority is taken. |
| Parallel Gateway | Allows the workflow to execute on multiple paths simultaneously. All paths start at the same time, and the workflow waits for all paths to complete before continuing. Parallel gateways must be used with converging gateways. |
| Inclusive Gateway | Unlike the parallel gateway, each path in an inclusive gateway has condition configuration and is only reached when the condition is met. Unlike the exclusive gateway, when multiple path conditions are met in an inclusive gateway, all qualifying paths execute simultaneously. |
| Converging Gateway | Used with parallel and inclusive gateways. Add a converging gateway where parallel paths complete. |
| Decision Node | The decision node works with decision tables and is typically used for predefined rules to automate certain scenarios and improve ticket processing efficiency. For example, using a decision table to predefine the assignees for different incident classifications and using the decision node in the workflow to reference the decision table and output the specific assignee value. |
Operation Introduction
| Operation | Description |
| Submit | Submits the current form information (manual nodes only). The workflow continues to the next step after submission. When the form is confirmed to be complete, submit to advance the workflow. |
| Update | Updates the current form information. Unlike Submit, it only updates the form without advancing the workflow. When an assignee has only partially filled in the form and wants to share the progress without advancing to the next node, they can click Update. |
| Save | Saves the content filled in the current task for later completion. Saved content is not officially updated and is only visible to users with processing permissions. |
| Claim | When a ticket is assigned to a group of users, a user can proactively claim the current task. For nodes with the claim feature enabled, the ticket must be claimed before processing. |
| Transfer | When the ticket assignee cannot process the ticket personally, they can transfer it to another person. |
| Return | When the current node assignee disagrees with how a previous node was handled, they can return the ticket to the previous node assignee for reprocessing. |
| Approval | The approval buttons for approval nodes are "Approve" and "Reject". Both actions submit the current form information, and the workflow continues afterward. |
| Countersign | Adds additional approvers to the current approval node (approval nodes only). When the current approval task requires input from other members, you can use the countersign feature to add approvers. It supports pre-countersign and post-countersign. Pre-countersign: The countersigned person must approve before I can approve. Post-countersign: I approve first, then the countersigned person approves. |
| Retry/Manual Execution | When an automatic node's task fails, you can click Retry or Manual Execution. Retry: Triggers the automatic task again. Manual Execution: When automatic execution consistently fails, you can use manual execution to fill in the output parameters and submit manually. |
| Withdraw | When the assignee of the previous node needs to reprocess their task, they can withdraw. Withdrawal is only possible if the next node has not yet been processed. If the next node has already been processed, withdrawal is not possible. |
| Suspend/Resume | Suspend: When a ticket temporarily does not need processing, you can choose to suspend it. Resume: When the current ticket needs to continue processing, click Resume. |
| Close | If the ticket content has been resolved in advance and does not need to follow the established workflow, you can close the ticket early. After closing, the ticket ends and will not proceed further. |
| Terminate | If the ticket content does not need to be completed for some reason, you can terminate it. After termination, the ticket ends and will not proceed further. |
| Reopen | After a ticket reaches the end state, if it needs to be re-processed for some reason, you can reopen it. After reopening, the ticket restarts from after the submission node. |
| Custom Button (Related Ticket) | Typically used for scenarios like converting an incident to a problem or an incident to a change. When you need to create a problem ticket from the current incident ticket and automatically populate relevant information, you can configure a related ticket button under the workflow's custom buttons. |
Start Event & Submission Node
The start event initiates the workflow. A workflow diagram must contain a start event. There is only one start event per workflow.
The initial workflow design automatically includes a start event with a built-in submission node that cannot be deleted. Click the submission node to configure the node's operation buttons and fields.

1.Operation Button Configuration
Click the submission node, select the "Operation Buttons" tab, and configure the operation buttons. Operations become visible at the node only after they are enabled.

Operation descriptions:
| Operation | Description |
| Submit | The ticket submission operation. After submission, the workflow proceeds to the next node. |
| Save Draft | When the form is not fully completed, click "Save Draft" to store the current content in the drafts folder. You can later open the corresponding ticket from the "My Drafts" list, complete the form, and submit it. |
| Save Template | Saves the current form information as a template. The next time you submit a ticket using the same workflow, you can select "Use Template" to quickly fill in the form. |
2.Field Configuration
Click the submission node, select the "Field Configuration" tab, and configure the form field states for this node. See the Node Field State Configuration section for details.

End Event:
The end event of the workflow. A workflow diagram must contain an end event. Multiple end events can be configured for different transition paths. No additional configuration is needed for end events.
Field State After Ticket Closure:
After a ticket ends, all fields are displayed in read-only mode by default, but configured form UI rule linkages will still take effect. For example, if configured to hide "Unresolved Reason" when the incident is resolved, and the ticket reaches the end state with "Incident Resolved" set to "Yes", the "Unresolved Reason" field will not be displayed.

Manual Node:
A task node in the workflow that requires manual processing. You can configure assignees, supported operations, and field states.
1.Assignee Configuration
Click the node card, select the "Assignee" tab, and configure the node's assignees. Three methods are supported: specify persons, specify user groups, and expressions. You can also reference form fields, system variables, and node variables as assignees.
Multi-person processing has two modes: Parallel and Collaborative:
1. When specifying persons:
- Collaborative: Only one user needs to process.
- Parallel: All users must process simultaneously.
Assuming variables are referenced and two person variables are selected, where Variable A has users 1 and 2, and Variable B has users 3 and 4:
- Collaborative: Any one of users 1/2/3/4 can process.
- Parallel: All of users 1/2/3/4 must process.
2. When specifying user groups:
- Collaborative: Any user from any user group can process.
- Parallel: All user groups must process. Within each user group, only one person needs to process. Processing occurs simultaneously.
Assuming variables are referenced and two user group variables are selected, where Variable A has user groups 1 and 2, and Variable B has user groups 3 and 4:
- Collaborative: Any user from any of user groups 1/2/3/4 can process.
- Parallel: All user groups 1/2/3/4 must process. Within each user group, only one person needs to process. Processing occurs simultaneously.

2.Operation Button Configuration
Click the node card, select the "Operation Buttons" tab, and configure the operation buttons. Operations become visible at the node only after they are enabled.

Operation descriptions:
| Operation | Description |
| Submit | Submits the current form information (manual nodes only). The workflow continues to the next step after submission. When the form is confirmed to be complete, submit to advance the workflow. |
| Update | Updates the current form information. Unlike Submit, it only updates the form without advancing the workflow. When an assignee has only partially filled in the form and wants to share the progress without advancing to the next node, they can click Update. |
| Save | Saves the content filled in the current task for later completion. Saved content is not officially updated and is only visible to users with processing permissions. |
| Claim | When a ticket is assigned to a group of users, a user can proactively claim the current task. For nodes with the claim feature enabled, the ticket must be claimed before processing. The scope of users who can claim is the configured assignee scope. Before claiming, Submit, Save, Update, Return, and Suspend operations are not available. |
| Transfer | When the ticket assignee cannot process the ticket personally, they can transfer it to another person. Set Transfer Scope: Set the scope of users available for transfer. |
| Return | When the current node assignee disagrees with how a previous node was handled, they can return the ticket to the previous node assignee for reprocessing. Set Allowed Return Nodes: Set which nodes can be returned to (currently only the "All Previous Nodes" option is available). After Return Re-submit: Set how the workflow transitions after return and re-submission (currently only "Follow Workflow Lines" is implemented, meaning the workflow re-transitions step by step from the returned node along the workflow path). After Return Re-submit: Set how the workflow transitions after return and re-submission (currently only "Follow Workflow Lines" is implemented, meaning the workflow re-transitions step by step from the returned node along the workflow path). |
3.Field Configuration
Click the node card, select the "Field Configuration" tab, and configure the form field states for this node. See the Node Field State Configuration section for details.

Approval Node:
A node with approval properties, with two possible outcomes: Approve and Reject. You can configure approvers, supported operations, and field states.
1.Approver Configuration
Click the node card, select the "Approver" tab, and configure the node's approvers. Three methods are supported: specify persons, specify user groups, and expressions. You can also reference form fields, system variables, and node variables as approvers.

Multi-person approval mode descriptions:
1. When specifying persons:
Sequential Approval (approve in order): All approvers must approve in sequence. The current node transitions only after all approvers have completed their approval.
-- Node approval result is "Approved": All approvers click "Approve".
-- Node approval result is "Rejected": Any approver clicks "Reject".
Or-sign (one approver's approval is sufficient): The current node transitions as soon as one person has approved.
-- Node approval result is "Approved": One approver clicks "Approve".
-- Node approval result is "Rejected": One approver clicks "Reject".
Countersign (all approvers must approve): All approvers must approve, but not necessarily in order. The current node transitions only after all approvers have completed their approval.
-- Node approval result is "Approved": All approvers click "Approve".
-- Node approval result is "Rejected": Any approver clicks "Reject".
2. When specifying user groups:
Sequential Approval (approve in order): All user groups must approve (any user within each group can approve), in sequence. The current node transitions only after all user groups have completed their approval.
-- Node approval result is "Approved": All approvers click "Approve".
-- Node approval result is "Rejected": Any approver clicks "Reject".
Or-sign (one approver's approval is sufficient): The current node transitions as soon as one person has approved.
-- Node approval result is "Approved": One approver clicks "Approve".
-- Node approval result is "Rejected": One approver clicks "Reject".
Countersign (all approvers must approve): All user groups must approve (any user within each group can approve), but not necessarily in order. The current node transitions only after all user groups have completed their approval.
-- Node approval result is "Approved": All approvers click "Approve".
-- Node approval result is "Rejected": Any approver clicks "Reject".
2.Operation Button Configuration
Click the node card, select the "Operation Buttons" tab, and configure the operation buttons. Operations become visible at the node only after they are enabled.

Operation descriptions:
| Operation | Description |
| Approve | The individual approval result. Both Approve and Reject submit the current form information, and the workflow continues afterward. |
| Reject | The individual approval result. Both Approve and Reject submit the current form information, and the workflow continues afterward. |
| Update | Updates the current form information. Unlike Submit, it only updates the form without advancing the workflow. Required fields are not validated on update. When an assignee has only partially filled in the form and wants to share the progress without advancing to the next node, they can click Update. |
| Save | Saves the content filled in the current task for later completion. Saved content is not officially updated and is only visible to users with processing permissions. |
| Transfer | When the ticket assignee cannot process the ticket personally, they can transfer it to another person. |
| Return | When the current node assignee disagrees with how a previous node was handled, they can return the ticket to the previous node assignee for reprocessing. |
| Countersign | Adds additional approvers to the current approval node (approval nodes only). When the current approval task requires input from other members, you can use the countersign feature. It supports pre-countersign and post-countersign. Countersign Position - Pre-countersign: The countersigned person must approve before I can approve. Post-countersign: I approve first, then the countersigned person approves. Countersign Approver Scope: The scope of users available for countersigning. 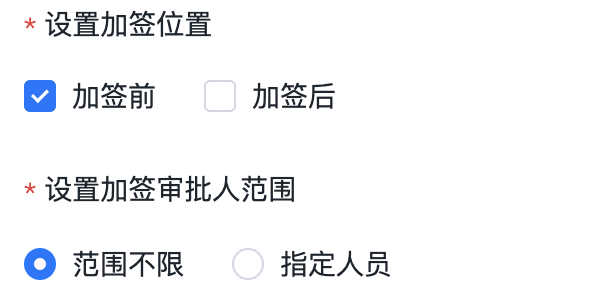 |
3.Field Configuration
Click the node card, select the "Field Configuration" tab, and configure the form field states for this node. See the Node Field State Configuration section for details.

Automatic Node:
An automatic node is used for tasks that do not require manual intervention and can be executed automatically by the system. Typically used for predefined, repetitive, or non-decision-requiring tasks, such as automated interaction between systems.
Click the node card to configure the automatic node:
- Emergency Assignee: When the automatic node fails, the emergency assignee can retry or manually process it.
- Select Action: The available actions here are from Platform Management / Integration Center / Action Management.
- Input Parameters: After selecting an action, configure the related input parameters. You can reference form fields, system and node variables.
- Output Parameters: Output parameters do not need configuration. If you want to reference output parameters as variables later, check the "Reference as Variable" option for the corresponding parameter.

- Custom Variables:
Custom variables are used to further process the output parameters of an action, flexibly adapting to different scenarios' variable requirements.
For example:
-
The API output is a list ["admin", "18", "xxxx"], which can be processed into a string: admin,18,xxx
-
Performing calculations on parameters: [10, 12] -> 22
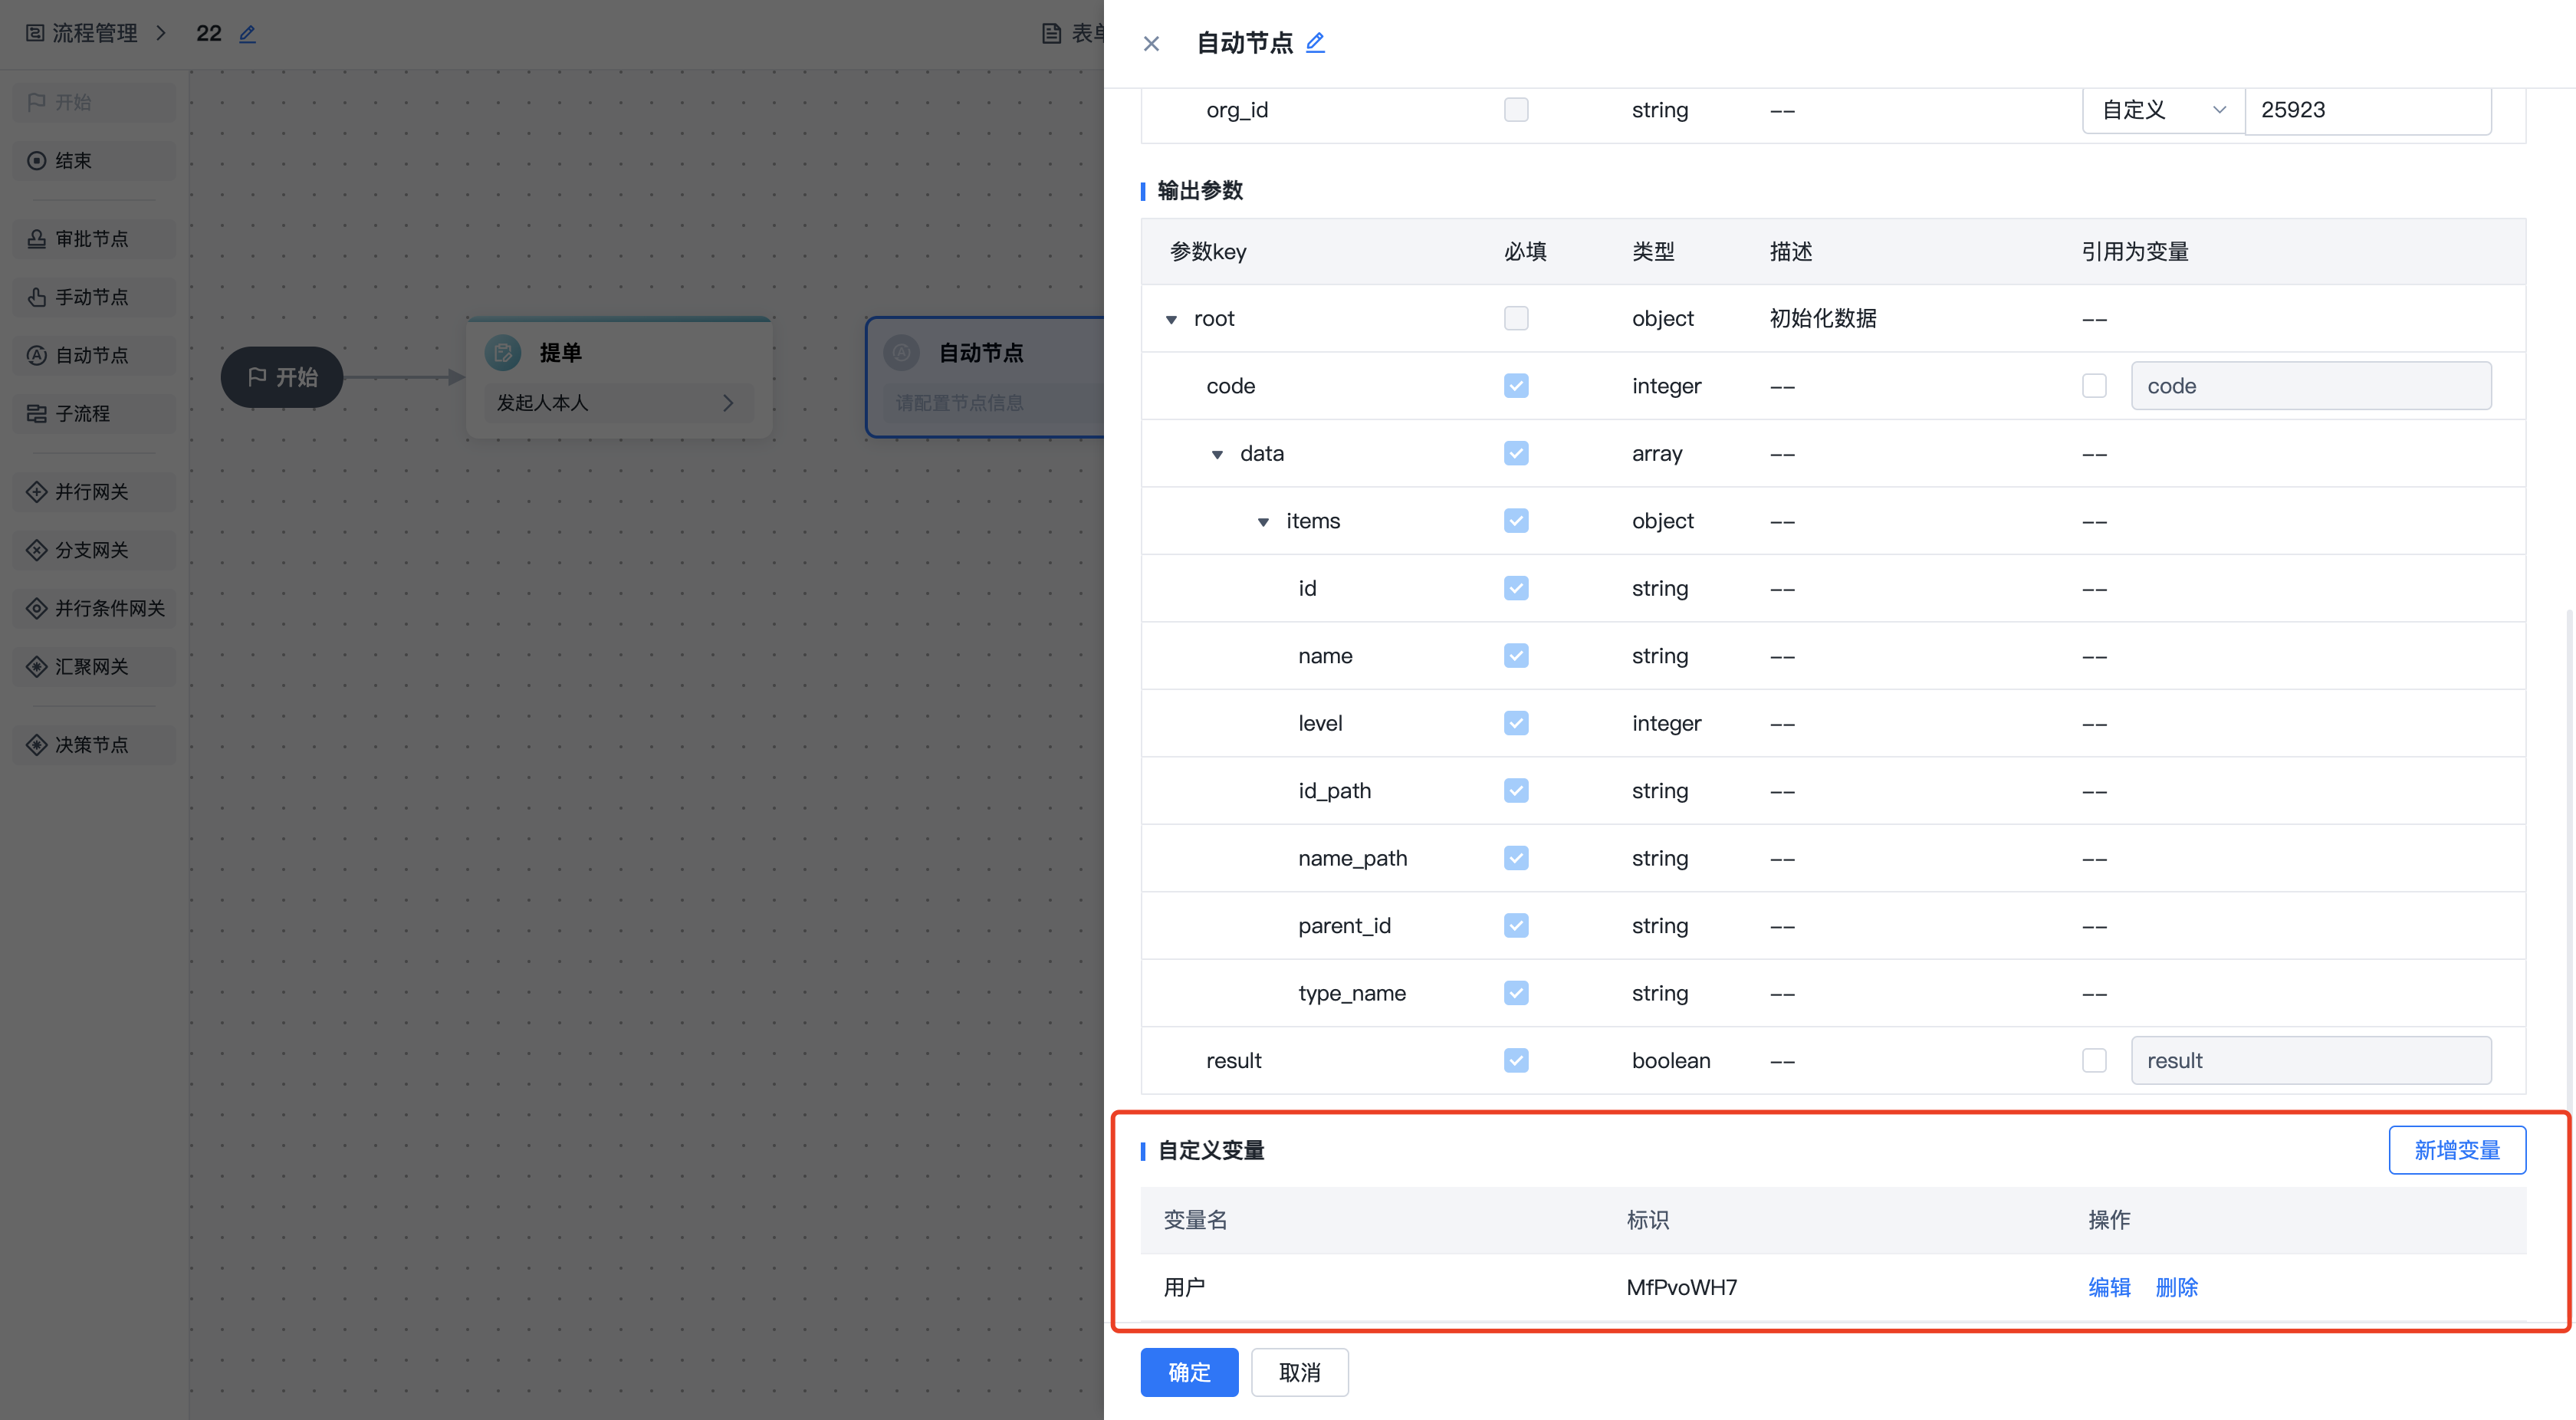
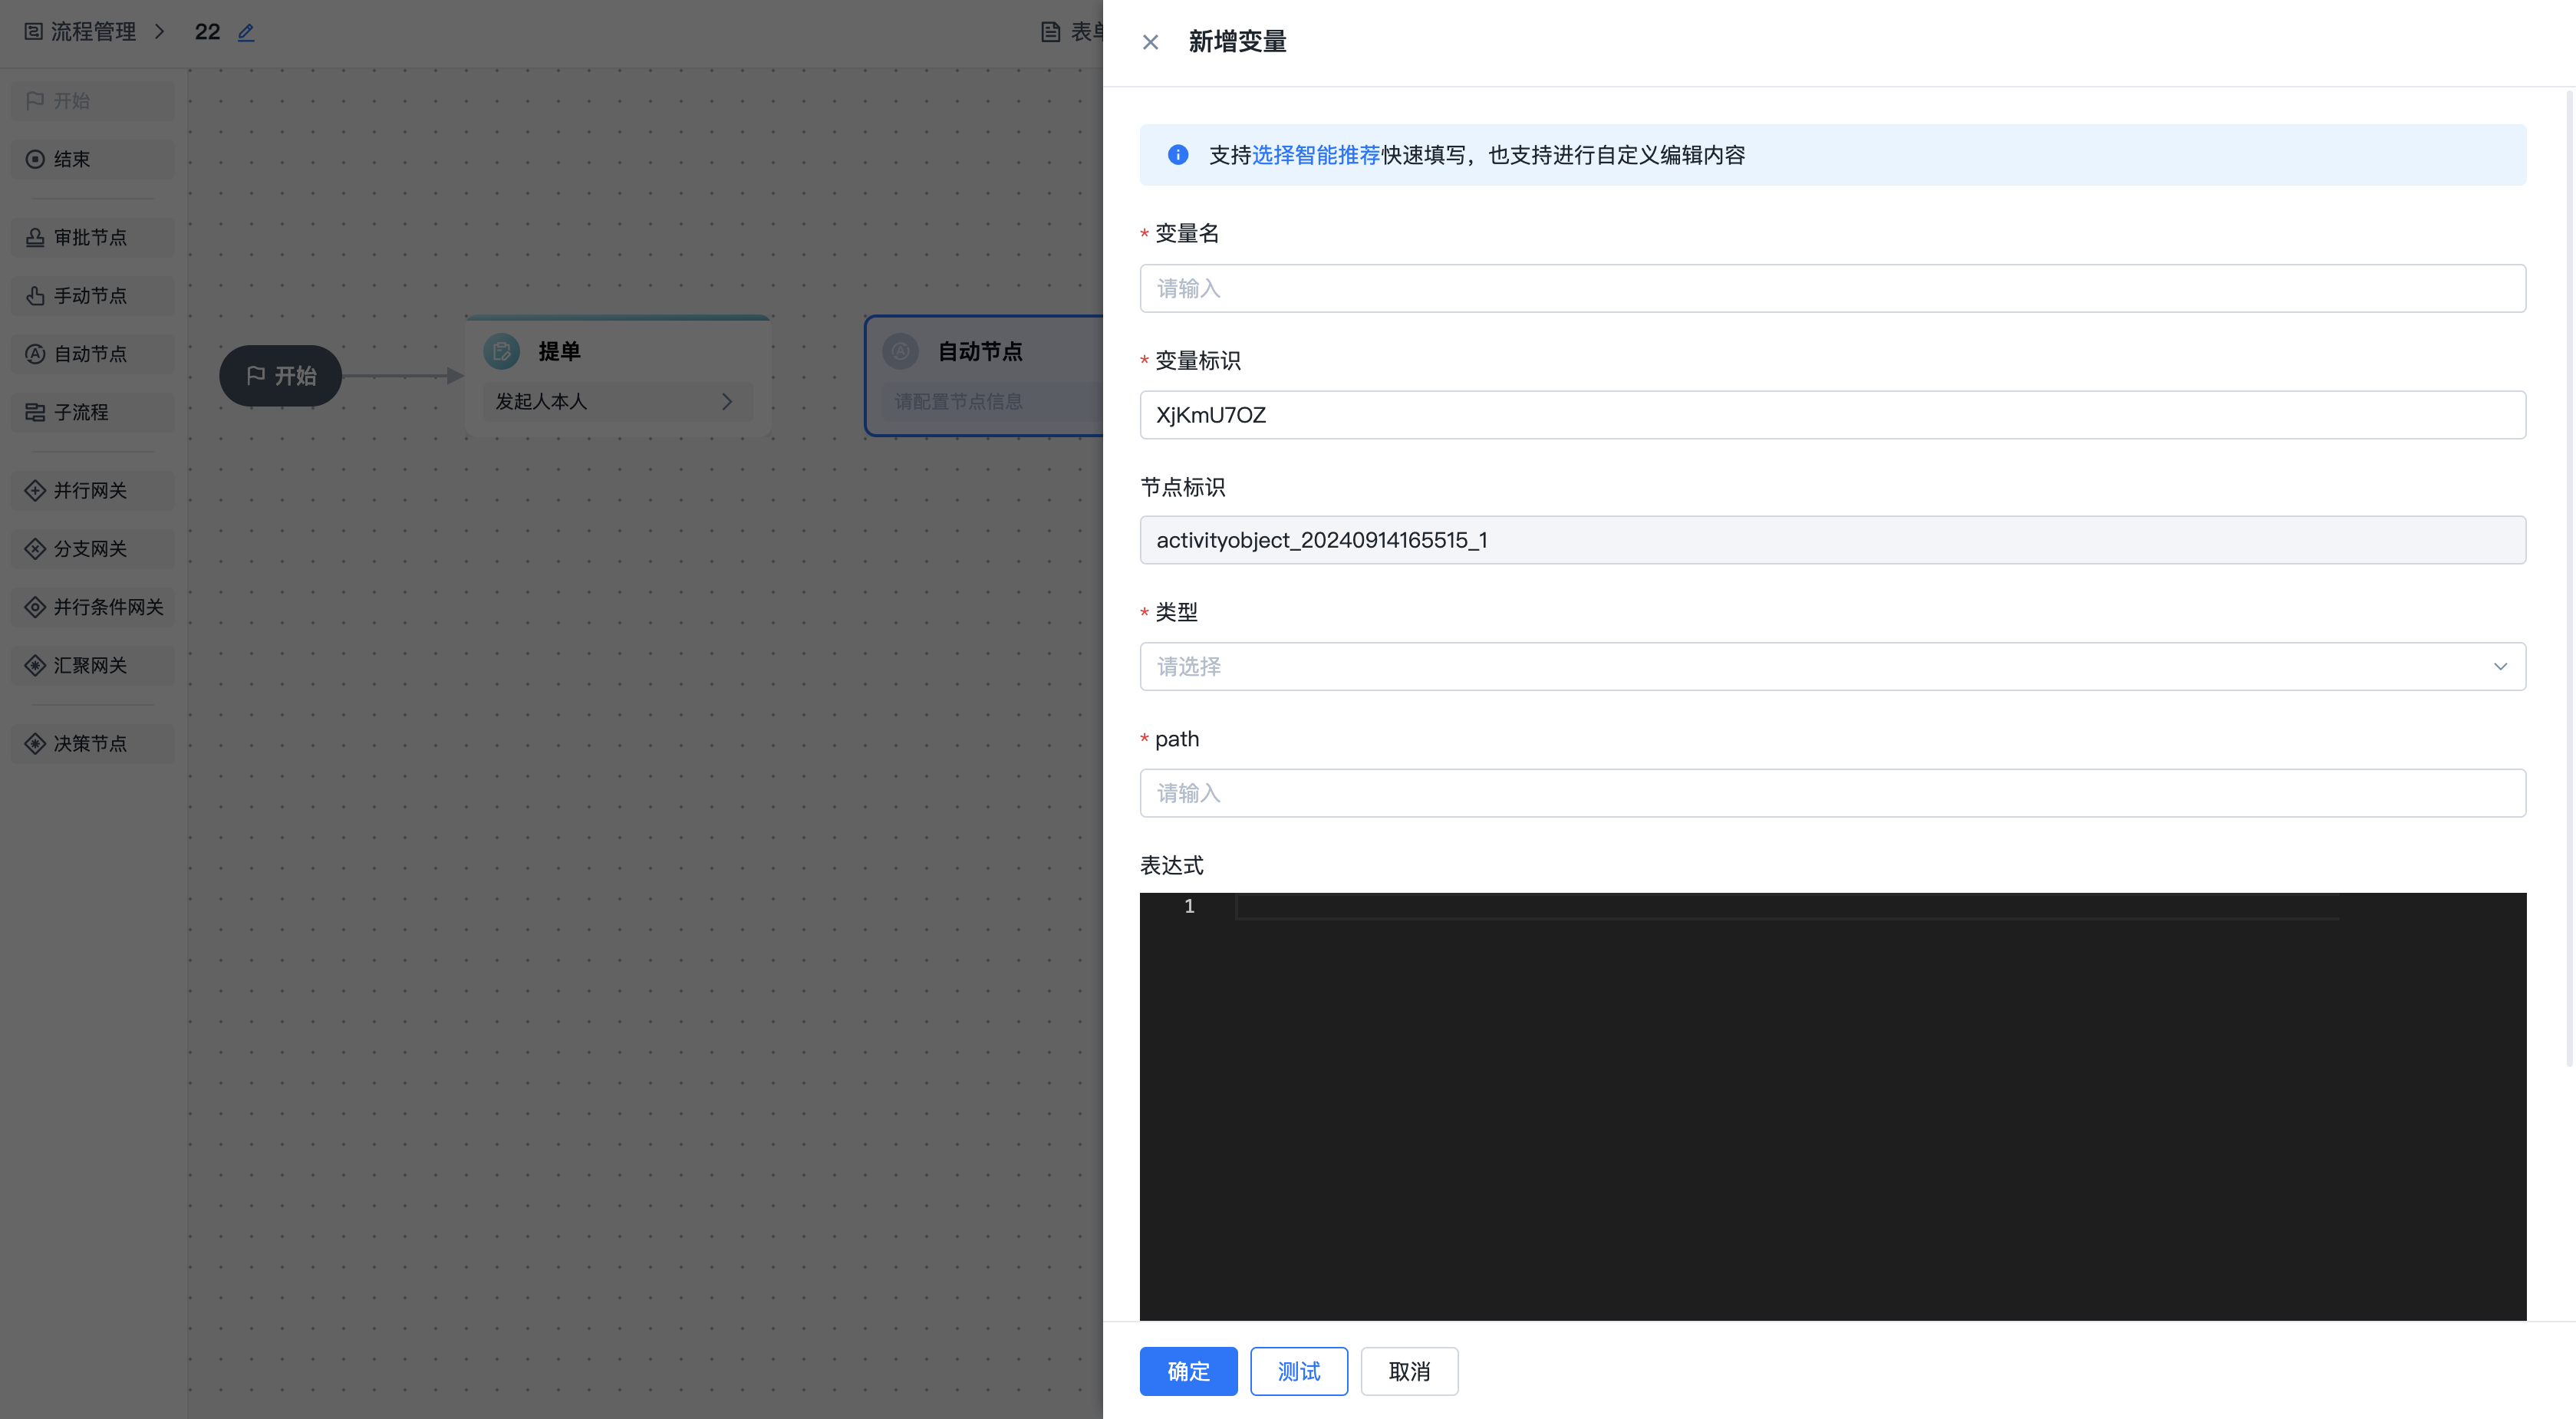
Configuring Variables:
Click "Add", fill in the relevant information, and save.
- Variable Name: The name of the variable.
- Variable Identifier: The identifier key of the variable.
- Node Identifier: The identifier of the current node.
- Type: The data type of the variable. Configure the correct type based on the usage scenario; otherwise, it may not be selectable when referenced.
- Path: The data path.
- Expression: Custom variables are edited using FEEL expressions. FEEL expression documentation to be supplemented.
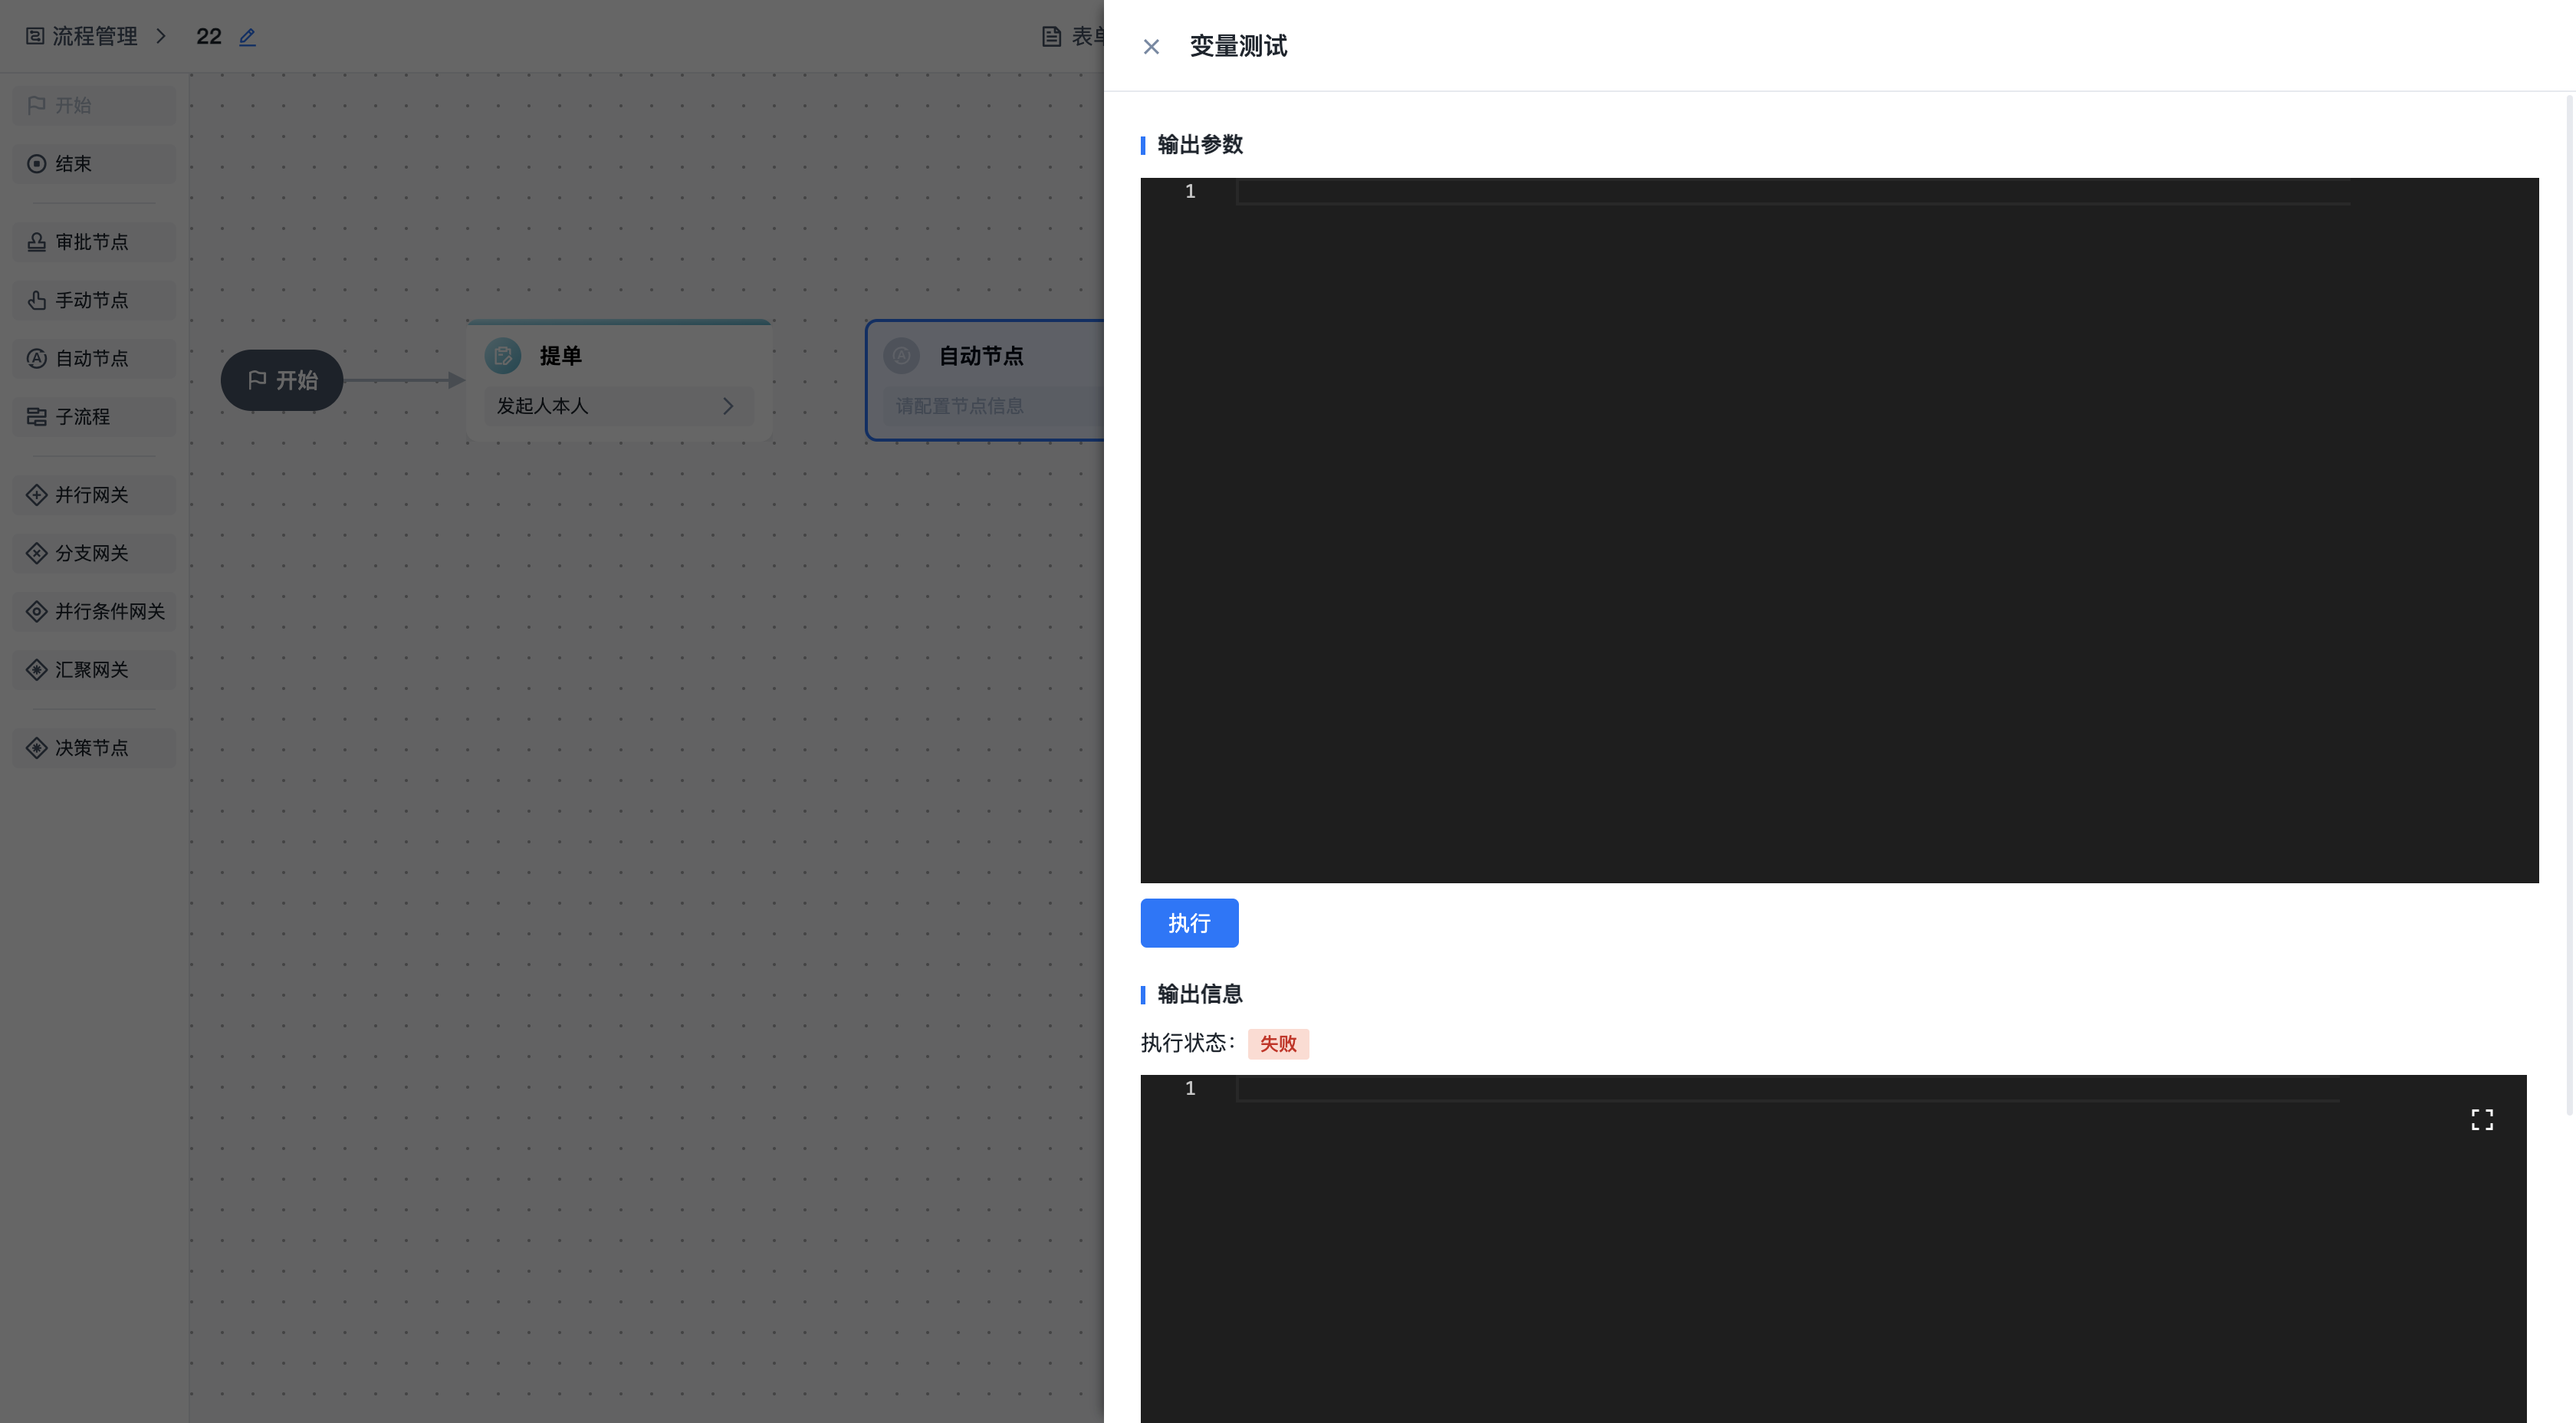
Variable Testing:
After configuring a variable, you can use the testing feature to verify whether the variable output meets expectations. Fill in the output parameters and click "Execute" to see the specific output information.
- Output Parameters: The output parameters here are for testing with the action's output parameter values. (Note: These are output parameters, not input parameters. During testing, the output parameters are used directly to test the variable's output result; it does not call the action through input parameters.)
- Output Information: The result after execution.
Sub-process:
When a workflow is complex, it can be split into multiple sub-processes for clearer management. However, in the current version, sub-processes still belong to the same ticket as the parent workflow and do not create a new ticket.
Click on the sub-process to expand it, and you can configure the specific workflow nodes inside. Sub-processes must also include start and end nodes.

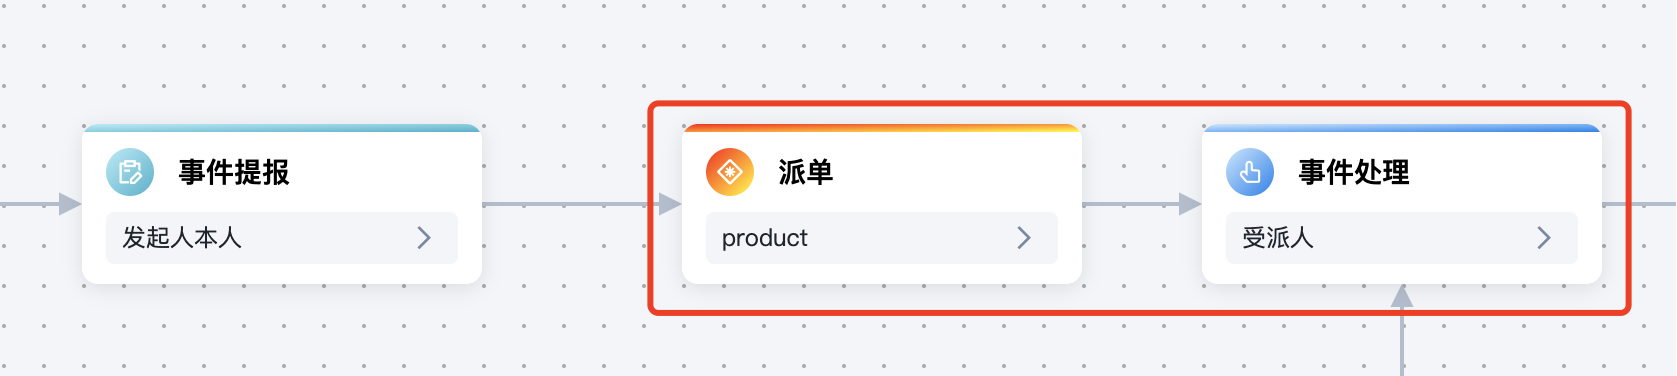
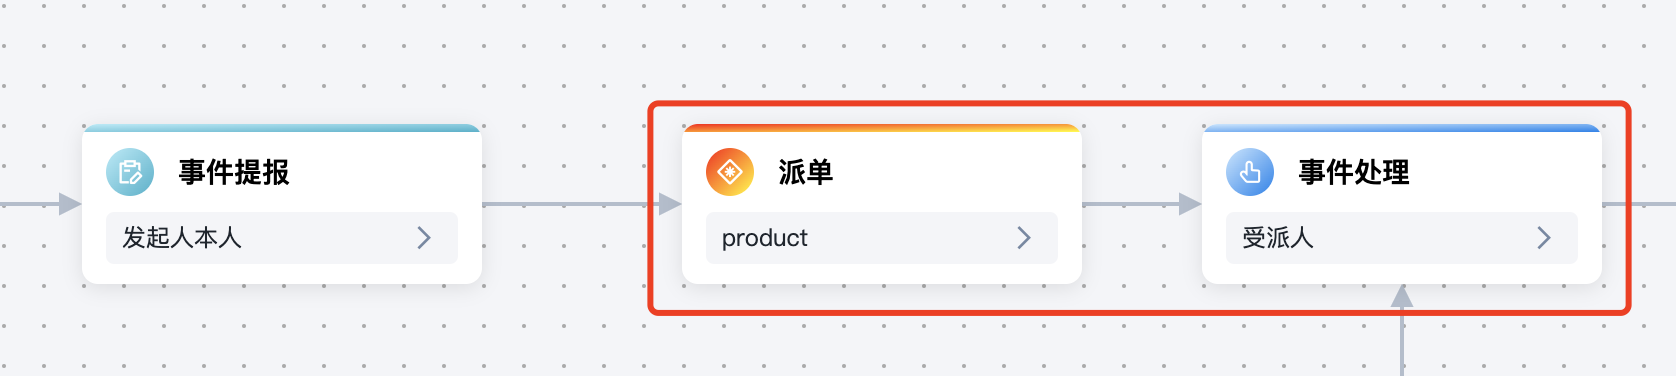
Dispatch Node:
The dispatch node is suitable for scenarios where tickets are dispatched before processing. When the workflow reaches the dispatch node, the dispatcher assigns the ticket, and then the assignee processes and submits it. You can configure assignees, supported operations, and field states.
The dispatch node has no effect when used alone; it must be used in conjunction with a manual node.
1.Assignee Configuration
Click the dispatch node card, select the "Assignee" tab, and configure the node's assignees. The assignees configured here are the users with dispatch permission at this node (i.e., the dispatchers). The dispatcher assigns the next node's handler. (Currently, the scope of users who can dispatch is not customizable and defaults to all users.)
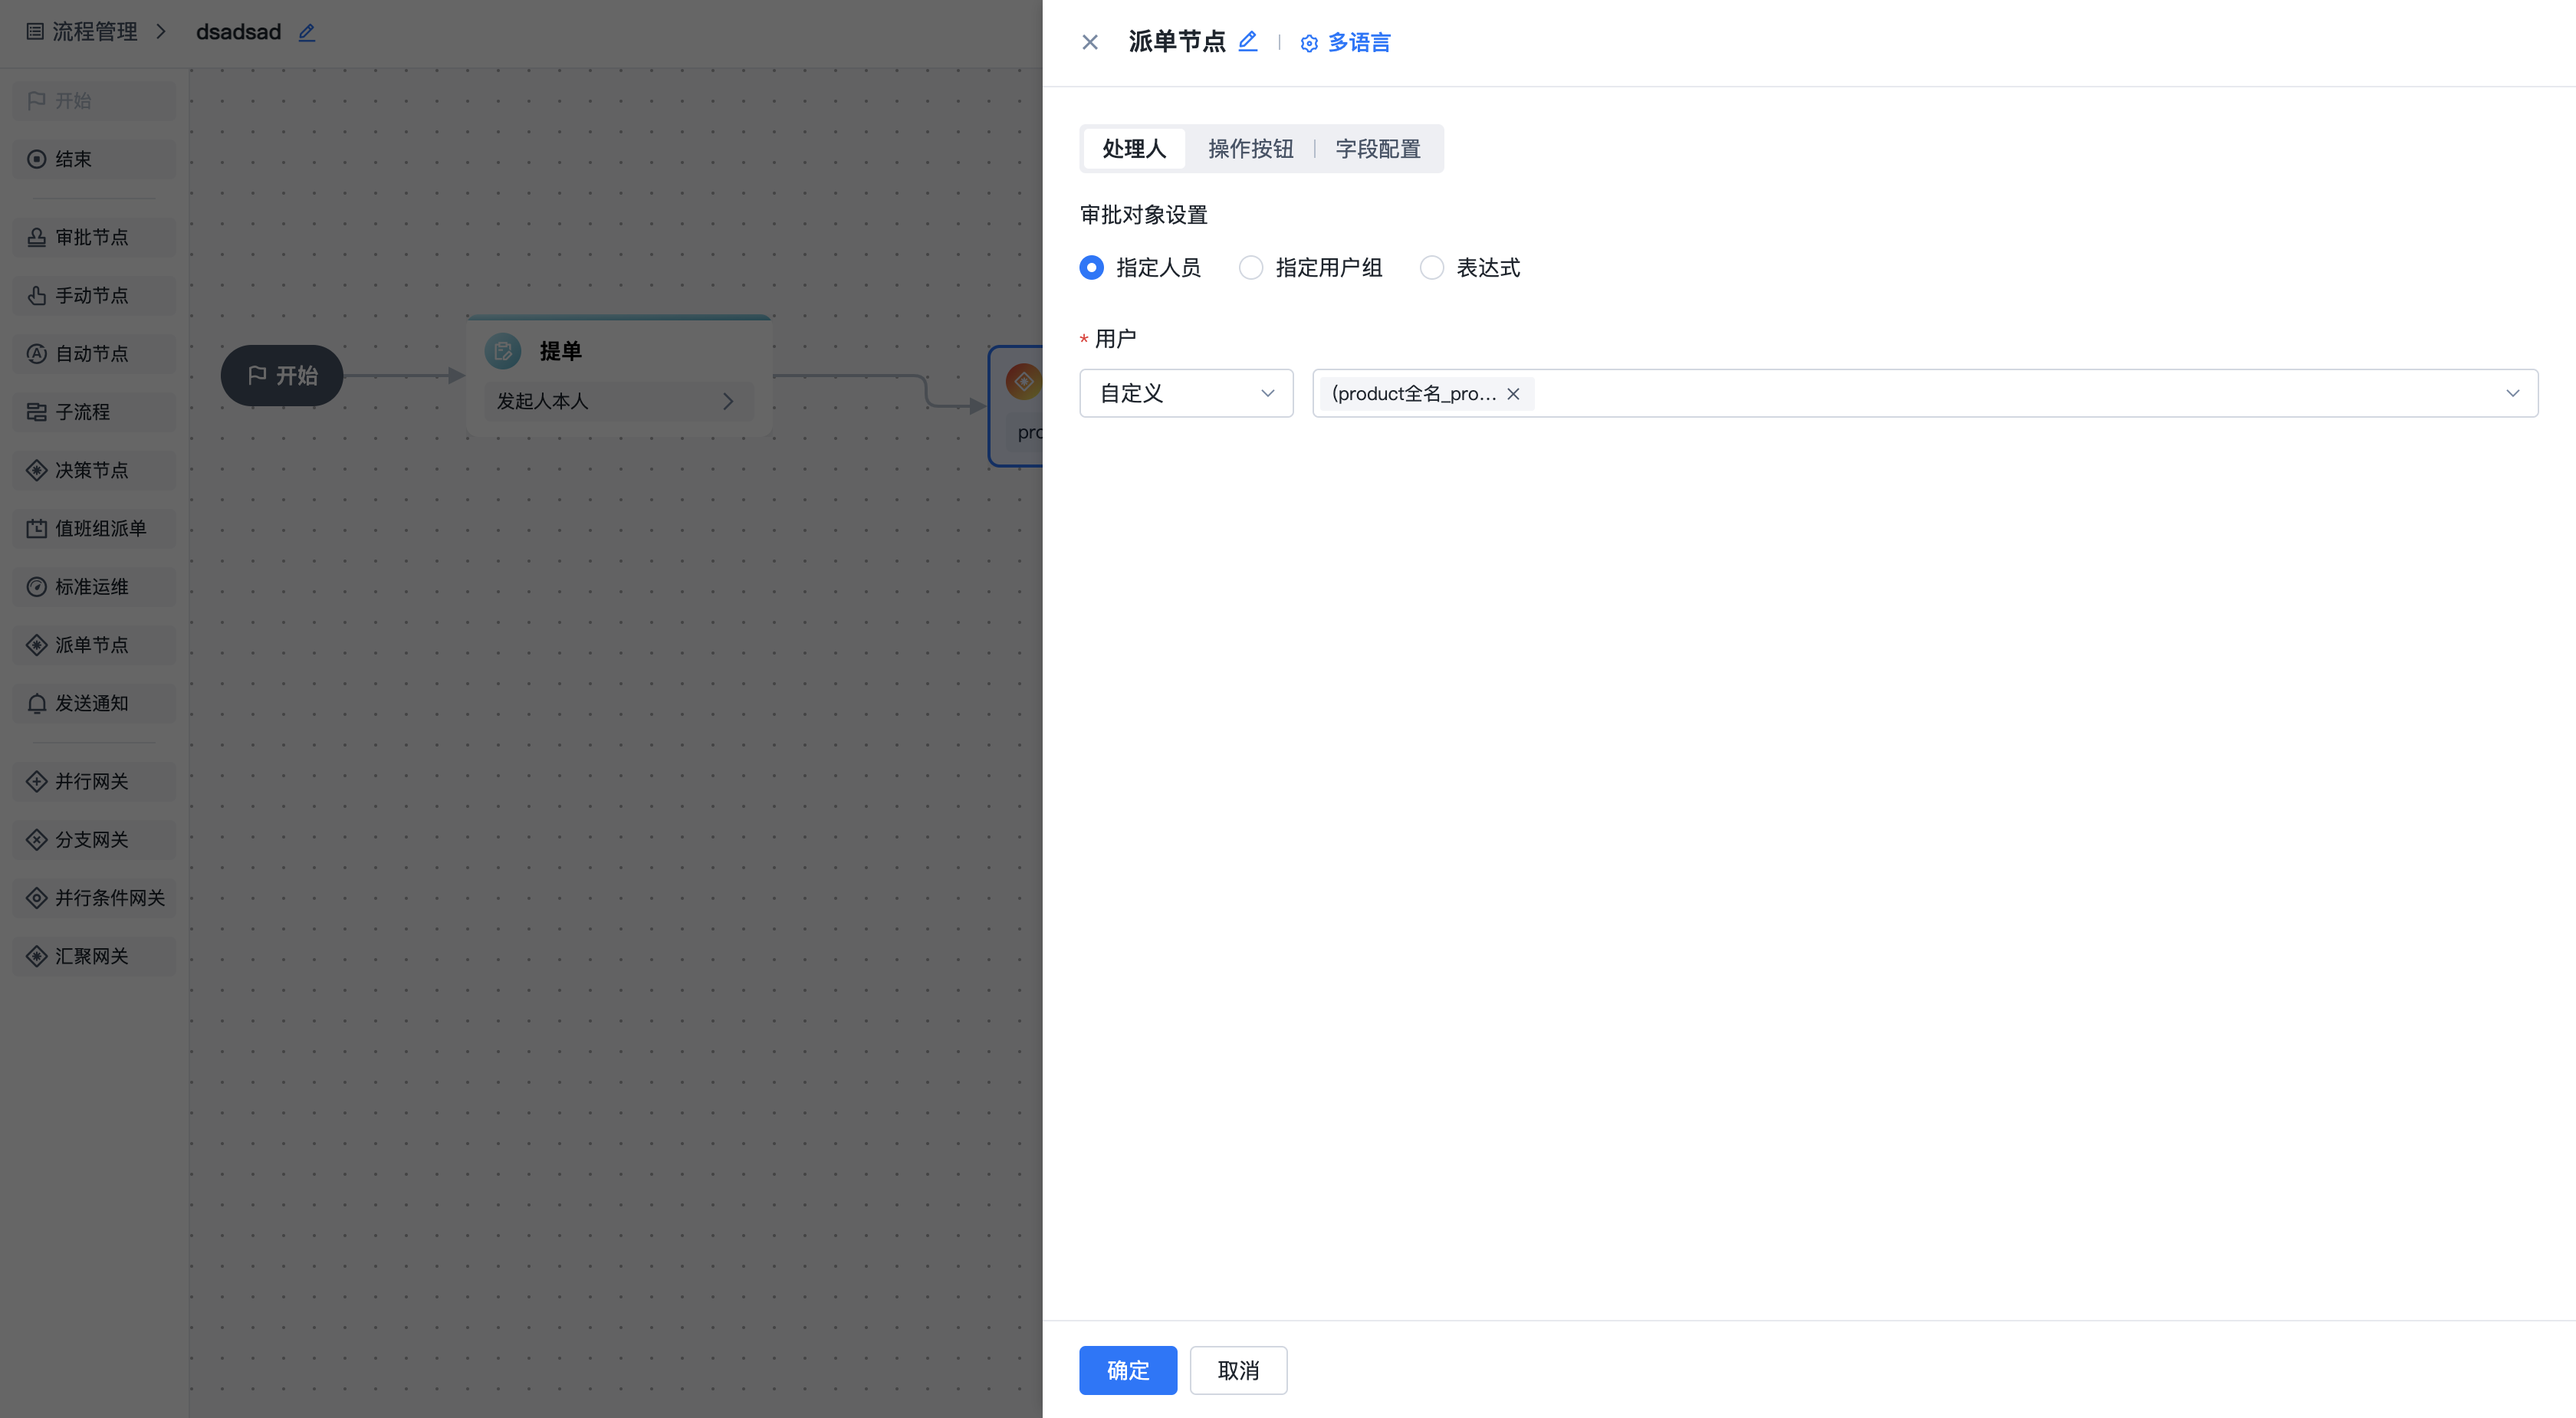
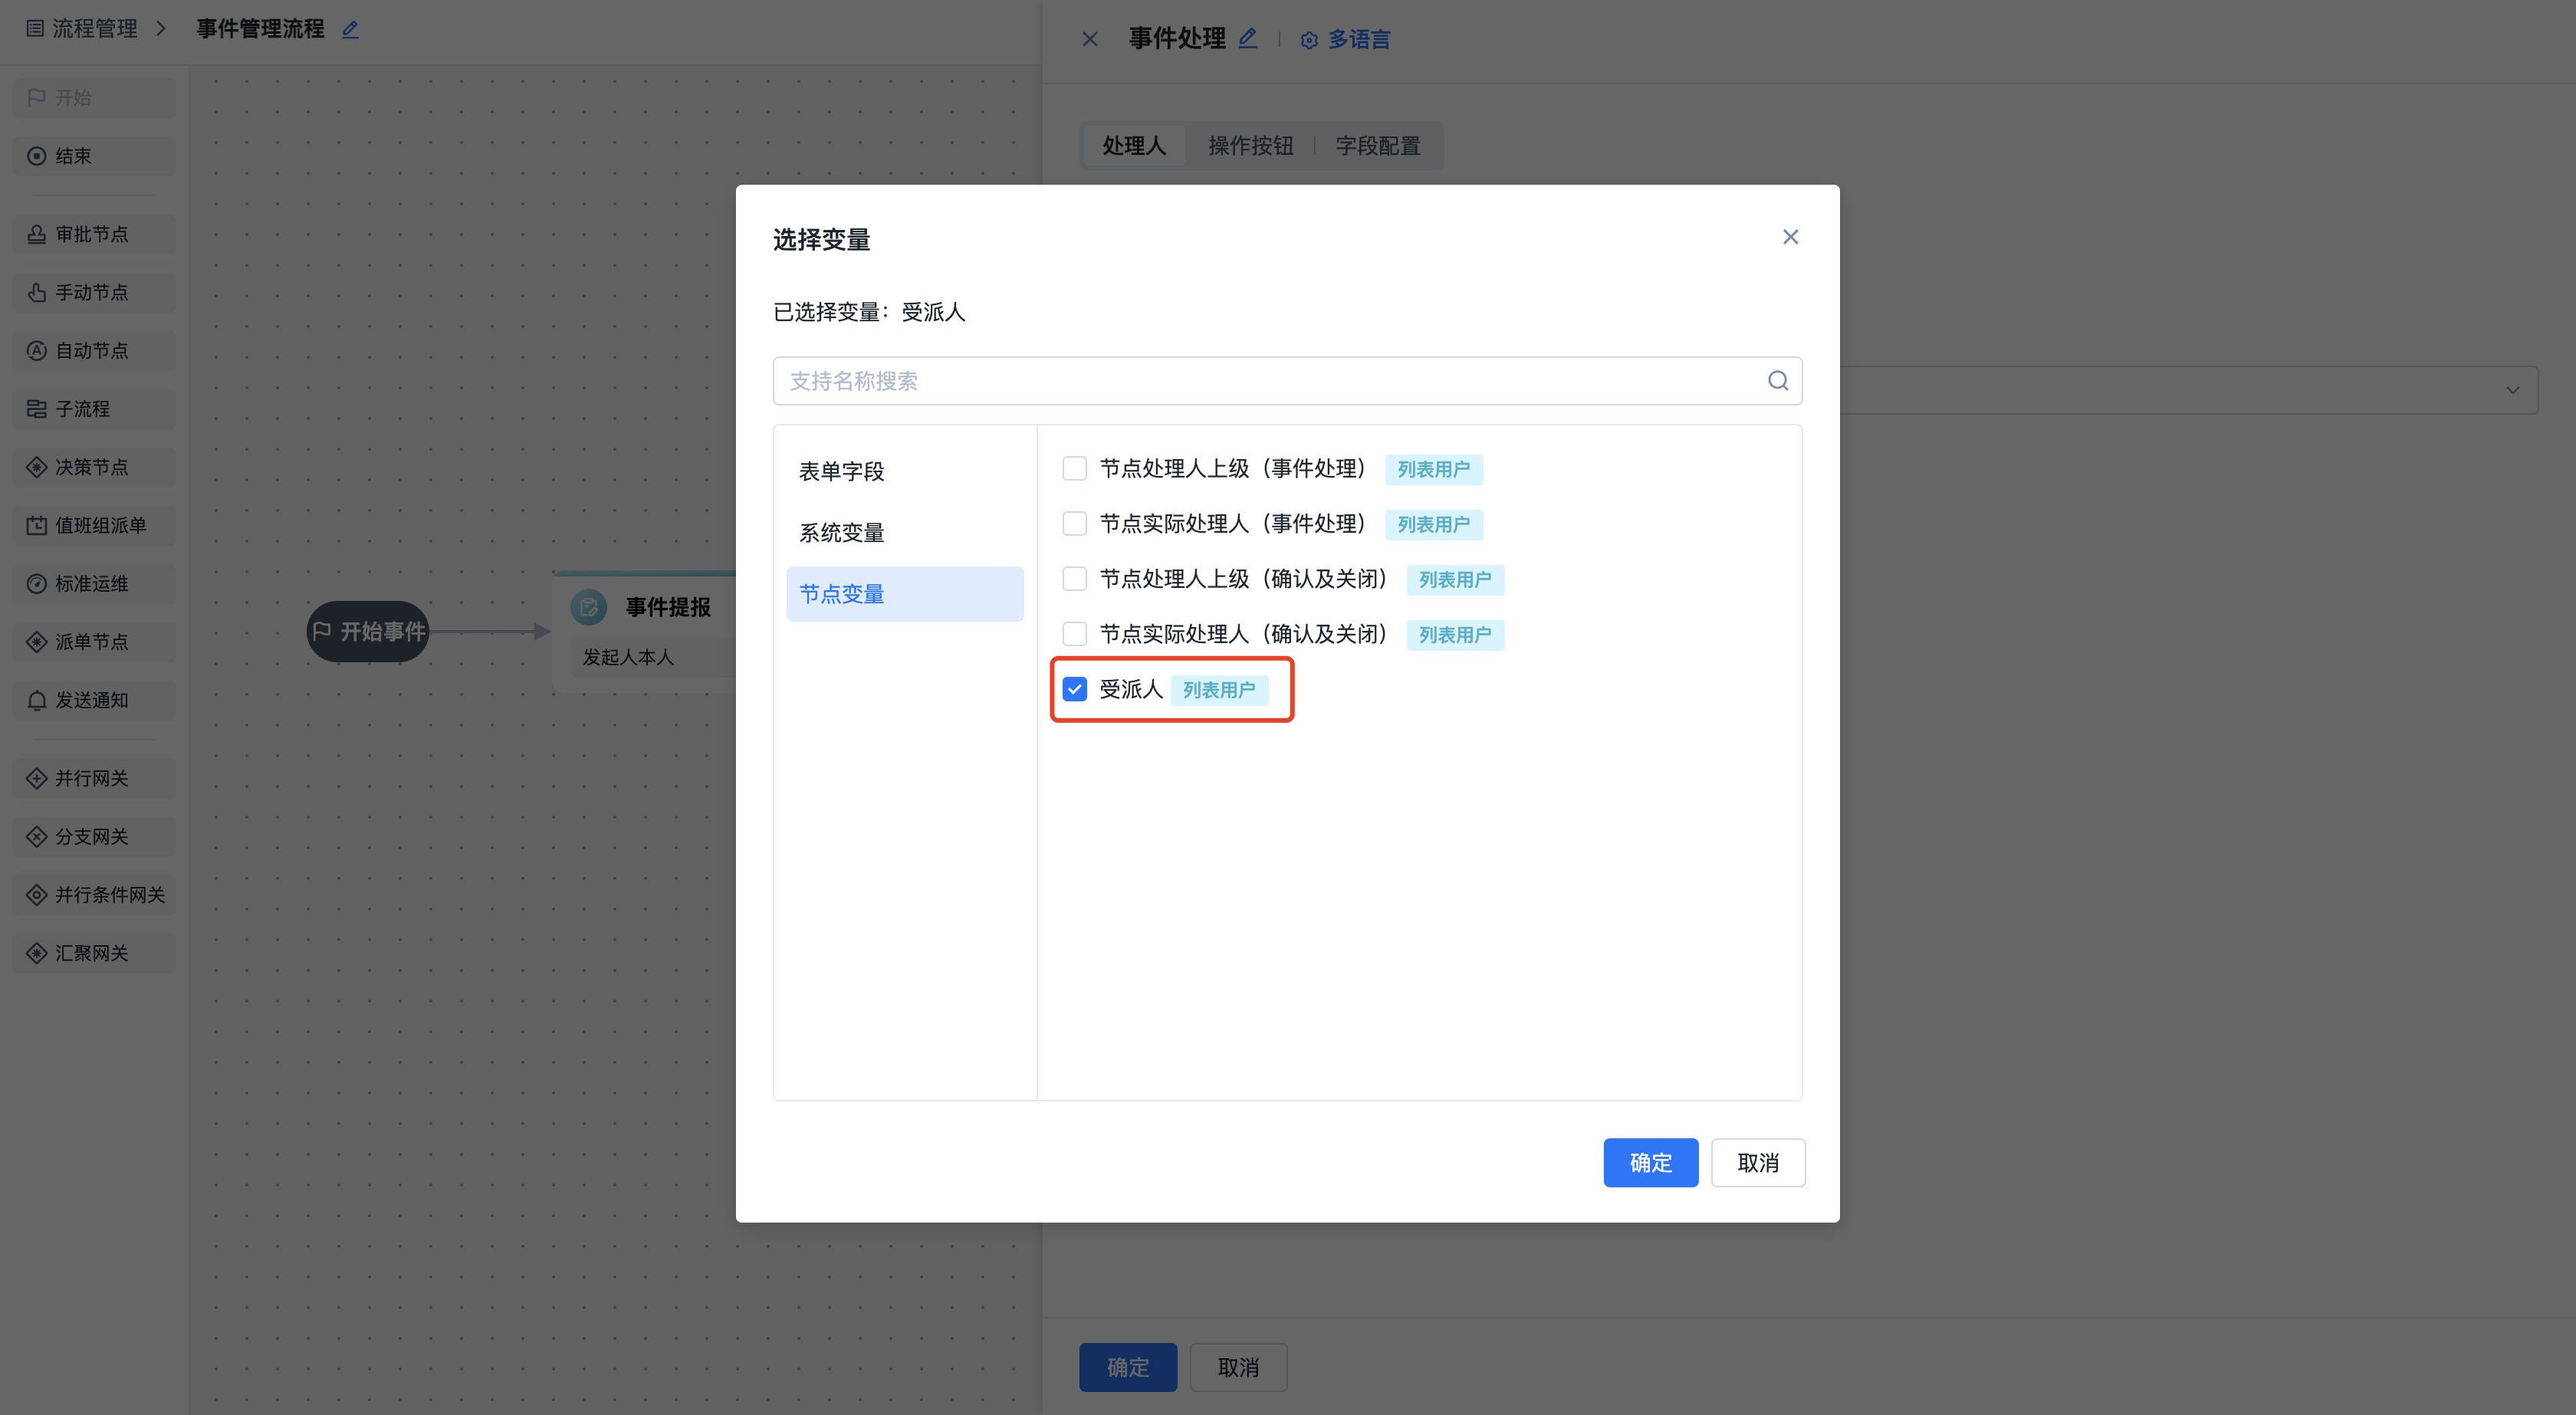
After setting up the dispatch node, the manual node following it needs to reference the dispatch node's "Assignee" variable for its handler.
For example, in the scenario: Incident Assignment - Incident Processing
The "Incident Processing" node after the dispatch node should reference the dispatch node's "Assignee" variable. Once set, when the workflow reaches this node, the handler is automatically set to the person assigned by the dispatch node.
2.Operation Buttons
Click the node card, select the "Operation Buttons" tab, and configure the operation buttons. Operations become visible at the node only after they are enabled.
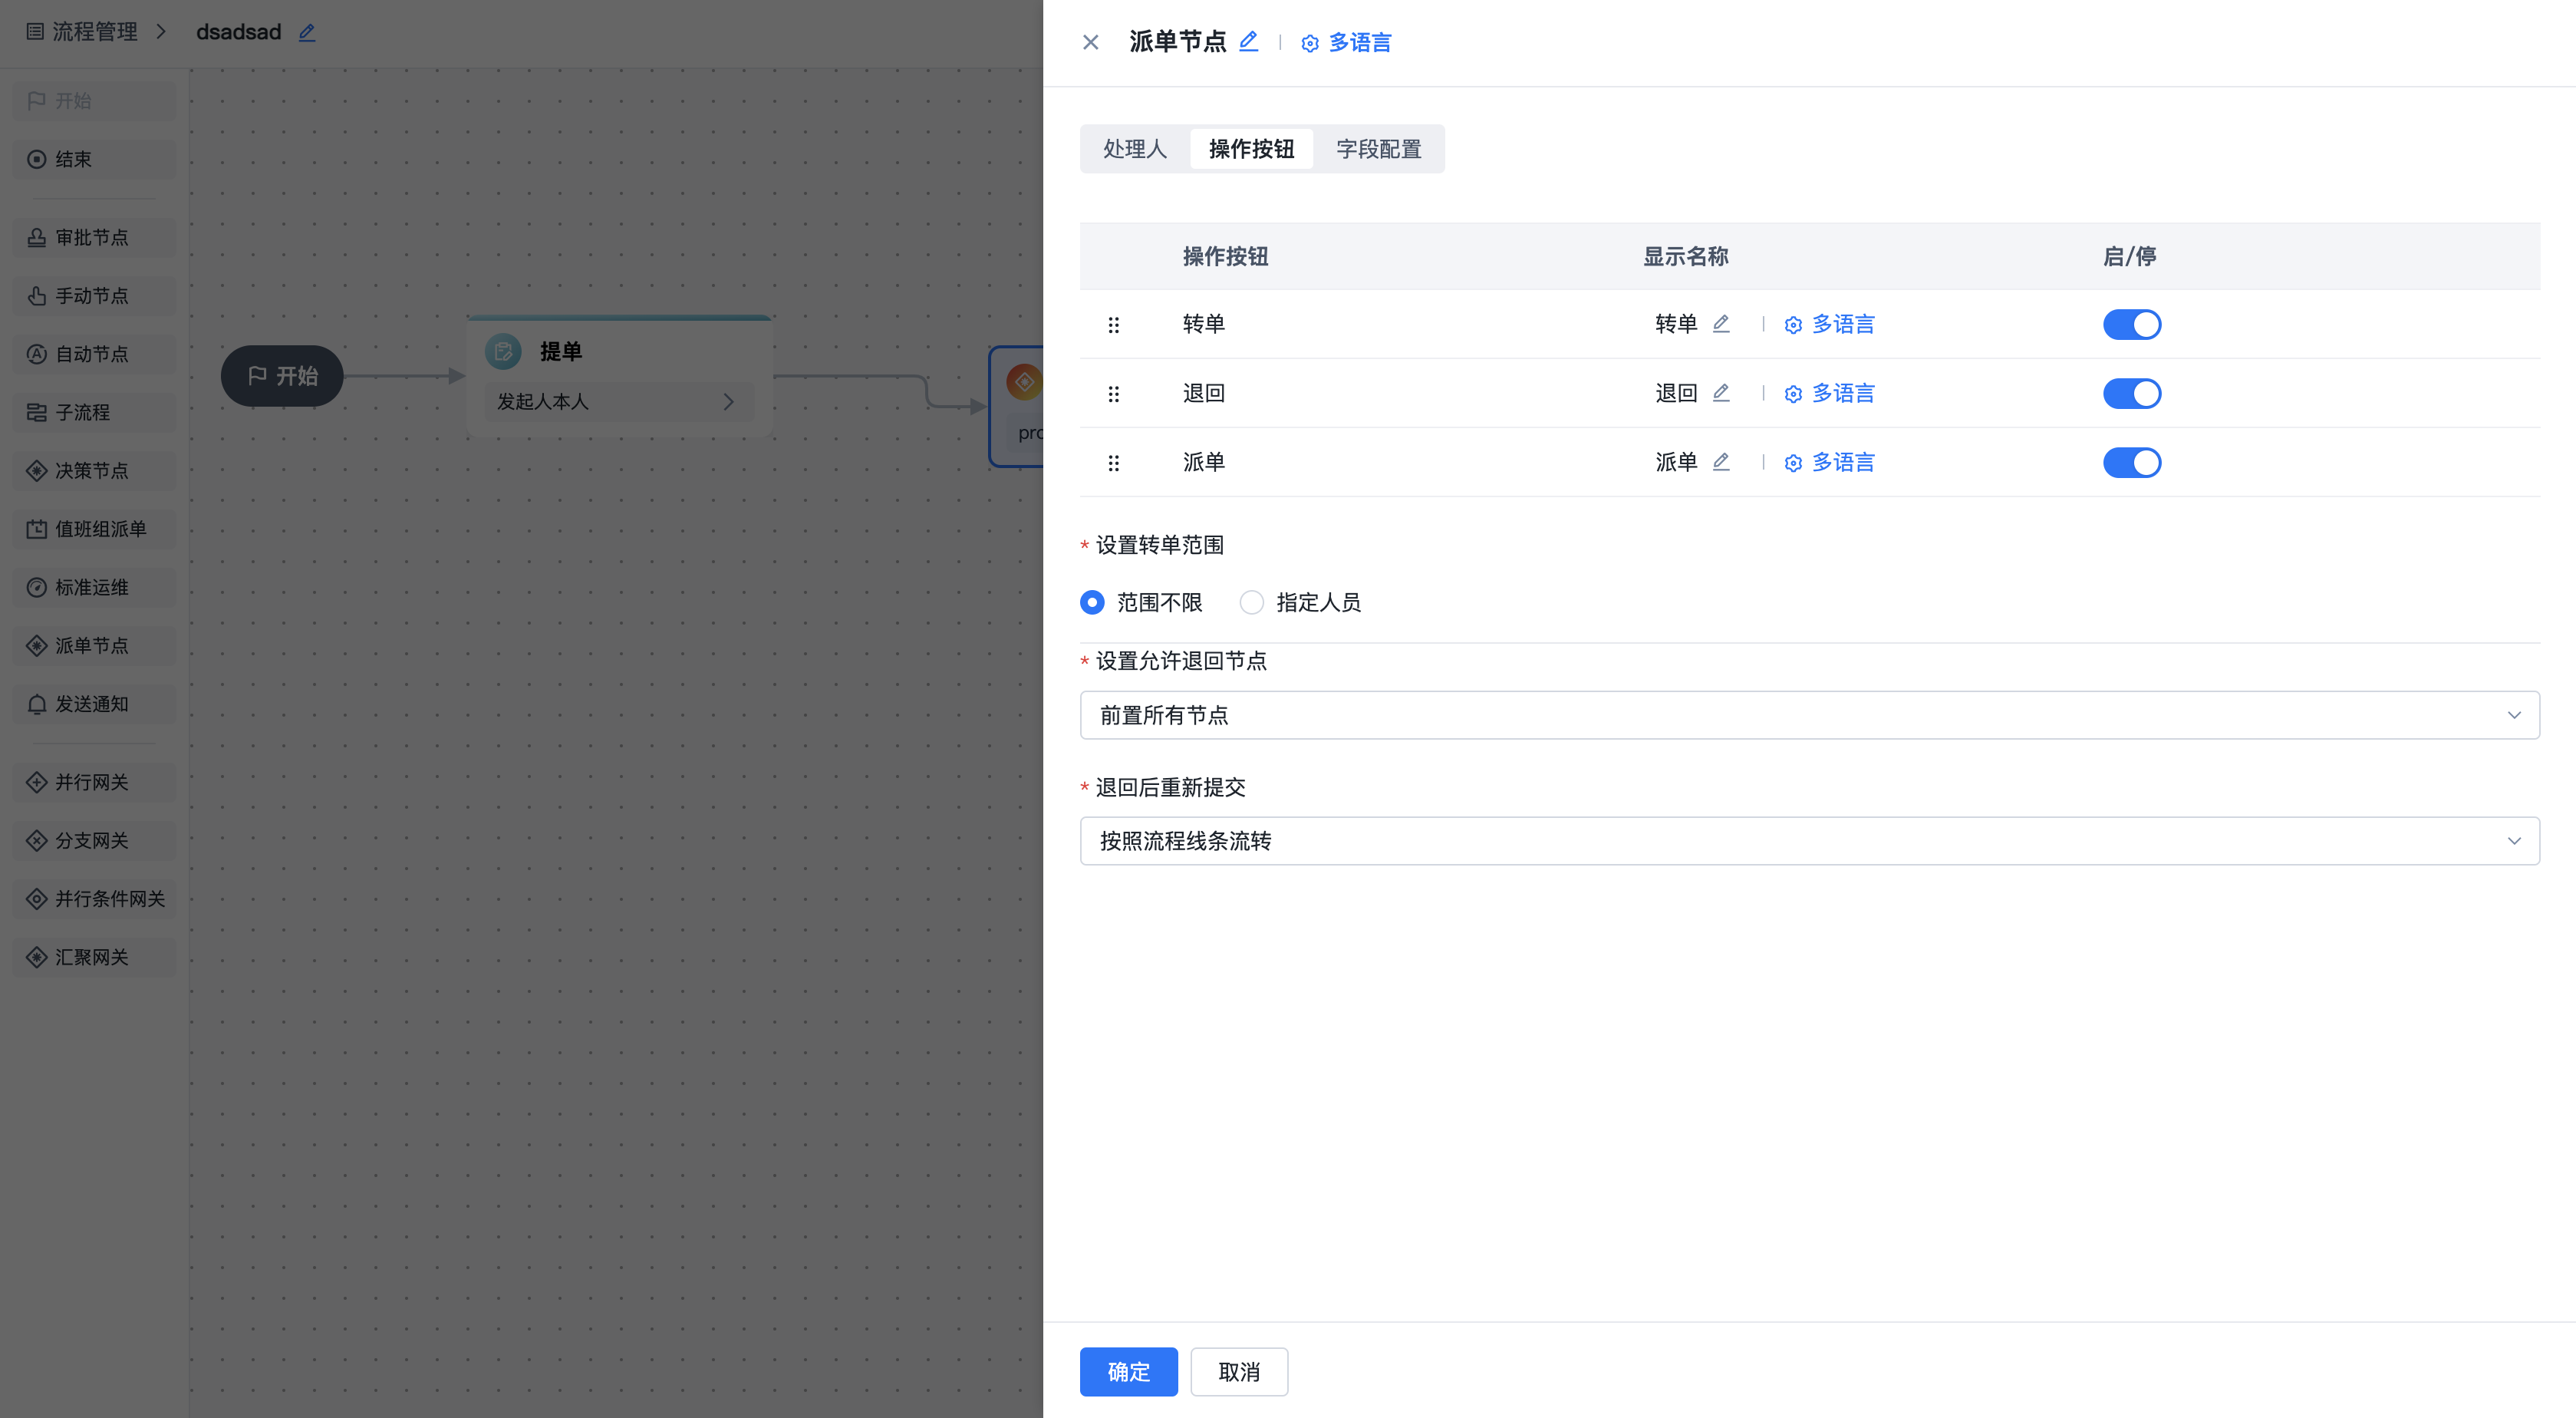
Operation descriptions:
| Dispatch | Assign the ticket to another person for processing. |
| Transfer | When the ticket assignee cannot process the ticket personally, they can transfer it to another person. |
| Return | When the current node assignee disagrees with how a previous node was handled, they can return the ticket to the previous node assignee for reprocessing. |
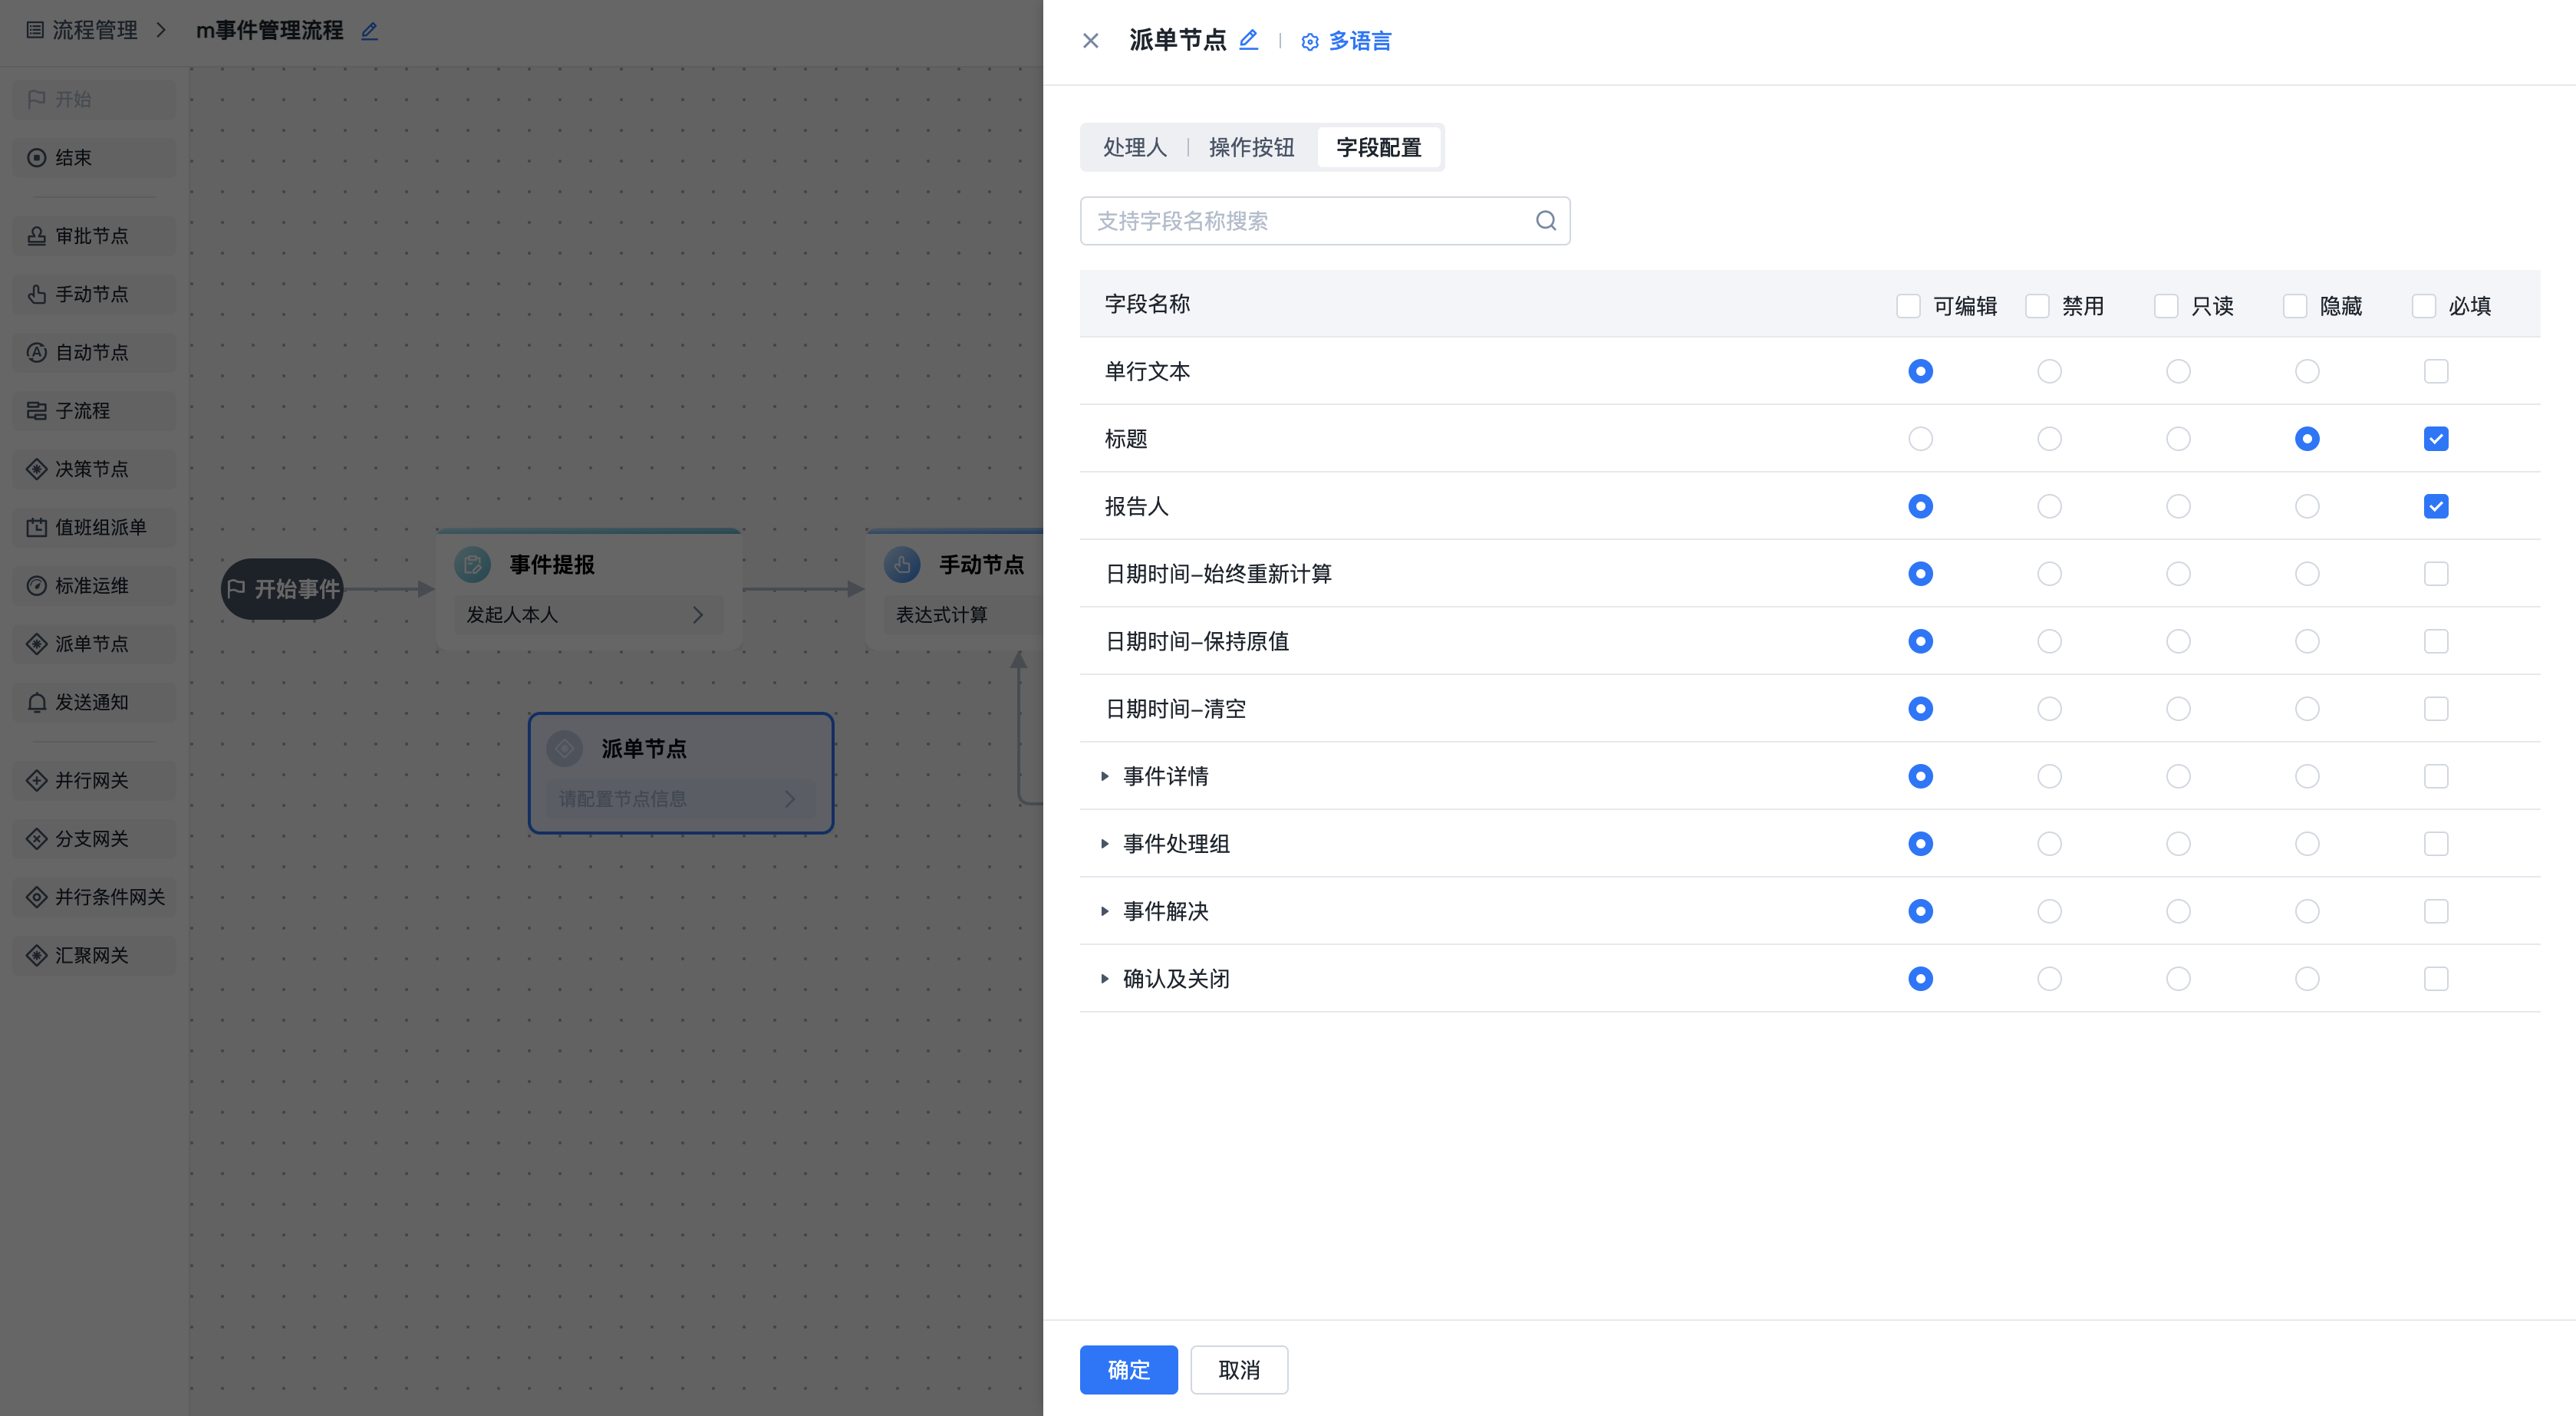
3.Field Configuration
Click the node card, select the "Field Configuration" tab, and configure the form field states for this node. See the Node Field State Configuration section for details.
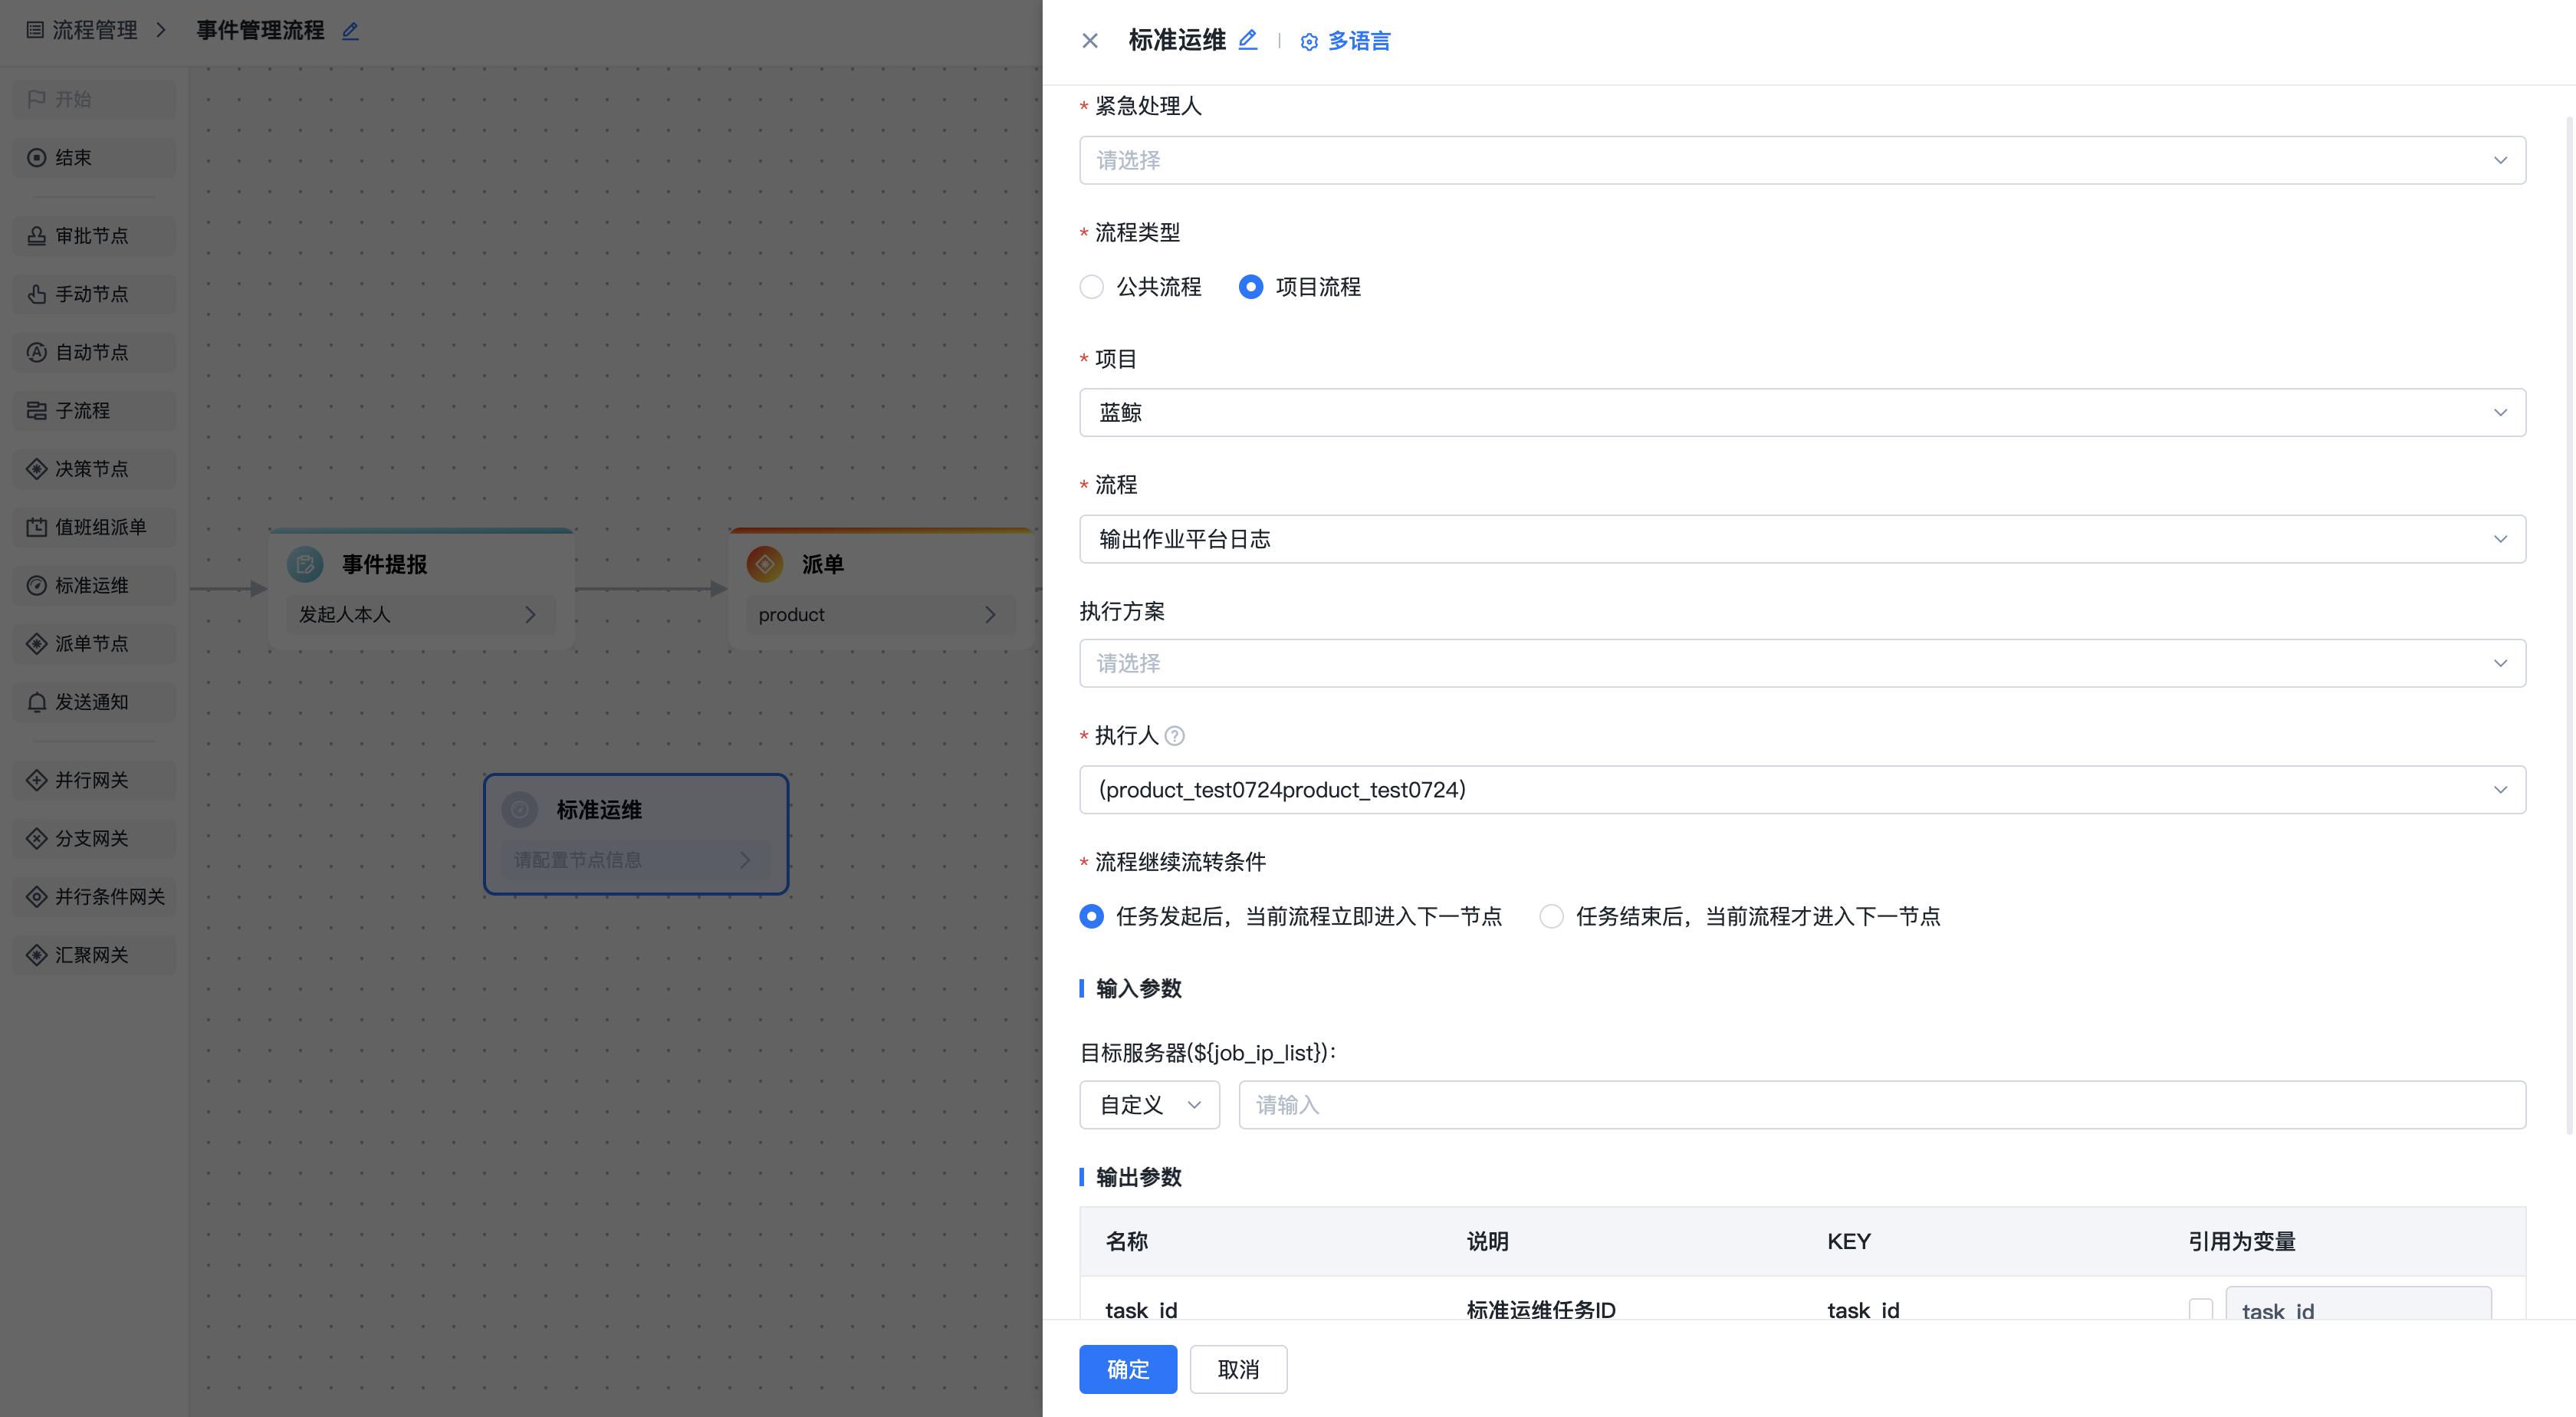
Standard Operations Node:
The Standard Operations node integrates with the platform's Standard Operations product, allowing the execution of Standard Operations tasks when the workflow reaches a specific node.
Click the node card to configure the Standard Operations node:
- Workflow Type: You can select a public workflow from Standard Operations or a workflow from a specific project.
- Execution Plan: The execution plan corresponding to the selected workflow, selected from Standard Operations.
- Executor: The identity under which execution occurs (ensure the executor has the corresponding Standard Operations workflow execution permissions).
- Workflow Continue Condition: Set whether the current Standard Operations task executes synchronously or asynchronously.
- Input Parameters: After selecting a workflow, configure the related input parameters. You can reference form fields, system and node variables.
- Output Parameters: Output parameters do not need configuration. If you want to reference output parameters as variables later, check the "Reference as Variable" option for the corresponding parameter.
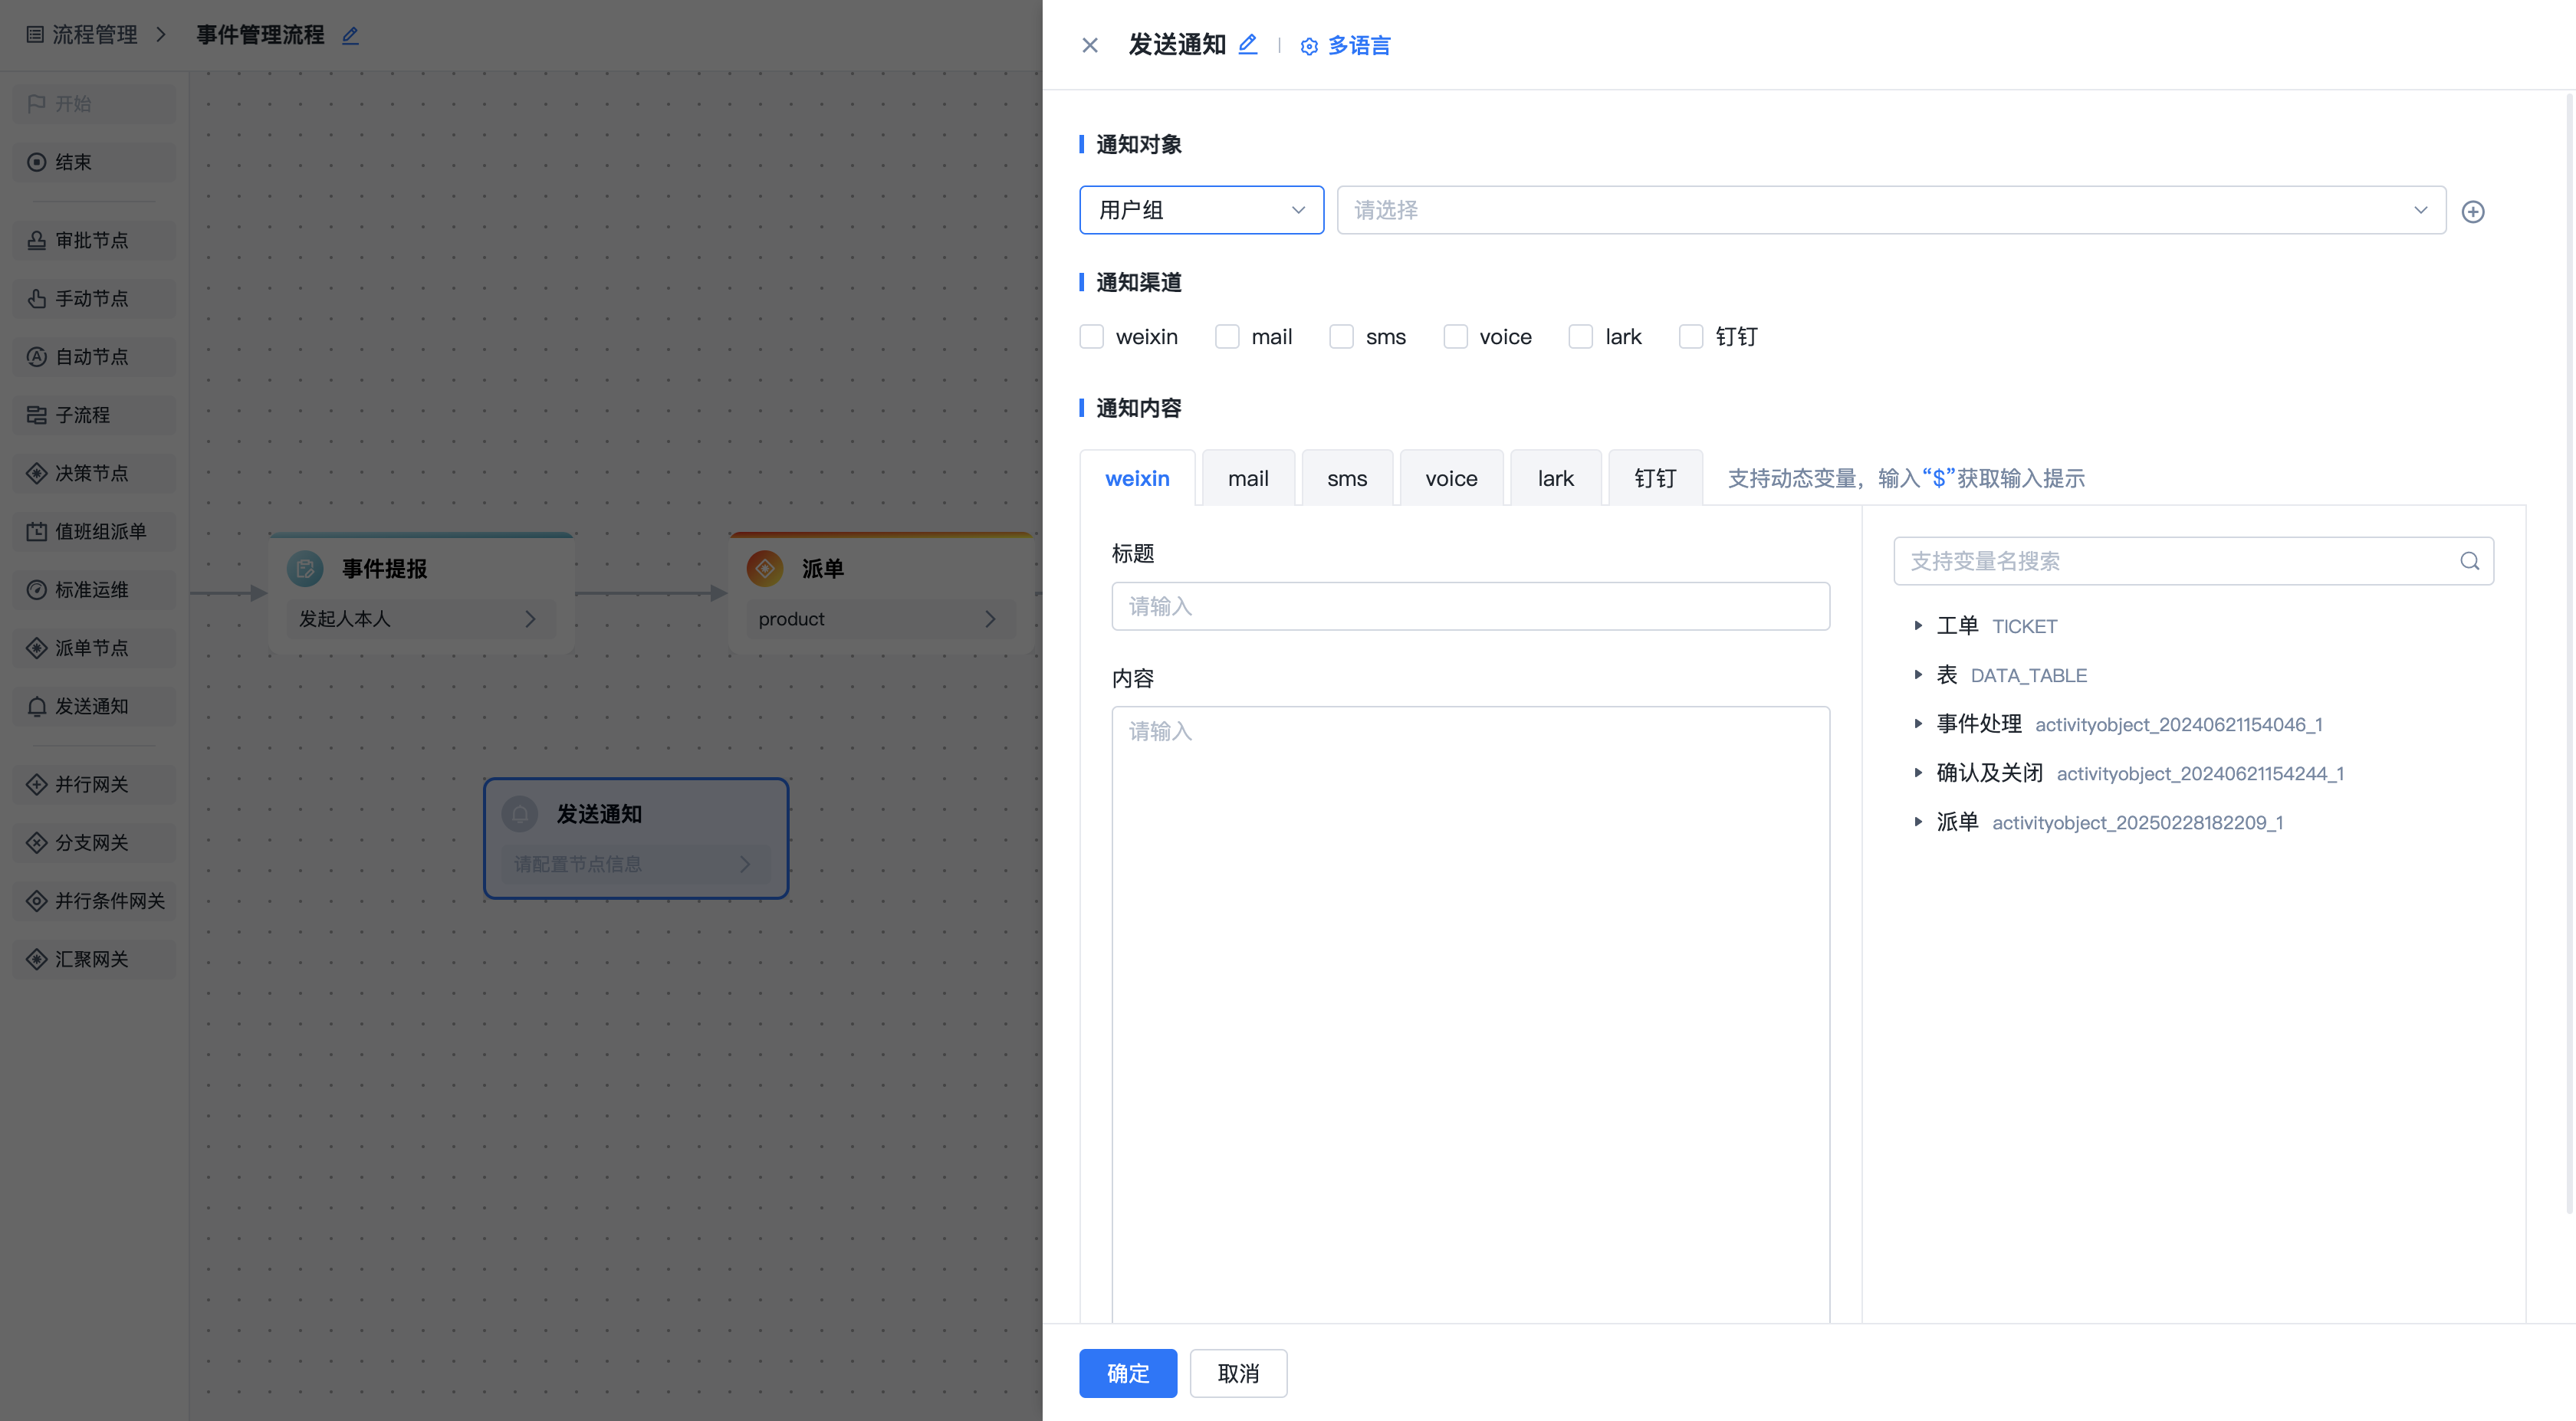
Send Notification Node:
The Send Notification node is used to configure notifications to relevant personnel at a specific stage.
- Notification Recipients: Who should receive the notification.
- Notification Channel: The channel through which the notification is sent, such as email or WeChat (notification channels are integrated with the platform).
- Notification Content: The specific content of the notification.
Exclusive Gateway:
The exclusive gateway allows the workflow to choose between different paths based on certain conditions or decision points. Only one path is executed. When multiple path conditions are met, the branch with the highest priority is taken.
Parallel Gateway:
The parallel gateway allows the workflow to execute on multiple paths simultaneously. All paths start at the same time, and the workflow waits for all paths to complete before continuing. Parallel gateways must be used with converging gateways.
Inclusive Gateway:
Unlike the parallel gateway, each path in an inclusive gateway has condition configuration and is only reached when the condition is met. Unlike the exclusive gateway, when multiple path conditions are met in an inclusive gateway, all qualifying paths execute simultaneously.
Converging Gateway:
Used with parallel and inclusive gateways. Add a converging gateway where parallel paths complete, then connect to the next node.
Decision Node:
The decision node works with decision tables and is typically used for predefined rules to automate certain scenarios and improve ticket processing efficiency.
For example, using a decision table to predefine the assignees for different incident classifications and using the decision node in the workflow to reference the decision table and output the specific assignee value. Below is the configuration for this example:
First, configure the incident assignment strategy decision table in the Decision Table module.

Then add a decision node in the workflow.
Click the decision node to configure it. Select the "Incident Assignment Strategy" decision table just configured, and configure the input conditions. Here, select the incident classification field from the form to correspond with the incident classification field in the decision table.

In the incident handling stage, configure the assignee by referencing variables and selecting the decision node's output variable "Assignee".

2.2.1.3.3. Node Field State Description
When configuring fields, you can set 4 states and 1 required validation:
- Editable
- Disabled
- Read-only
- Hidden (not checking hidden means the field is visible)
- Required (validated when the field is editable)
Note: Hidden field values will not be submitted or updated.
The priority order is: Hidden > Read-only > Disabled > Required > Editable. The system allows form field state and required validation configuration in multiple places. When configured in multiple places simultaneously, the [Node Field Configuration] and [UI Rule Linkage Configuration] are stacked with the higher-priority state taking precedence, overriding the field's own configuration.
Example: For a field A, if node 2's field configuration sets it as hidden, and the form's UI rule linkage sets it as editable when a condition is met, since hidden has higher priority than editable, field A will remain hidden at node 2 even when the editable condition is met.
The following 3 places can configure field states and required validation:
- The field configuration area in the form designer

- The form's UI rule linkage settings

- The node's field configuration

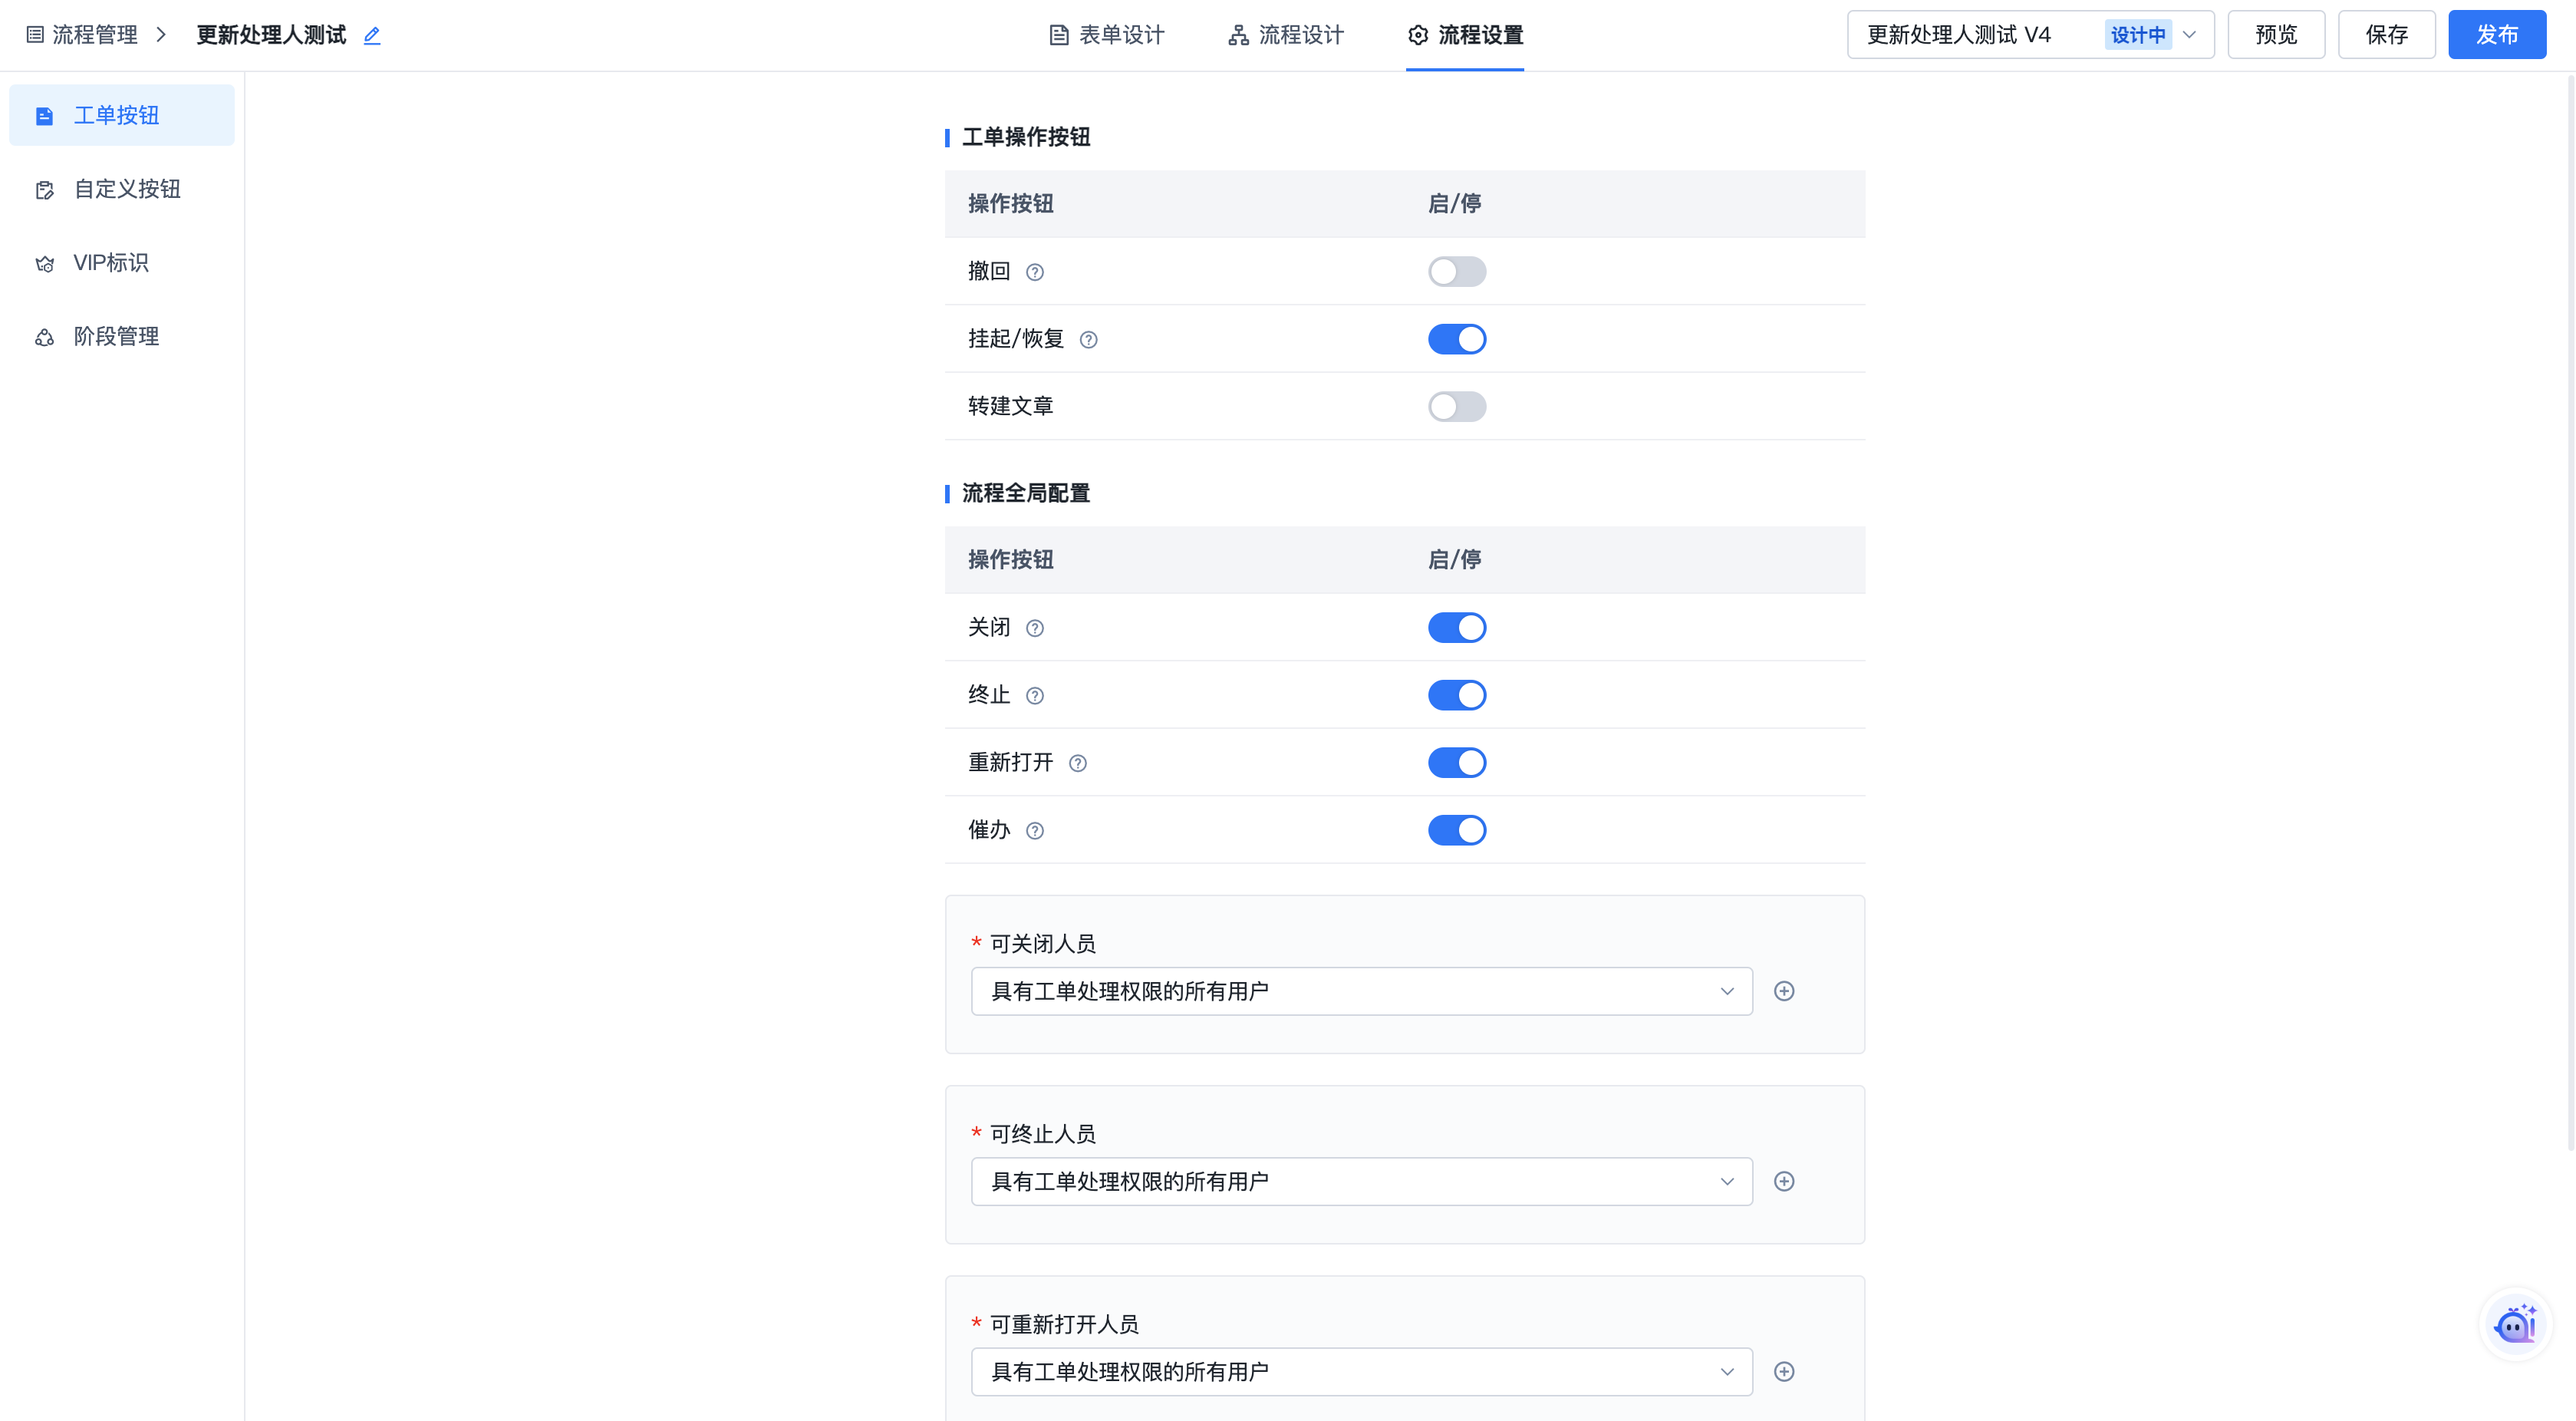
2.2.1.4. Other Workflow Configurations
After form and workflow design are complete, proceed to the third step "Workflow Settings" for additional configurations.
1.Ticket Buttons
Provides configuration for other ticket-related buttons.
| Operation | Description |
| Withdraw | When the assignee of the previous node needs to reprocess their task, they can withdraw. Withdrawal is only possible if the next node has not yet been processed. If the next node has already been processed, withdrawal is not possible. Allowed Withdrawal Nodes: Configure which nodes allow initiating a withdrawal. If "Incident Processing" is checked, withdrawal is allowed while the ticket is at the Incident Processing node before submission. If not checked, withdrawal is not allowed. |
| Suspend/Resume | Suspend: When a ticket temporarily does not need processing, you can choose to suspend it. Resume: When a suspended ticket needs to continue processing, click Resume. |
| Close | If the ticket content has been resolved in advance and does not need to follow the established workflow, you can close the ticket early. After closing, the ticket ends with a status of "Completed" and will not proceed further. |
| Terminate | If the ticket content does not need to be completed for some reason, you can terminate it. After termination, the ticket ends with a status of "Terminated" and will not proceed further. |
| Reopen | After a ticket reaches the end state, if it needs to be re-processed for some reason, you can reopen it. After reopening, the ticket restarts from after the submission node. |
| Expedite | When processing progress is not meeting expectations, you can click Expedite to urge the assignee. The assignee will receive a ticket expedite notification. (You need to manually configure and enable the ticket expedite notification in the Notification Management module.) |
2.Custom Buttons
The current custom button feature provides button configuration for related ticket scenarios. Typically used for scenarios like converting an incident to a problem or an incident to a change. When you need to create a problem ticket from the current incident and automatically populate relevant information, you can configure a related ticket button under the workflow's custom buttons.
Custom Button Configuration:
Click "Add Custom Button" to add a button configuration panel. Currently, only the related ticket button type is available, so no button type selection is needed.
- Button Name Setting: Click the
 icon next to the name in the upper left corner of the button configuration panel to modify the button name.
 - Related Workflow Setting: For example, to convert an incident to a problem, configure a problem related ticket in the incident management workflow and select the problem management workflow as the related workflow.
- Field Mapping Setting: Configure the field value mapping relationships to be automatically populated when creating the related ticket.

Custom Button Usage:
After configuring the custom button, the corresponding button appears in the ticket. Click the button.

After clicking the button, the submission page for the configured related workflow opens. Relevant values are automatically populated based on the configured field mappings. After completing the form and submitting, the related ticket is successfully created.

The created related ticket can be viewed in the Related Tickets list on the ticket detail sidebar.

2.2.2. Triggers
A workflow trigger is a mechanism that automatically executes specific operations within a workflow. When specific events occur or conditions are met, the trigger is activated, initiating one or more related actions. These actions may include sending notifications, updating database records, creating new tasks, etc.

2.2.2.1. Trigger Configuration
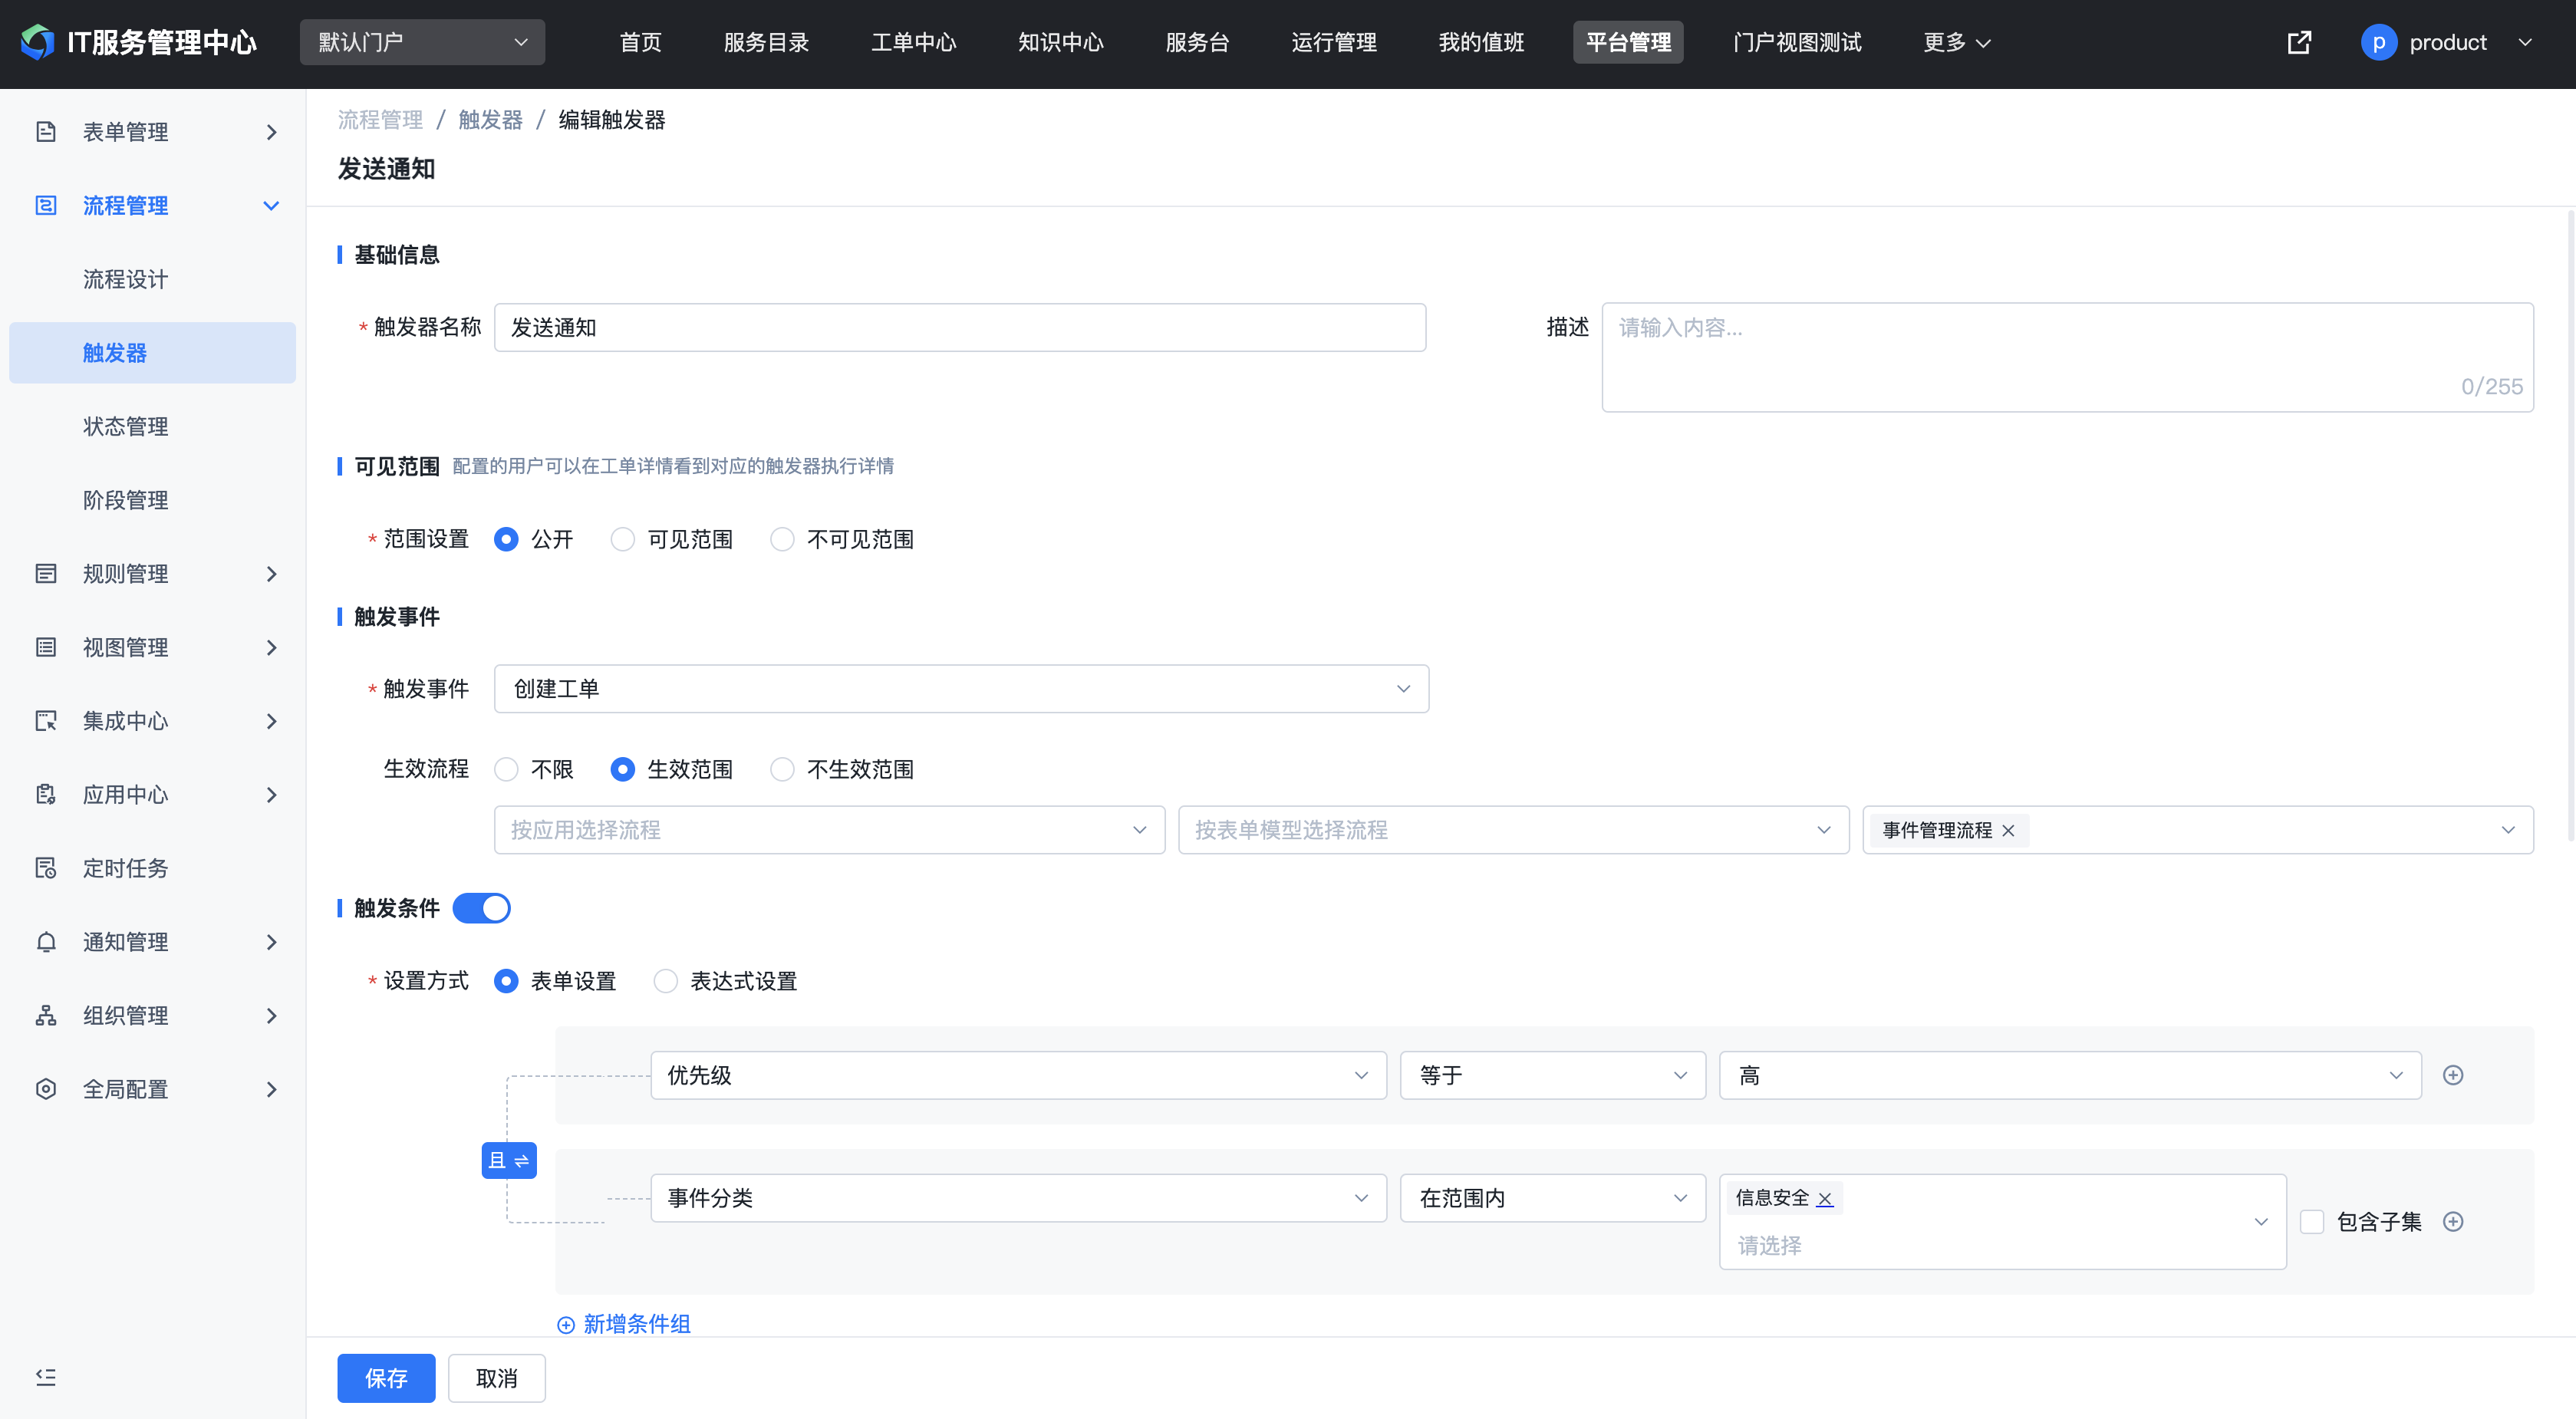
Click the "Add" button in the upper right corner of the trigger list to create a trigger. Fill in the information:
- Basic Information: Name, Description
- Trigger Event: Set which event activates the trigger, such as ticket creation or ticket update. You can also set the scope of effective workflows.
- Trigger Condition: Configure additional conditions for the trigger to take effect, specifying what conditions must be met.
When selecting variables for condition configuration, the available variable scope depends on the workflow scope configured in the trigger event. If the scope includes multiple form models/workflows, only system variables can be referenced. If the scope is a single form model/workflow, custom variables from the model/workflow can be selected.
- Response Action: Configure the action to execute when the trigger event and conditions are met. The available actions here are from Platform Management / Integration Center / Action Management. After selecting an action, the required input parameters are automatically listed. Input parameter configuration can be custom values or referenced variables.
- Additional Notes: Trigger execution is asynchronous and does not block ticket execution.
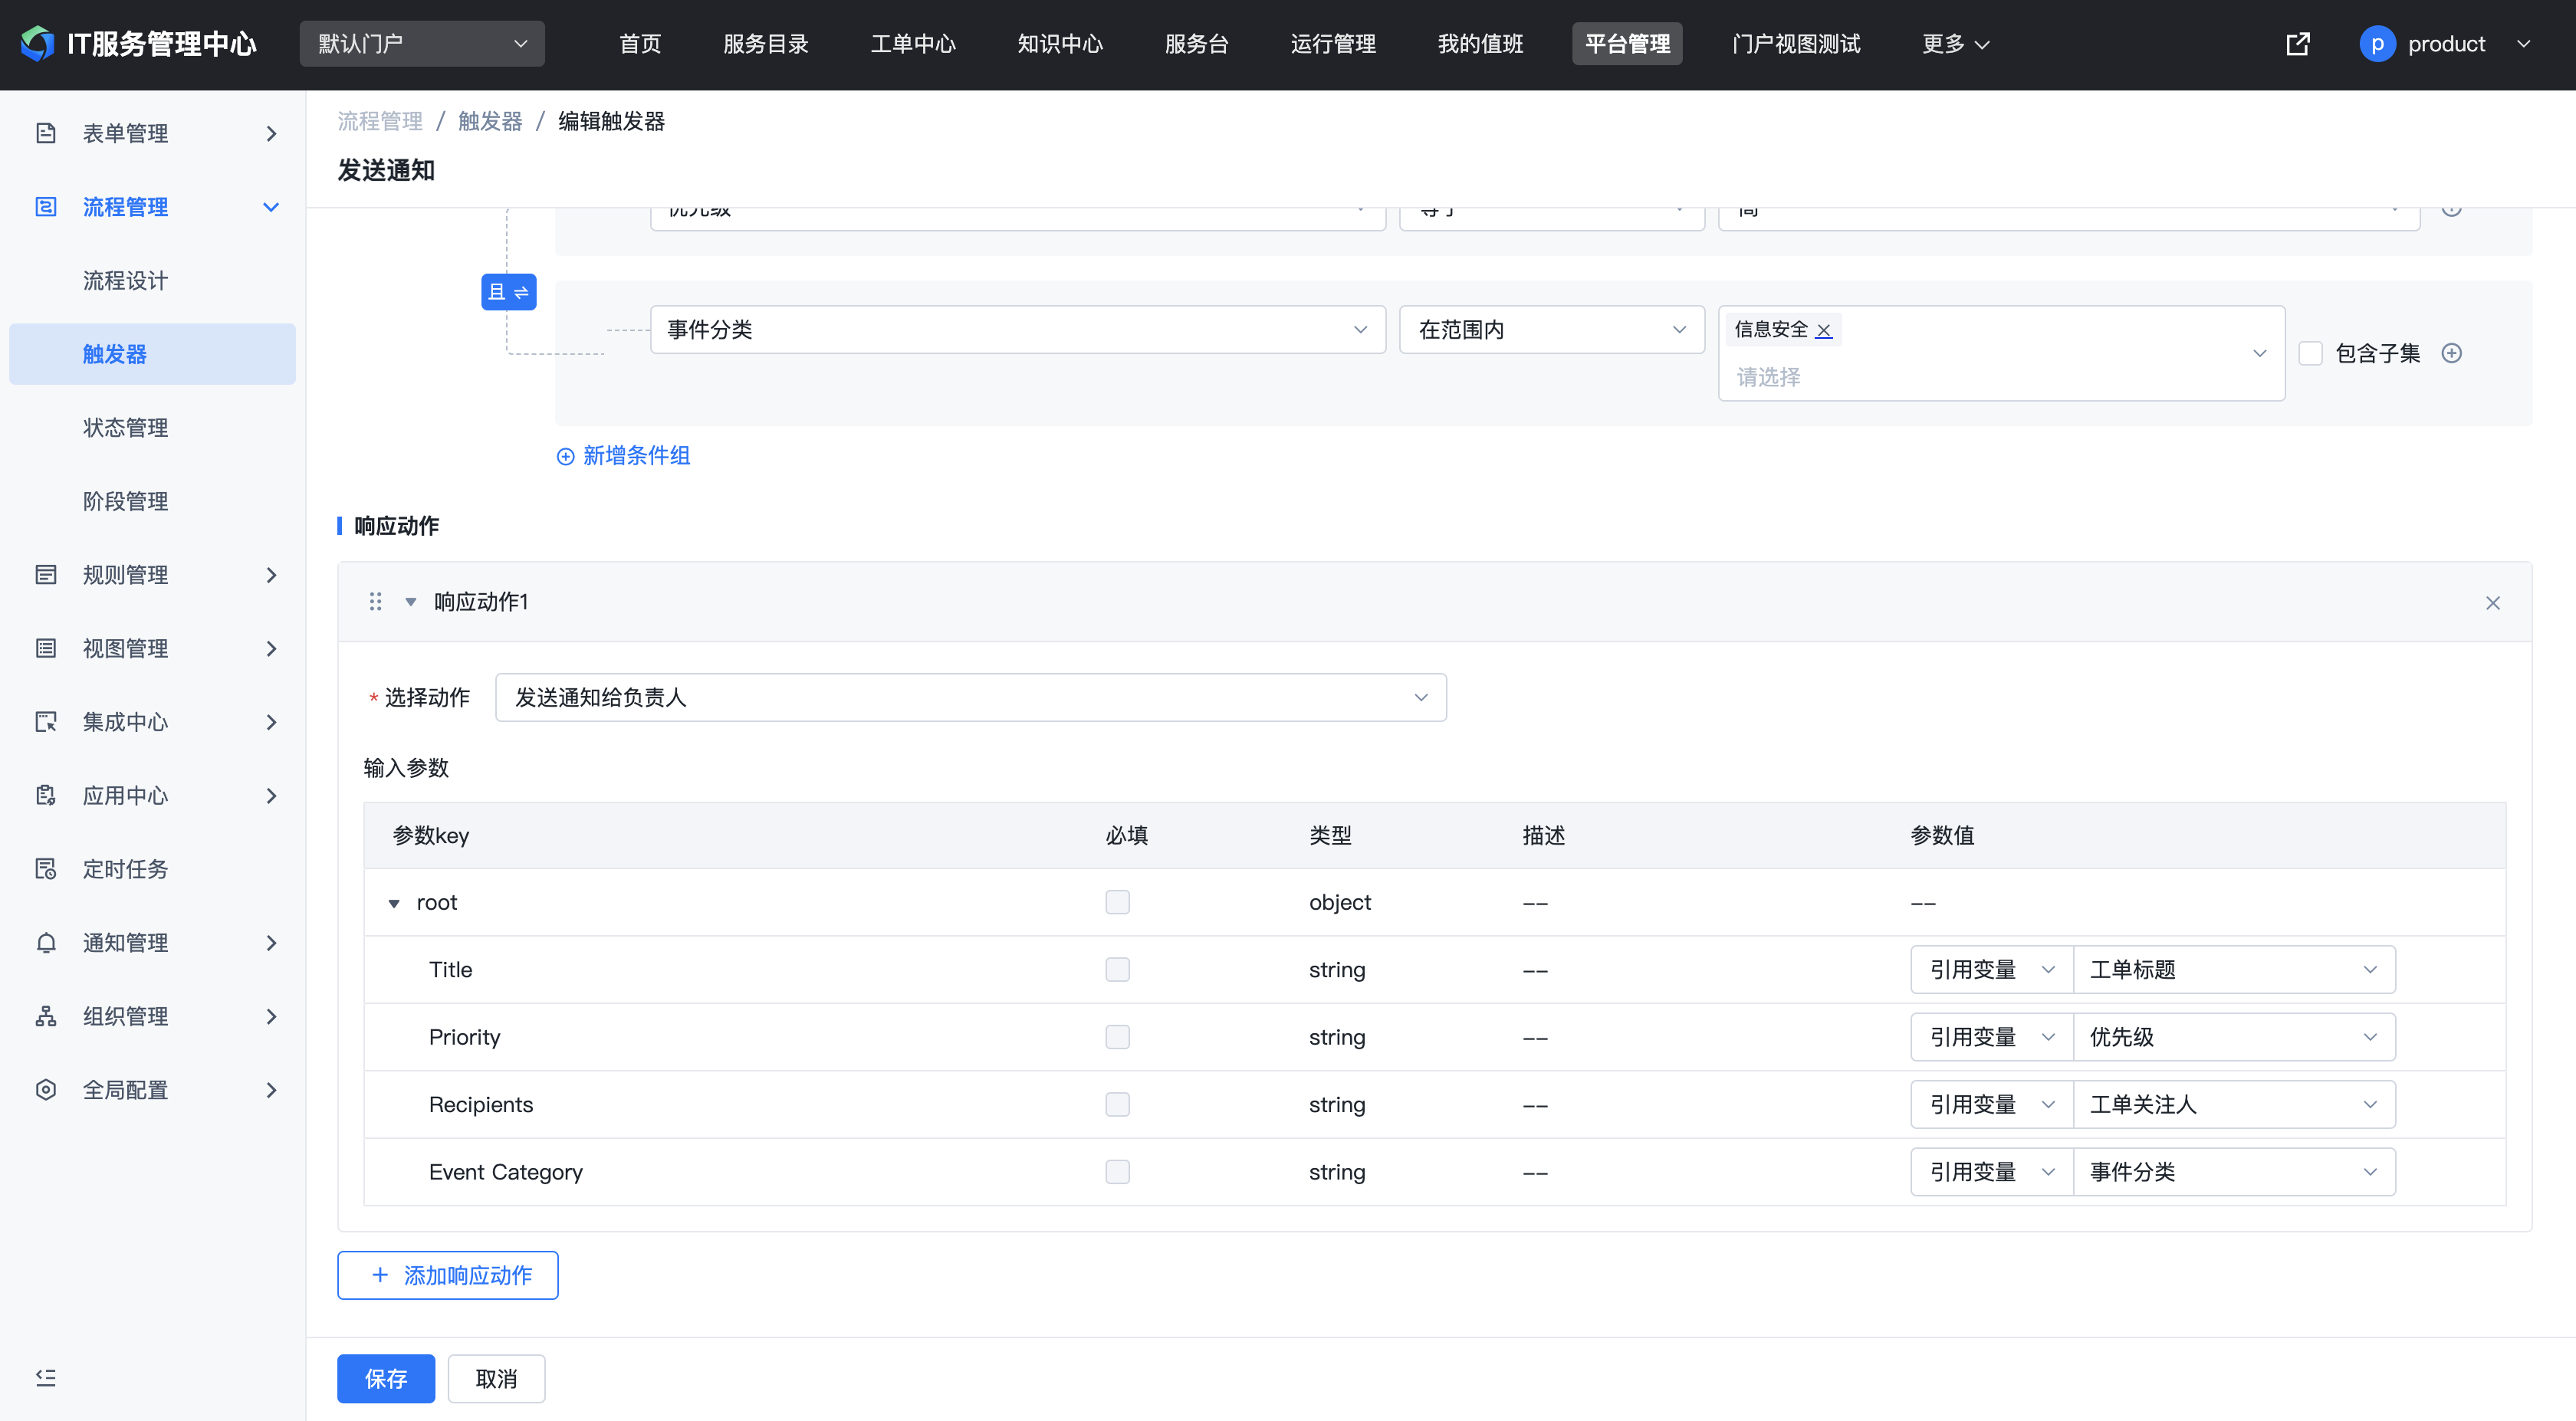
2.2.2.2. Trigger Usage
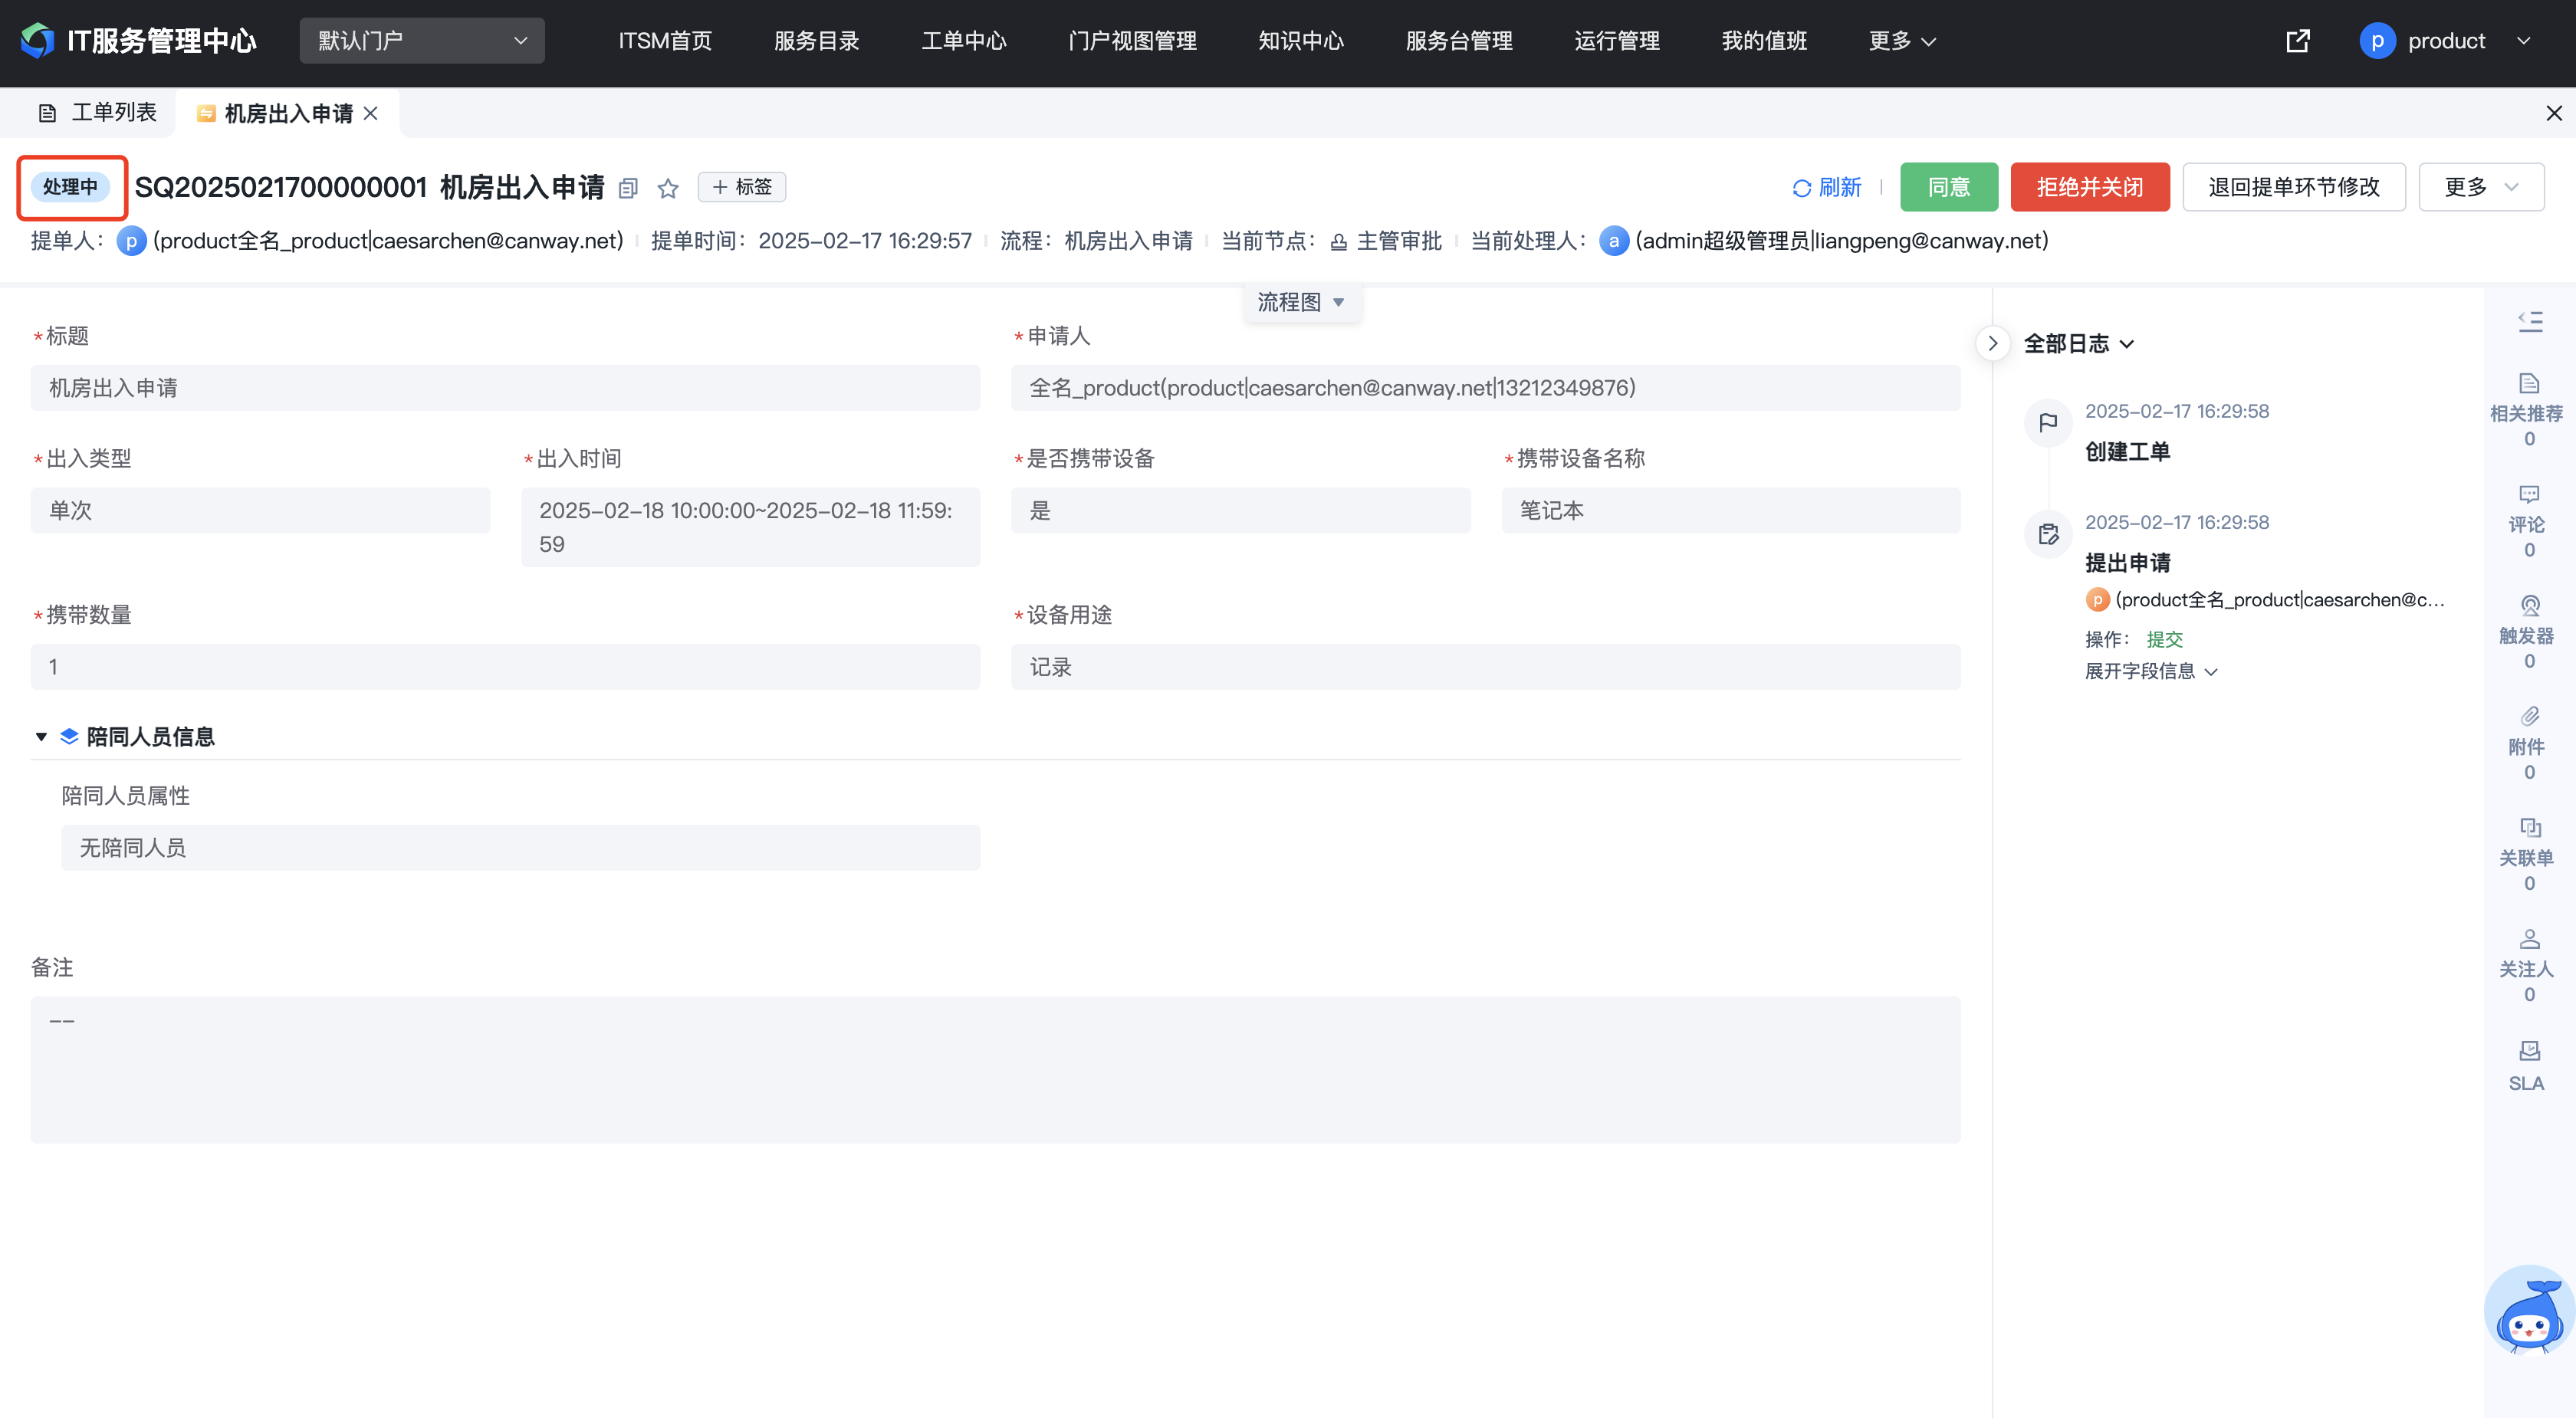
After trigger configuration is complete, when the trigger event and conditions are met, the action executes automatically without manual intervention. After trigger execution, the execution records can be viewed on the specific ticket detail page.

2.2.3. Status Management
The ticket status management module is used to configure the status transition logic throughout the entire ticket lifecycle from creation to closure. The system provides built-in status models and also supports user-defined statuses and transition rules, which can be configured as needed.

2.2.3.1. Configuring a Status Model
- Basic Information: Basic information includes name, description, and form model settings.
- The form model and status model have a one-to-one relationship (if a form model is not visible when selecting, it may be because that form model is already bound to another status model).
- If a workflow is not bound to a form model, or the bound form model does not have a corresponding status model configured, the system will automatically use the built-in default status model.
- Status List: Define status values. The system has built-in statuses: Draft, In Progress, Suspended, Completed, and Terminated. If additional statuses are needed, click "Add" to customize.
- Automatic Transitions: Used to set automatic status transition rules. When rules conflict, the one with the lower sequence value takes precedence. The built-in basic status transition logic is as follows:
- Draft: Tickets saved as drafts have the status "Draft".
- In Progress: Tickets that reach other nodes and are being processed normally during transition have the "In Progress" status.
- Suspended: After a ticket is suspended, its status changes to "Suspended". When the ticket is resumed, the status returns to the pre-suspension status.
- Completed: After a ticket completes its normal transition or is manually closed, its status changes to "Completed".
- Terminated: After a ticket is terminated, its status changes to "Terminated".
Note:
- End Status: When in an end status, the workflow does not continue and all form fields become read-only, unless the ticket is reopened.
- When adding transition rules, pay attention to the priority order and logical consistency. For example, avoid rules that change the status to "In Progress" when the ticket ends.

2.2.3.2. Ticket Status Display
The current ticket status can be seen in the ticket list or in the upper left corner of the ticket detail page.
2.2.4. Stage Management
The ticket stage management module organizes complex workflow nodes into stages. During workflow transitions, you can clearly see which stage the ticket is currently at, providing a better user experience.
2.2.4.1. Stage Model Configuration
1.Creating a Stage Model
Click the "Add" button in the upper right corner of the stage model list to create a stage model. Fill in the information:
- Basic Information: Name, Description
- Stage List: Define the stage values and the stages this model should contain.

2.Binding a Stage Model to a Workflow
In the third step of workflow design, click "Stage Management" to bind workflow stages.
After selecting the corresponding stage model, the stages contained in the model are automatically listed. Select the workflow nodes behind each stage to complete the binding.
2.2.4.2. Stage Usage
After the workflow stage binding is complete, when a ticket is created using this workflow, the current stage progress is displayed on the ticket detail page.
2.3. Rule Management
2.3.1. Decision Table
A decision table is a structured analysis method that presents complex logical conditions in a clear tabular format for unified maintenance and use.
Decision tables are used to automate decision-making processes during workflow execution, helping improve service efficiency and quality. For example, in incident management scenarios where handlers are automatically matched based on incident classification, you can use a decision table to pre-maintain the mapping between incident classifications and handlers, enabling automated assignment in the workflow.
2.3.1.1. Decision Table Configuration
- On the decision table list page, click the "Add" button in the upper right corner to enter the decision table configuration page.

- On the decision table configuration page, enter the decision table name and description, then click "Add Field" in the rule configuration to configure condition fields and result fields.
- Condition Fields: Fields used for condition matching.
- Result Fields: Output fields when conditions are matched.

Conditions can be configured by directly clicking the input box in the table.
For complex combined condition configurations, click "Combined Condition Settings" for more advanced configuration.

2.3.1.2. Decision Table Usage
Decision tables can be used in the following two scenarios:
1.Decision Node
Typically used for predefined rules to automate certain scenarios and improve ticket processing efficiency.
For usage details, see the Decision Node section under "Platform Management / Workflow Management / Workflow Design / Workflow Node Introduction" in this document.

2.Form Data Linkage
Typically used when a form field's value can be automatically derived based on certain business rule logic.
For usage details, see the Decision Table Linkage Configuration section under "Platform Management / Workflow Management / Workflow Design / Form Design / Data Linkage Settings" in this document.

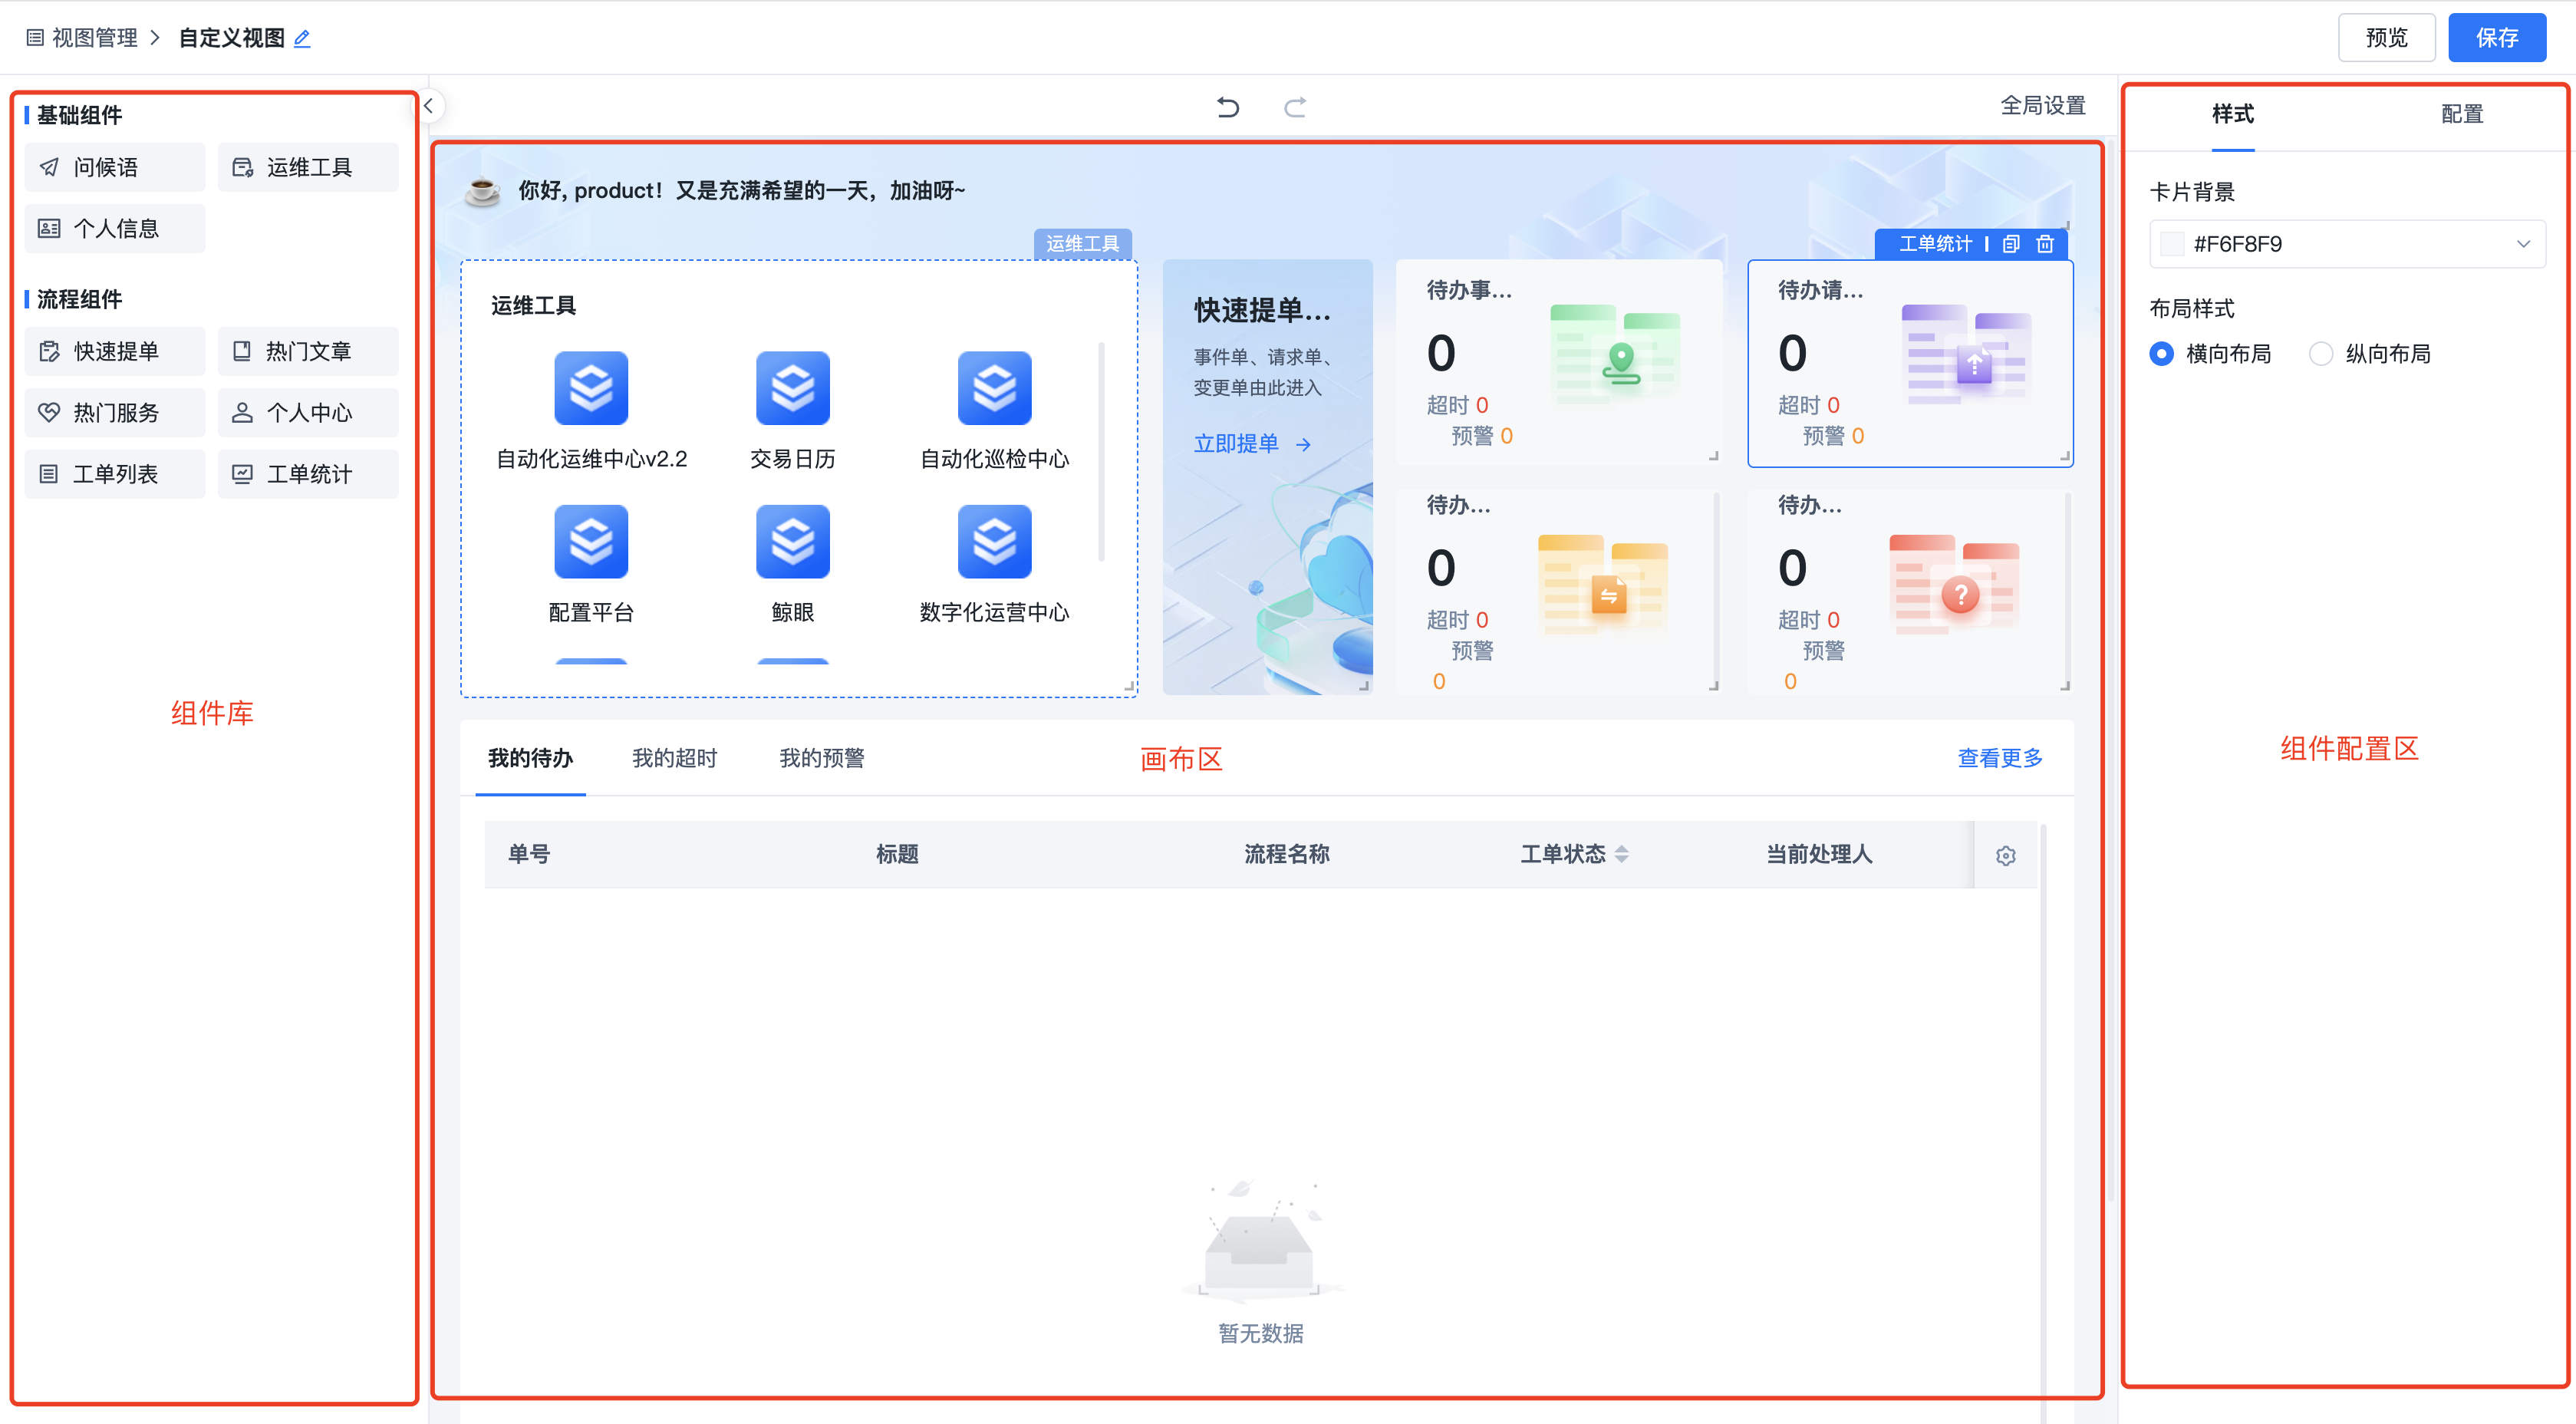
2.4. View Management
2.4.1. View List
The view list displays all views provided by the system or installed with plugins, and supports adding external link views or designing new views based on component orchestration.
The left sidebar shows view groups. The label next to the group indicates the application the view belongs to. The right side shows the specific view list under that group.

2.4.1.1. Adding Views
To add a view, create a new group (new views cannot be added to built-in view groups). In the new group, click the "Add" button in the upper right corner to add a view. After adding a view, you need to add it to a menu in the Menu Management module for it to be displayed.
1.Adding an External Link View
Select "External Link" as the creation method, enter the link address, and the view is added.

2.Adding a Custom Orchestrated View
A custom orchestrated view is designed by dragging and configuring components from the product's component library. Select "Custom Orchestration" as the creation method to enter the view orchestration engine.
2.4.2. Menu Management
The Menu Management module is used to arrange the entire system's menus. The system provides a built-in default menu and supports custom new menus.
1.Adding a Menu
Click the "Add" button in the upper right corner to create a new menu, or select an existing menu and copy it for editing.

2.Arranging Menus
Click "Edit" to enter the menu editing page. From the "Available View List" on the left, check the views you need. They will be added to the right-side menu arrangement area, where you can drag and drop to adjust positions.

3.Adding a Directory
Click the "Add" button in the upper right corner of the menu arrangement area to create a new directory, then drag the corresponding views into the directory.

4.Enabling a Menu
After the menu is configured, click "Enable" to immediately activate the new menu (only one menu can be active per portal).

2.5. Integration Center
2.5.1. Data Tables
The Data Tables module is used to maintain business data related to ITSM for use within workflows.
2.5.1.1. Data Table Configuration
- On the data table list page, click the "Add" button in the upper right corner to enter the data table configuration page.

- On the data table configuration page, enter the data table name and description, then click "Add Field" to configure the data table fields. Save when the configuration is complete.

- Click the data table name in the list to enter the data management page for maintaining data.


2.5.1.2. Data Table Usage
- Form Data Linkage
Data tables can be used for form data linkage configuration, allowing automatic lookup of related information from the data table based on values entered in certain form fields.
For usage details, see the Data Table Linkage Configuration section under "Platform Management / Workflow Management / Workflow Design / Form Design / Data Linkage Settings" in this document.

- Data Source for Selection Fields
When the data source for selection fields in form models, decision tables, or workflow forms comes from a data table, set the option configuration method to "Data Table Field Values" and configure accordingly.
2.5.2. Action Management
The Action Management module is used to uniformly manage integrations with third-party systems. Automation scenarios can be implemented in workflows through automatic nodes or the Trigger module.
2.5.2.1. Action Configuration
- On the action management list page, click the "Add" button in the upper right corner to enter the action configuration page.

- On the action configuration page, enter the action name and description, then select the action type (currently supporting Python, API, and Service Action). Configure the input/output parameters.
Details for each type:
Python Script Type:
After uploading a Python file, the input and output parameters are automatically parsed.
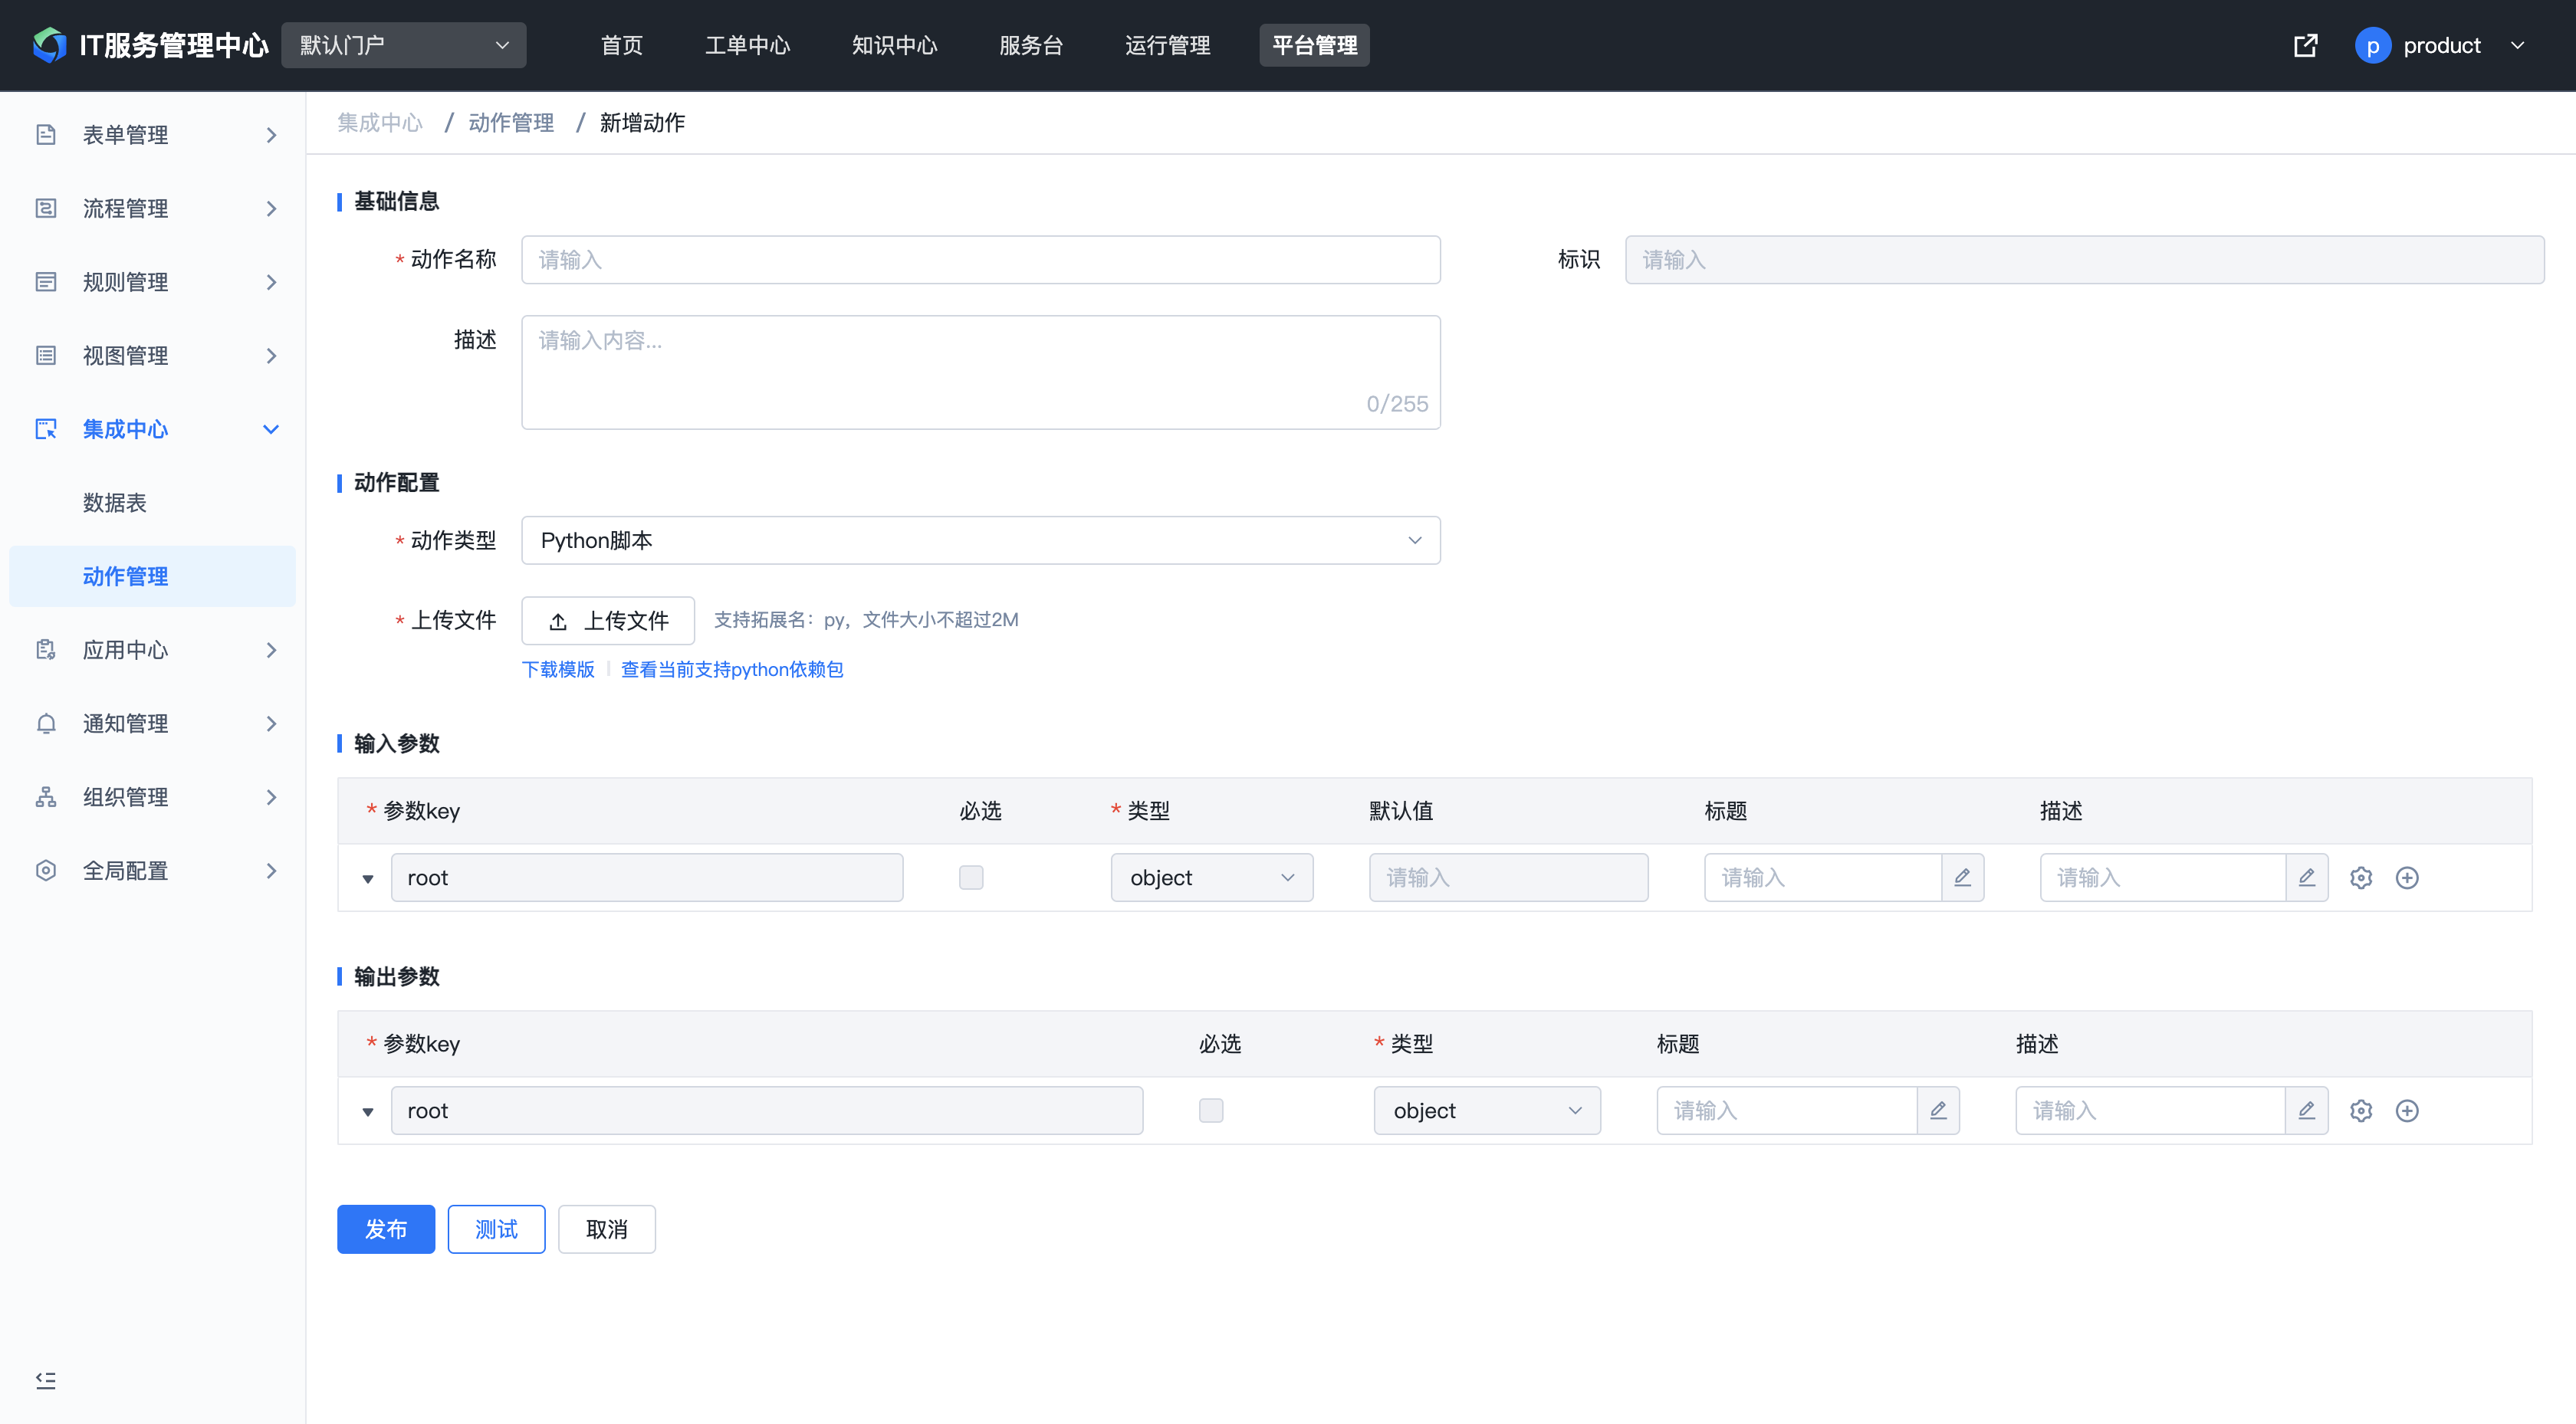
API Type:
API-type actions interface with data from the platform's API Gateway. Input and output parameters need to be manually configured.
- Executor: The resource (API) is called under this executor's identity. Ensure the executor has the corresponding resource permissions.
- Execution Mode: Two modes are available - synchronous and asynchronous. Asynchronous actions can only be used in workflow automatic nodes and are not available elsewhere.
- Synchronous: After the action is initiated, it actively waits for execution to complete and directly retrieves the output parameters.
- Asynchronous: After the action is initiated, the called party must actively callback through the callback URL to return the output parameters.
- Callback URL: When the execution mode is asynchronous, a callback URL is automatically generated for receiving the output parameters via callback.
- Timeout Duration: When the execution mode is asynchronous, if the callback does not occur within the timeout period, the emergency assignee configured at the automatic node can manually enter the output parameters.

Service Action:
Service actions interface with the platform's atomic action capabilities, pulling action lists from the platform's action service. The platform provides integrated capabilities from development, debugging, to deployment for action-style plugin development. For details on service action development, see the platform's service action documentation.
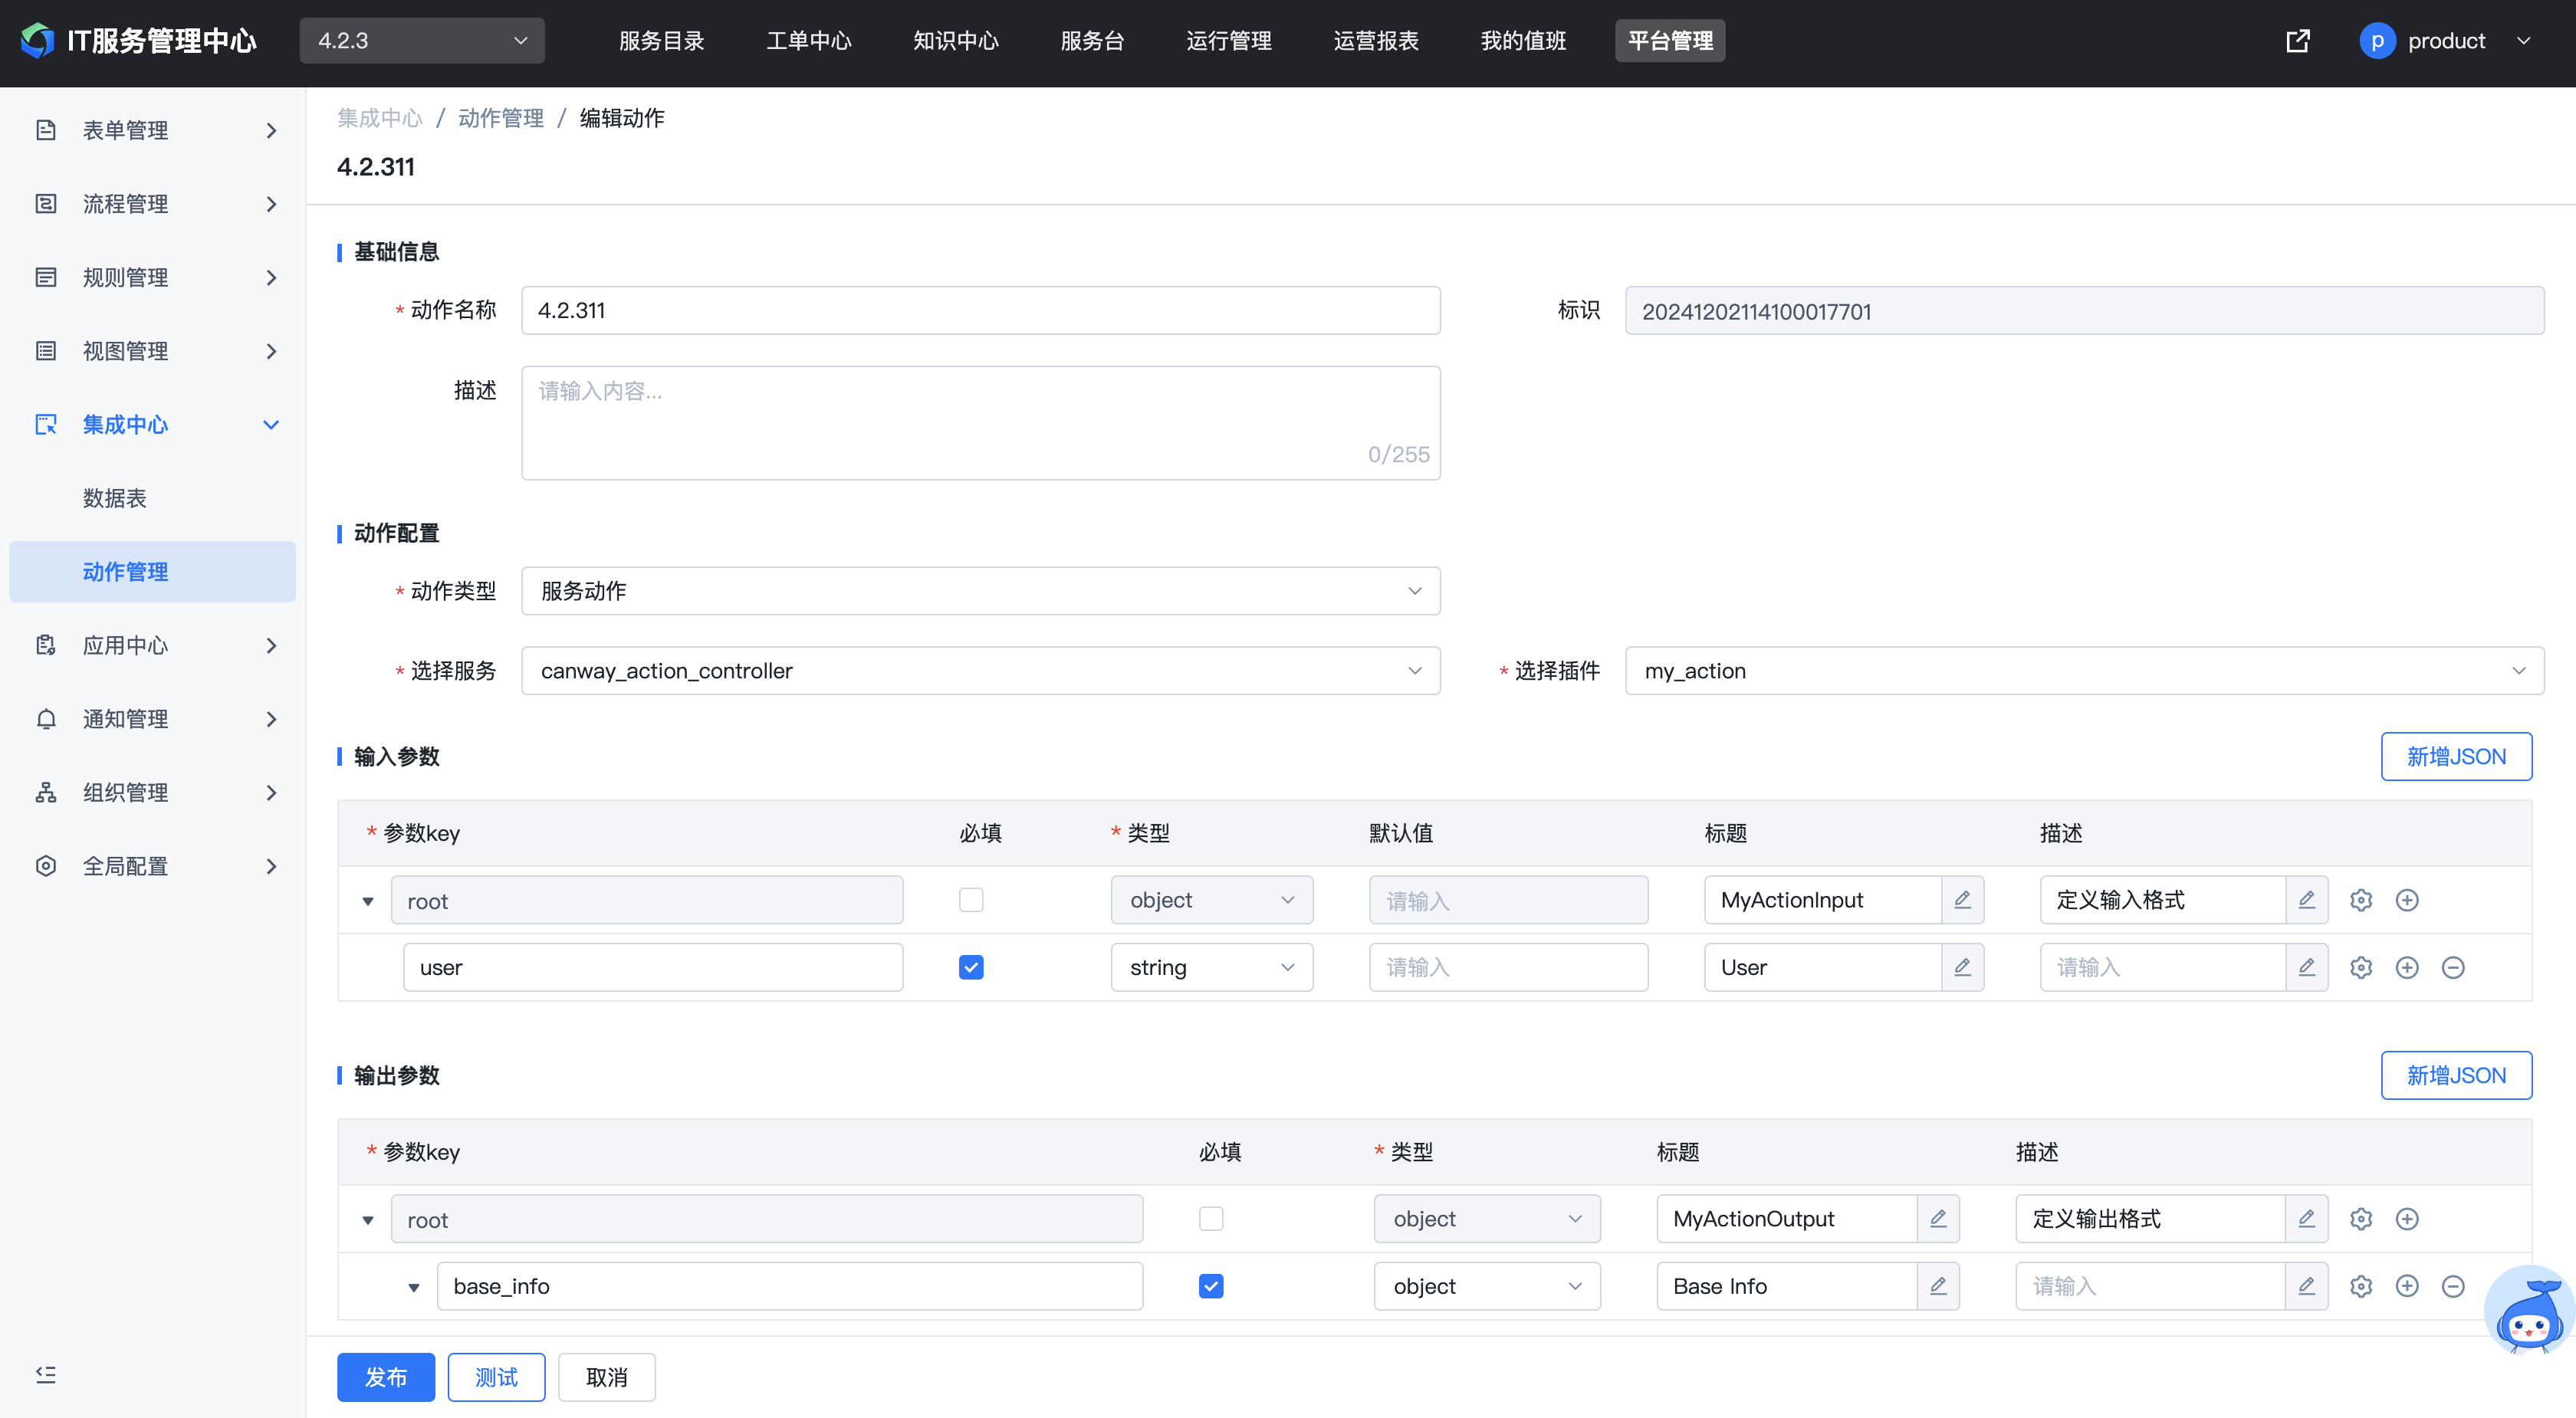
2.5.2.2. Action Usage
Actions can be used in the following four scenarios:
1.Automatic Nodes in Workflows
Automatic nodes are used for tasks that do not require manual intervention and can be executed automatically by the system. Typically used for predefined, repetitive, or non-decision-requiring tasks.
For usage details, see the Automatic Node section under "Platform Management / Workflow Management / Workflow Design / Workflow Node Introduction" in this document.

2.Form Data Linkage
When the data source for data linkage comes from an external system, you can integrate the corresponding API through the Action Management module and configure it via action linkage.
For usage details, see the Action Linkage Configuration section under "Platform Management / Workflow Management / Workflow Design / Form Design / Data Linkage Settings" in this document.

3.Data Source for Selection Fields
When the data source for selection fields in form models, decision tables, or workflow forms comes from an external system, you can integrate the corresponding API through the Action Management module and reference it through fields.
Set the option configuration method to "Reference Action" for selection fields and configure accordingly.

4.Trigger Action Execution
A workflow trigger is a mechanism that automatically executes specific operations within a workflow. When specific events occur or conditions are met, the trigger is activated, initiating one or more related actions. These actions may include sending notifications, updating database records, creating new tasks, etc.
For usage details, see "Platform Management / Workflow Management / Triggers" in this document.

2.6. Notification Management
2.6.1. Notification Rules
The Notification Rules module is used to configure message notification rules throughout the ticket lifecycle. The main purpose is to ensure that relevant parties can receive timely and accurate ticket-related messages.
2.6.1.1. Built-in Notification Rules
The platform includes commonly used built-in notification rules. Enter the detail page to configure notification channels, then enable them. Other configurations can also be modified if needed.

Built-in notification descriptions:
| Notification Name | Trigger Event | Notification Recipient |
| Ticket Closure Notification | Notification after ticket closure | Ticket Submitter |
| Ticket Suspension Notification | Notification after ticket suspension | Ticket Submitter |
| Ticket Resume Notification | Notification after ticket suspension recovery | Ticket Submitter |
| Ticket Comment Notification | Notification when @mentioned in ticket comments | @Mentioned Users |
| Ticket Return Notification | Notification after ticket return | Current ticket assignee after return |
| Ticket Withdrawal Notification | Notification after ticket withdrawal | Current ticket assignee after withdrawal |
| Ticket Creation Notification | Notification after ticket creation | Ticket Submitter |
| To-Do Ticket Notification | Notification when a new to-do is assigned | Newly assigned ticket handler |
2.6.1.2. Notification Rule Configuration
If additional notification requirements exist, custom notification rules can be created.
Click the "Add" button in the upper right corner of the notification rules list to create a notification rule. Fill in the information, save, and enable.
- Basic Information: Name, Description
- Trigger Event: Set which event triggers the notification rule, such as ticket creation, ticket return, ticket withdrawal, etc. You can also set the scope of effective workflows.
- Trigger Condition: Configure additional conditions for the notification rule to take effect, specifying what conditions must be met.
- Notification Recipient: Who should receive the notification.
- Notification Channel: The channel through which the notification is sent, such as email or WeChat (notification channels are integrated with the platform).
- Notification Content: The specific content of the notification.


2.6.1.3. Notification Rule Usage
After notification rules are configured and enabled, notifications are sent automatically when rule conditions are matched, without manual intervention.
2.7. Scheduled Tasks
Scheduled tasks refer to operations or workflows automatically triggered at preset time rules. They are typically used for periodic or planned IT service management activities. The core objective is to improve operational efficiency, standardize workflow execution, and reduce manual intervention. For example, scheduled inspection tasks.
2.7.1. Scheduled Task Configuration
- Click the "Add" button to create a new scheduled task.
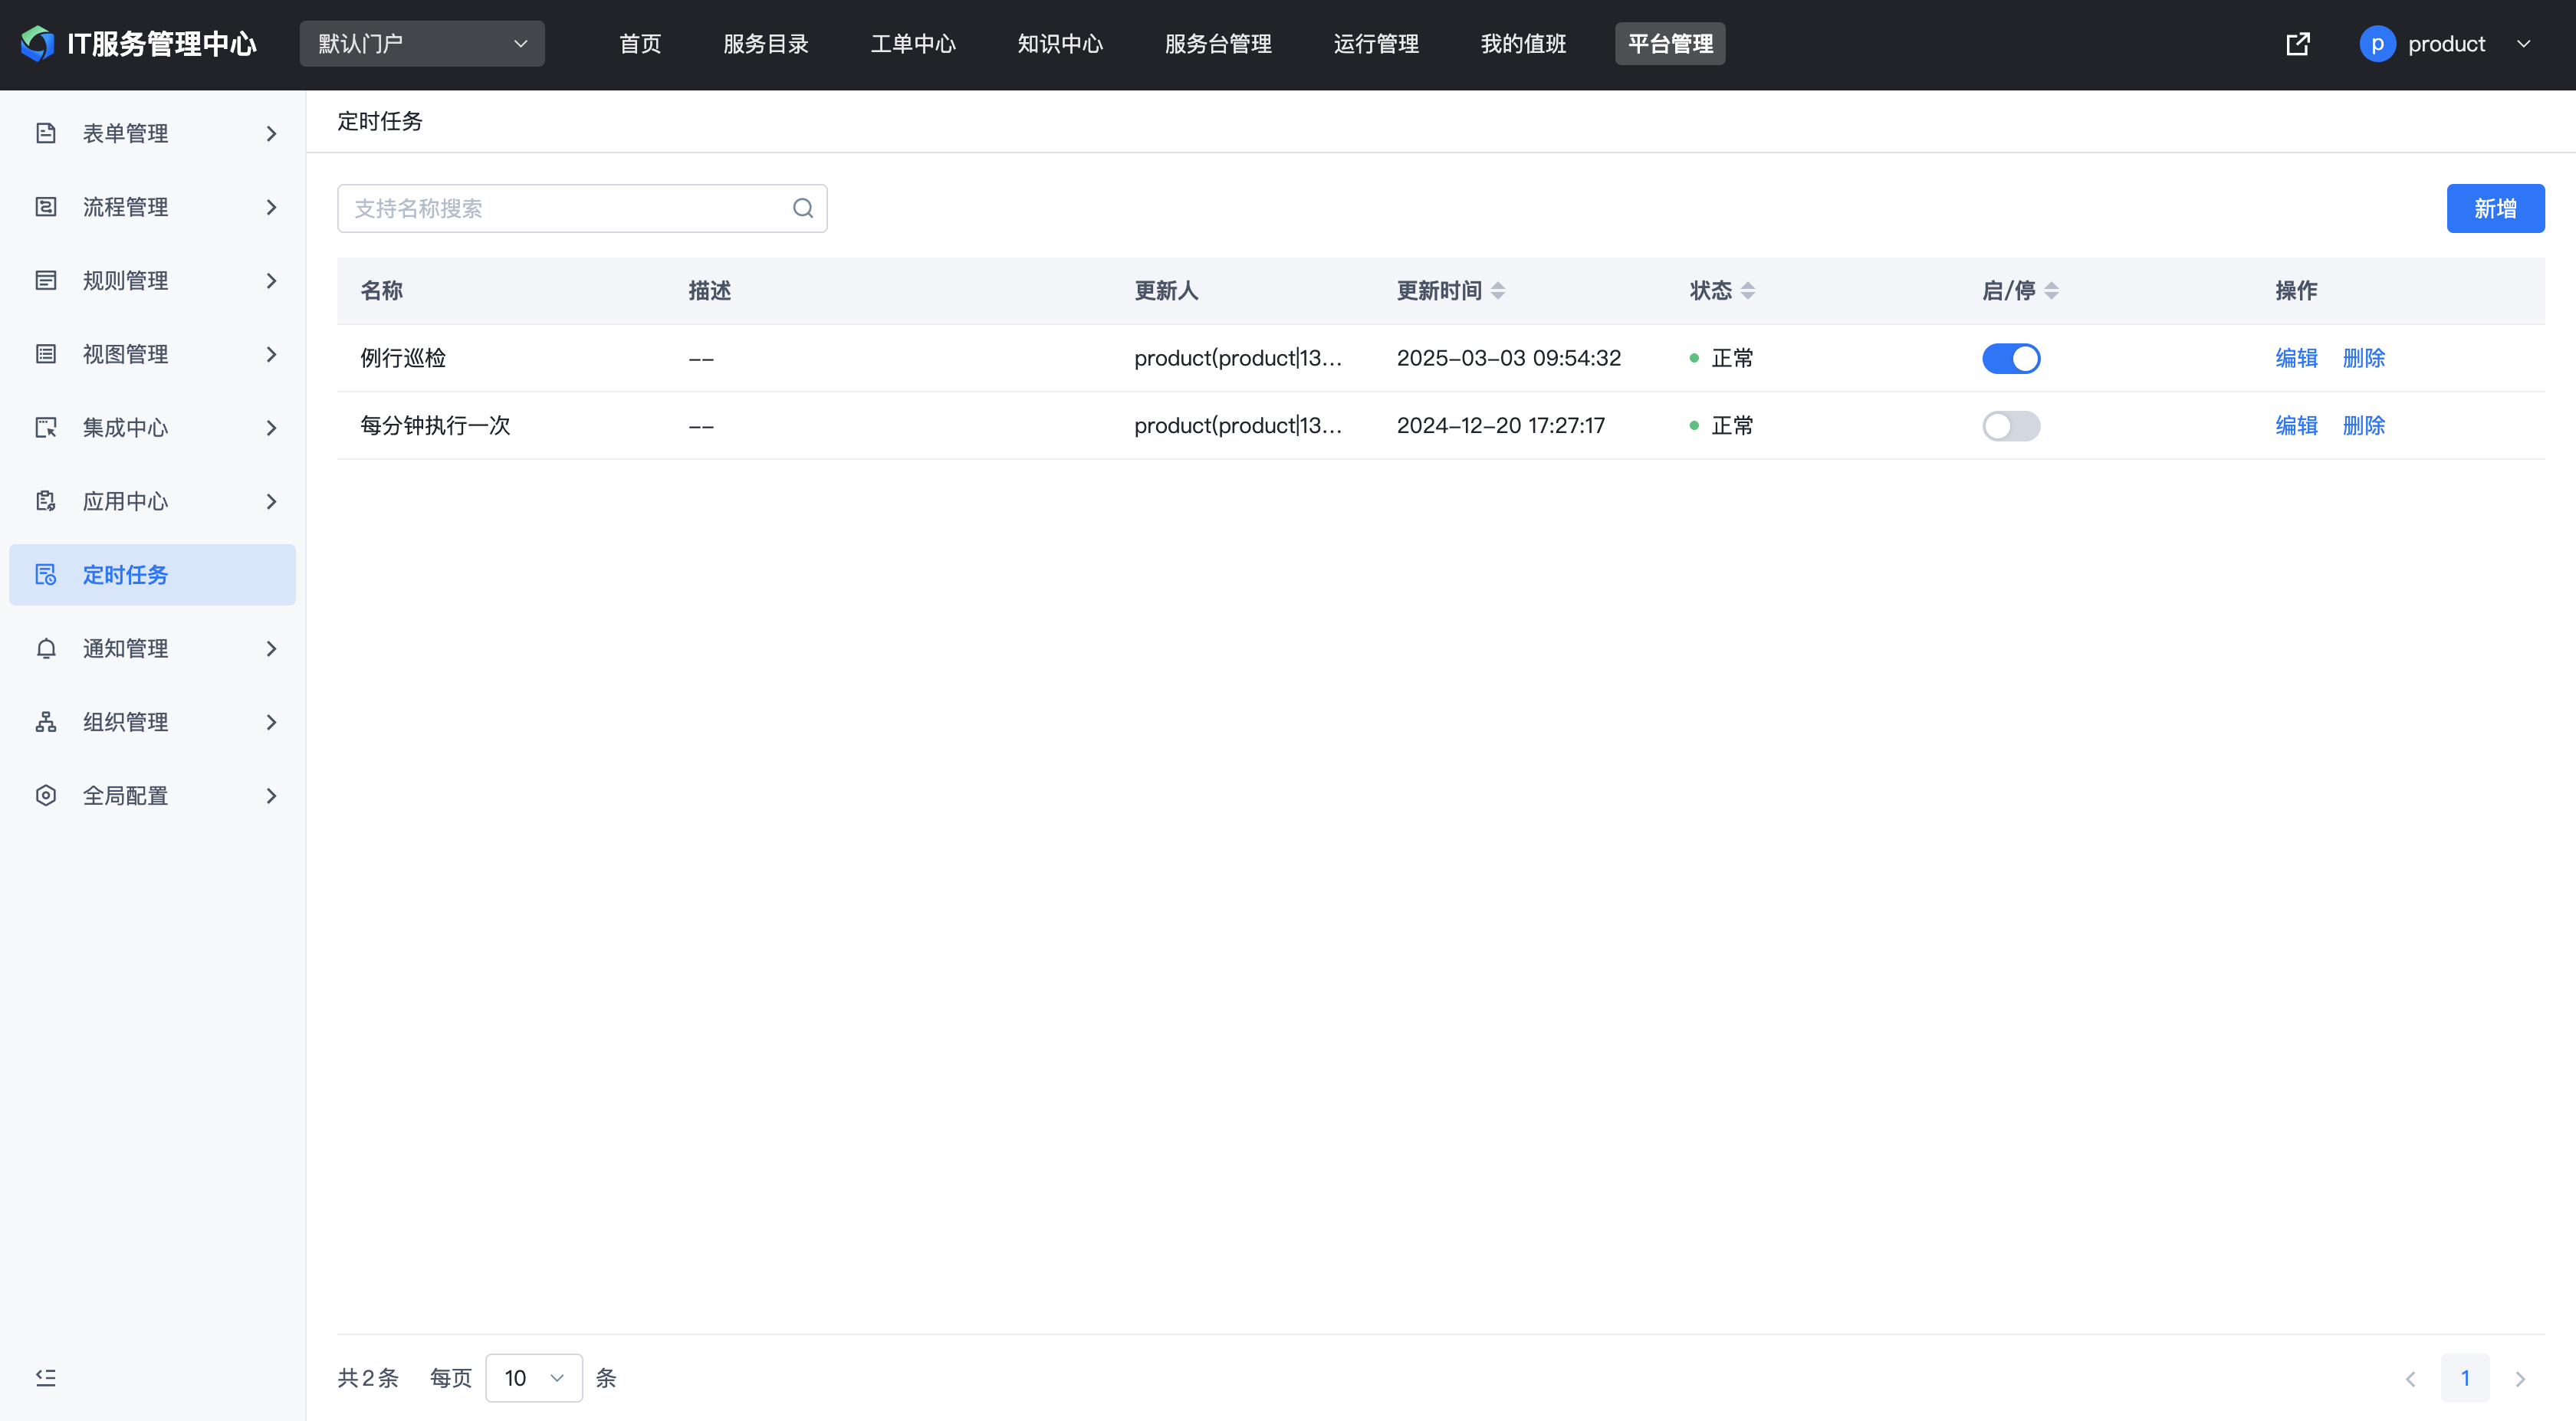
- Set the execution cycle, supporting single fixed-time execution or periodic execution.
- Select the ticket to be initiated by the scheduled task, and set the submitter and submission information.
2.7.2. Scheduled Task Usage
After the scheduled task is configured, when the configured execution time is reached, the ticket creation task is automatically triggered without manual intervention.
2.8. Organization Management
2.8.1. User Group Management
A user group is a collection of users. The User Group Management module is used for creating and managing user groups.
2.8.1.1. Adding a User Group
In the left-side user group categories, select a leaf node. Click the "Add" button in the upper right corner of the user group list to create a user group. Fill in the information, save, and enable.
- User Group Category: The category the user group belongs to, corresponding to the category tree on the left side.
- User Group Tags: Tag the user group. Tags are maintained in the built-in "User Group Tags" dictionary in the Data Dictionary.


After the user group is created, click the user group name in the list to enter the user group detail page and view detailed information.

2.8.1.2. Modifying a User Group
Enter the user group detail page to modify basic information and user group members.
- Basic Information: Hover over the corresponding field to reveal the icon. Click the icon to modify.
- User Group Members: Click the "Add Member" button in the upper right corner of the member list to add members. Click the "Remove" button at the end of the member list to remove members.

2.8.1.3. Enabling/Disabling User Groups
User groups can be enabled or disabled using the toggle button in the user group list.
After a user group is disabled:
- The disabled user group will not be visible in places where user group selection is available on the frontend.
- If a disabled user group is configured in a workflow, ticket tasks will still be dispatched. If you do not want tasks dispatched to the disabled user group, you need to manually modify the workflow configuration.

2.8.1.4. Deleting a User Group
Click the "Delete" button in the user group list to delete a user group.
Before deleting a user group, you must first disable it. Enabled user groups cannot be deleted.
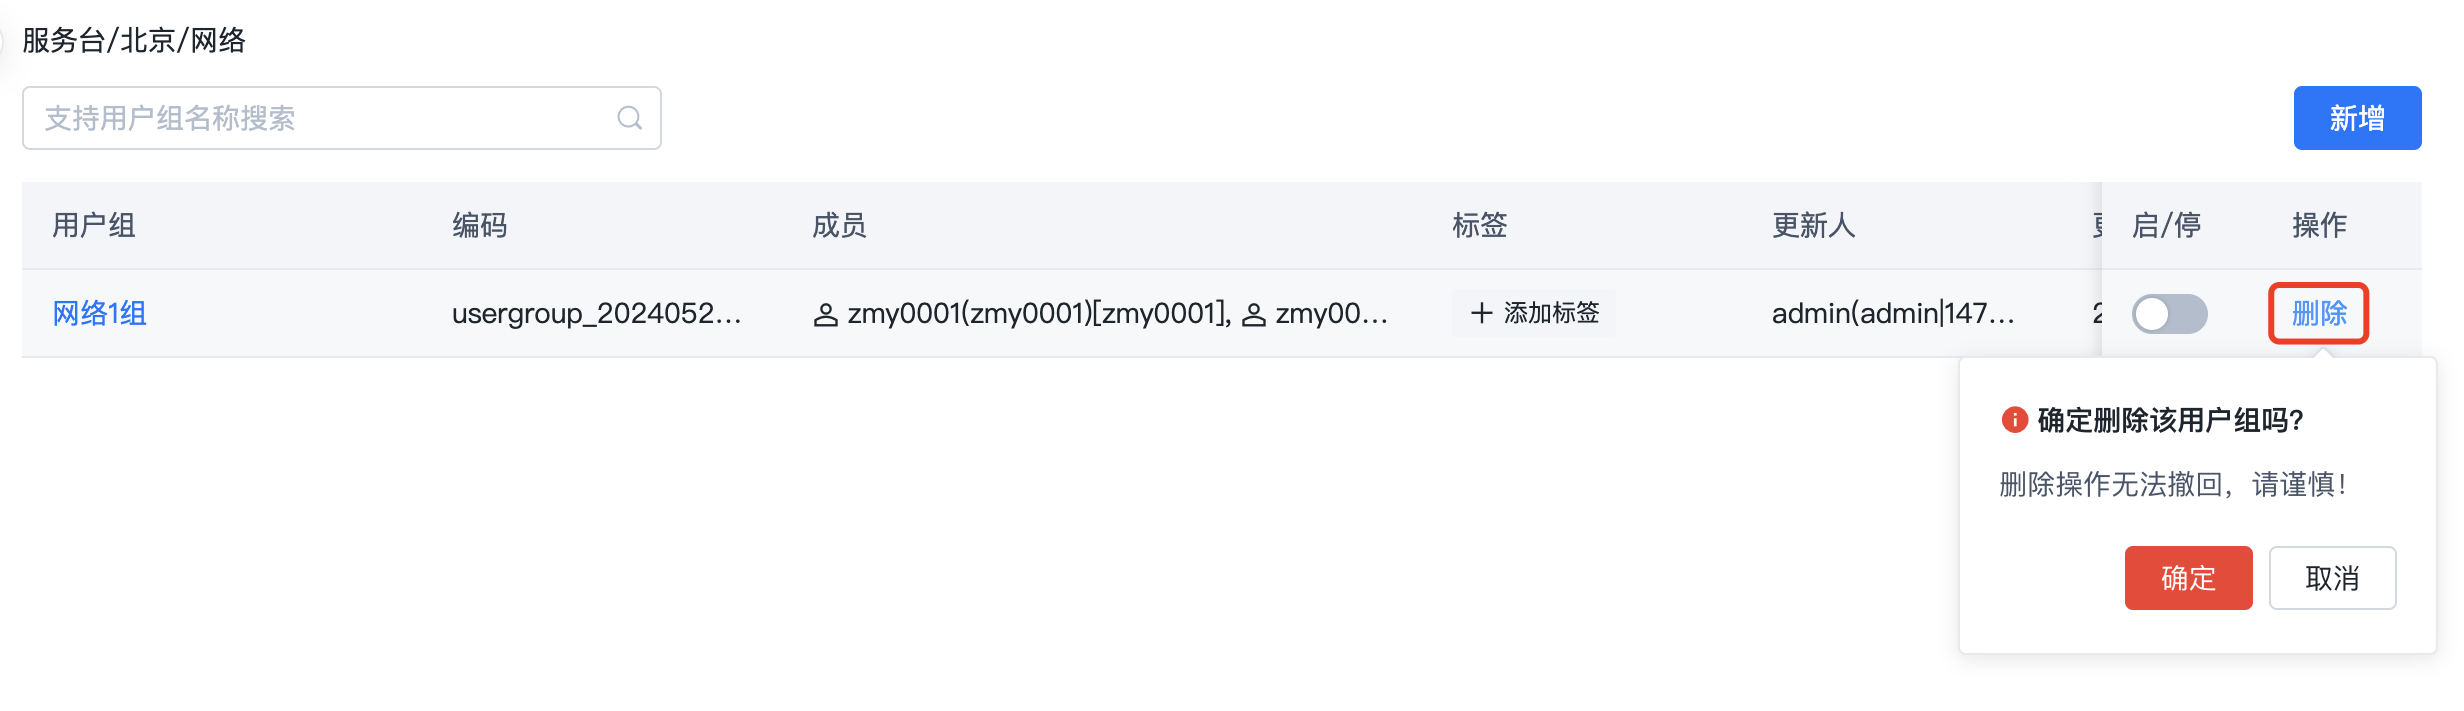
2.8.2. VIP Management
VIP Management is used to manage VIP users within the organization. Person fields associated with users in the VIP list can display VIP badges in ticket forms or ticket lists, enabling priority processing.
- On the VIP Management page, click the "Add User" button in the upper right corner to add VIP users.

- In the third step "Workflow Settings" of the specific workflow design, set the person fields that should display VIP badges.
- After configuring VIP badges, VIP badges will be displayed next to VIP users in the corresponding fields in the ticket list and ticket details.

2.9. Global Configuration
2.9.1. Basic Configuration
Basic system configurations are unified in this module.

1.Attachment Type Configuration:
Configures the attachment types supported by attachment upload features throughout the system.
To add a new attachment type, enter ".xxx" in the input box (note the "." prefix is required), press Enter to add, then click Save.

2.User Information Configuration:
Configures the display of user information in the system.
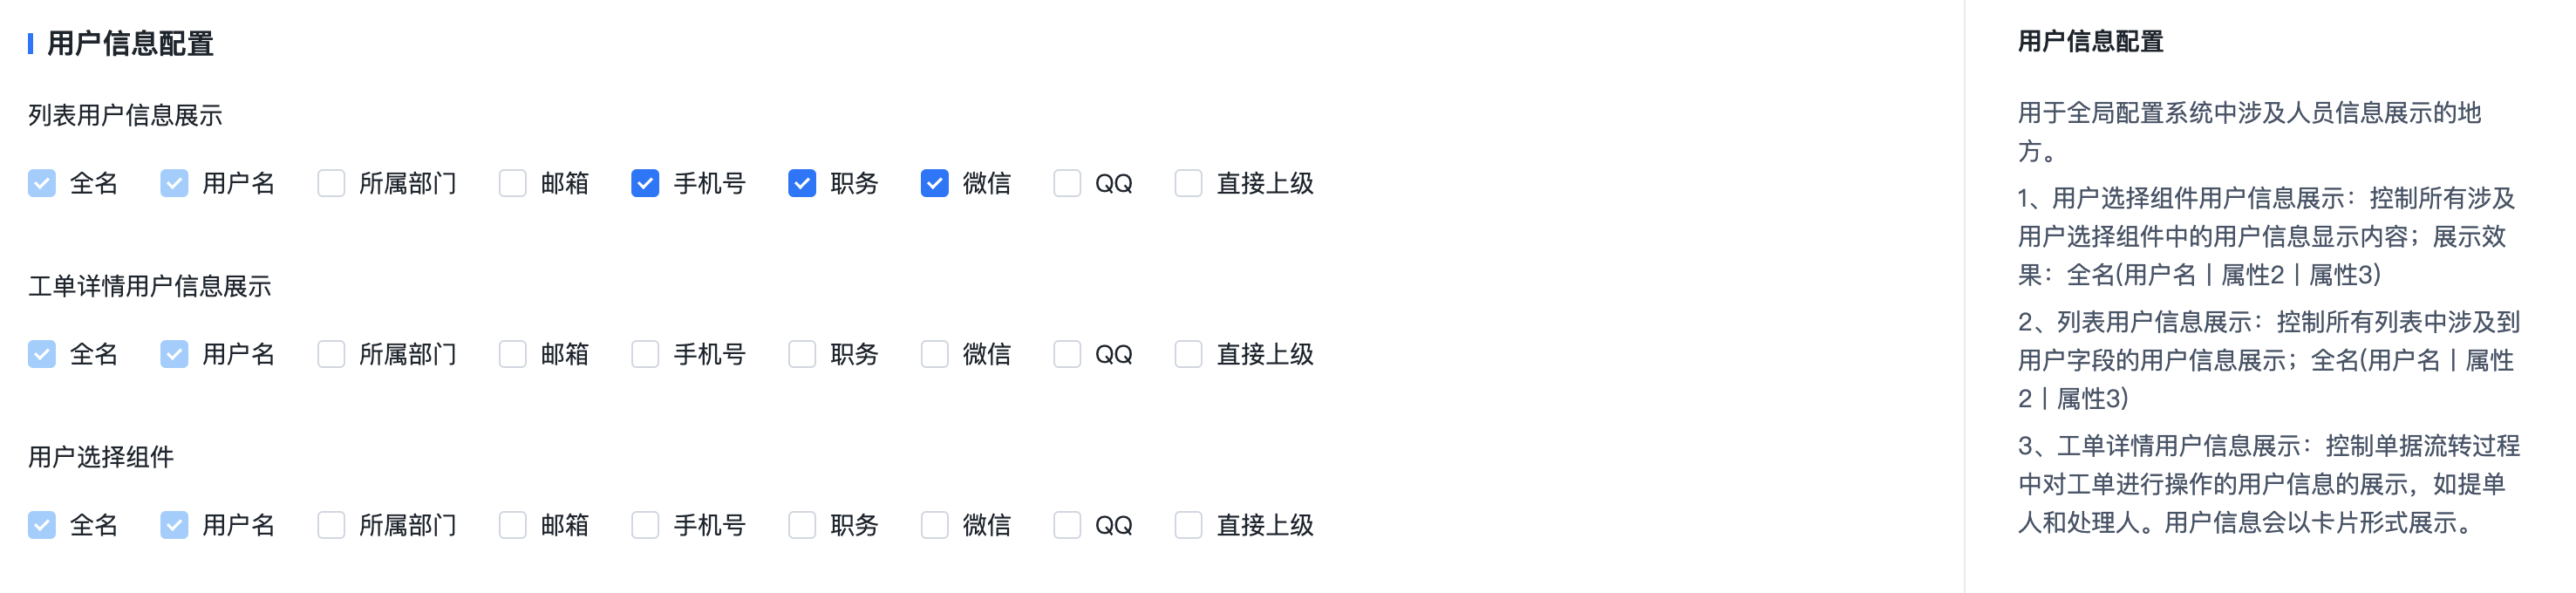
- List User Information Display: User information display in various lists.
- Ticket Detail User Information Display: User information card display in ticket details.

- User Selection Component Display: User information display in all user selection components.

2.9.2. Data Dictionary
The Data Dictionary is used to maintain data sources for selection fields in tickets. Data with reusable characteristics (such as incident classification, incident source, etc.) is centrally maintained in the Data Dictionary to ensure data standardization and consistency, reduce management workload, and improve workflow design efficiency.
2.9.2.1. Data Dictionary Configuration
1.Adding a Data Dictionary
Click the "Add" button in the upper right corner of the data dictionary list to create a data dictionary. Fill in the information, save, and enable.
The data dictionary also supports hierarchical data maintenance for use with cascade fields.


2.Importing a Data Dictionary
Data dictionaries can also be imported. The import file format is JSON, which is equivalent to importing a data dictionary file exported from this system.

2.9.2.2. Data Dictionary Usage
When designing workflow forms, the option source for selection fields can be set to "Data Dictionary" to select from the data dictionary.
Field types that can use the data dictionary as an option source include: Single/Multi-select Dropdown, Single/Multi-select Radio/Checkbox, Single/Multi-select Cascade Selector.

2.9.3. Workflow Types
Workflow types refer to different categories of workflows. Workflow type configuration is as follows:
- On the Workflow Types page, click the "Add" button, enter the type name and ticket number prefix, and save to add the workflow type.
Ticket number logic:
- Format: Prefix + Date + 8-digit sequence number. Example: INC2024061700000001
- The last 8 digits of the ticket number are isolated by workflow type and portal. Tickets of the same type within the same portal have sequence numbers that reset to 1 each day and increment.


- When designing a workflow, you need to select a workflow type. When submitting tickets using this workflow, the ticket number prefix will match the prefix configured for that type.

- When creating tickets in the Ticket Center, the left-side categories are organized by workflow type.

2.9.4. Portal Configuration
ITSM provides portal configuration functionality, supporting the creation of multiple portals. "Multi-portal" refers to the concept of providing customized access entry points for different user groups or roles. Each portal is designed for a specific user group to meet their specific needs and preferences. The purpose of multi-portal is to provide a more personalized and efficient user experience, ensuring users can easily access information and services relevant to them.
2.9.4.1. Portal Configuration
Click the "Add" button in the upper right corner of the portal configuration list to create a new portal. Fill in the information, save, and enable.

After creating a portal, a graded management space is automatically created in the Permission Center. Click "Permission Configuration" to navigate to the Permission Center and enter the portal's graded management space.

In the graded management space, you can configure the portal's administrators, authorized personnel, and maximum authorization boundaries.
For detailed instructions on using the Permission Center, refer to the Permission Center user guide.

Portal administrators can switch to the corresponding portal management space in the upper left corner of the Permission Center to configure user groups and permission templates for the portal. They can also create secondary management spaces under this space.

2.9.4.2. Portal Usage
After portal configuration is complete, users with visibility permissions for the portal can switch between portals in the upper left corner of the product homepage.


Switching portals

2.9.4.3. Portal Data
Data across different portals is isolated by portal, except for ticket data and the VIP user list.


2.9.5. Ticket Groups
2.9.5.1. Ticket Group Configuration
Administrators can configure and initialize ticket groups for users in the backend Ticket Group module.
- Adding a Group Directory
The left side maintains the ticket group directories. Click to add a new group directory.

- Adding a Group
Under the corresponding group directory, click the "Add Group" button to create a new group.


- Adding Groups to a Directory
After creating a group, check the corresponding group in the group configuration and add it to "Selected Groups".

- Group Permission Configuration
You can control group visibility permissions through visibility scope configuration. Only users within the scope can see the groups under the group directory.

2.9.5.2. Ticket Group Usage
After administrators configure ticket groups, users with permissions can see the corresponding groups in the Ticket Center.
Ticket groups organize tickets that users already have viewing permission for, so the same group may show different ticket data for different users, depending on ticket viewing permissions.

If a new group's conditions are based on a single workflow or a single form model, you can also configure workflow fields or form model fields to be displayed in the list.

Individual users can also click the settings button next to the ticket groups to customize their ticket groups. If they do not want the initialized groups configured by administrators, they can disable them.
