Quick Start
Through this quick start guide, you can complete the first end-to-end workflow in BlueKing Lite CMDB within 30 minutes: define an asset model, enter or import instances, establish relationships, verify results through views and search, and then use auto discovery to continuously supplement data. The entire process requires no secondary development and is suitable for teams to first establish an asset foundation that is "usable, searchable, and continuously updated."
1. Step-by-Step Guide
Step 1: Create Your First Asset Model
BlueKing Lite CMDB uses a "model-driven" design. The first step is to define asset standards.
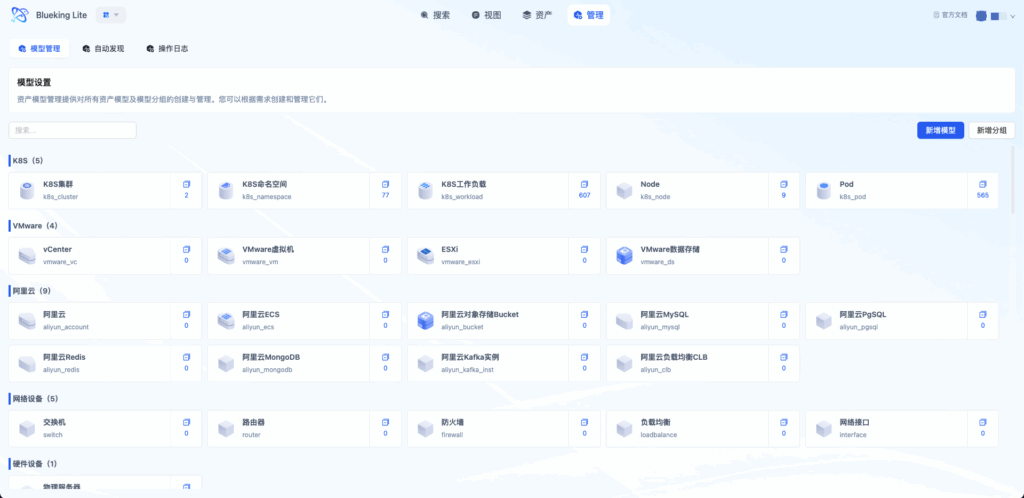
1.1 Create a Model Category
- Navigate to the Asset Model Management page
- Click the "+Category" button to create your first category
- Enter the category name (e.g., "Host Resources," "Container Platform")
1.2 Create an Asset Model
- Click "+Model" under the target category
- Configure the model basic information:
- Model ID: English characters, e.g.,
linux_host - Model Name: Display name, e.g., "Linux Host"
- Icon: Select an icon matching the asset type
- Model ID: English characters, e.g.,
1.3 Configure Model Attributes
Enter the model detail page and configure fields on the "Attributes" tab:
| Recommended Field | Field Type | Constraint Suggestion | Description |
|---|---|---|---|
ip_addr | String | Required, Unique | Primary identifier for association and search |
status | Enumeration | Required | Running status, referencing the public option library |
environment | Enumeration | Required | Environment type (Production/Testing/Development) |
owner | User | Editable | Asset owner |
tags | Tag | - | Flexible labeling, supports multi-dimensional search |
1.4 Set Up Field Groups (Optional)
- Switch to the "Field Groups" tab
- Create groups such as "Basic Information," "Network Configuration," and "Operations Information"
- Drag and drop fields into the corresponding groups and adjust the display order
1.5 Define Model Relationships
- Switch to the "Relationships" tab
- Click "+Add Relationship" and configure the relationship type:
- Source Model: Current model
- Target Model: Related model (e.g., "Business System," "Network Device")
- Relationship Type: Select "Runs on," "Depends on," "Contains," etc.
- Mapping Constraint: Set 1:1, 1:n, n:n, etc.
Efficiency Tip
To create similar models, use the Model Duplication feature:
- Click the "Duplicate" button on an existing model
- Select to duplicate "Attributes," "Field Groups," and "Relationships"
- The new model inherits all configurations and only needs minor adjustments
UI Guide:
- Diagram explanation: The Model Management page uses a "Category - Model - Detail" three-level navigation. The left category tree supports drag-and-drop sorting, center model cards display instance statistics, and the right detail page organizes attributes, groups, relationships, and other configurations through tabs.
Efficiency Tip
To create similar models, use the Model Duplication feature:
- Click the "Duplicate" button on an existing model
- Select to duplicate "Attributes," "Field Groups," and "Relationships"
- The new model inherits all configurations and only needs minor adjustments
Step 2: Enter or Import Your First Batch of Instances
Once the model is ready, start entering actual asset data.
Method A: Single Entry (Suitable for Validation Phase)
- Navigate to the Asset Data page
- Select the target model from the left panel
- Click the "+New" button
- Fill in attribute values in the form and submit
Method B: Batch Import (Suitable for Legacy Migration)
- Click the "Import" button on the asset list page
- Download the import template (Excel format)
- Organize existing data according to the template format:
- First row contains field names (corresponding to model attribute IDs)
- One instance record per row
- Enumeration fields should contain option IDs
- Upload the file; after system validation, confirm the import
Export Model Configuration (with Model Selection)
To migrate model definitions to other environments:
- Click "More → Export Model Configuration" in the top-right corner of the Model Management page
- In the popup, select a subset of models to export using the category-based collapsible tree (default is all selected)
- Click "Confirm" to download
model_config.xlsx
Note: When selecting only some models for export, selected models' categories and relationship endpoints that fall within the selection will be automatically retained, while cross-selection relationships will be discarded; the public enumeration library is always exported in full.
Important
For the first import, it is recommended to validate with 5-10 sample records:
- Verify field mappings are correct
- Check for uniqueness constraint conflicts
- Confirm enumeration values match
Proceed with large batch imports only after successful validation.
Efficiency Tip
When performing batch instance data import, you can simultaneously plan and enter relationships between instances. For assets that already have clear upstream/downstream, deployment, or ownership relationships, it is recommended to supplement relationship data immediately after importing instances, reducing the repetitive work of building relationships one by one later and forming a usable topology structure faster.
UI Guide:
- Diagram explanation: The asset list page has a filter bar at the top supporting attribute-based condition filtering; the left panel shows a model navigation tree; the center table displays instance data; the top-right corner provides import, export, and batch operation entry points.

Step 3: Establish Instance Relationships and View Topology
The core value of CMDB lies in expressing dependency structures between assets.
3.1 Create Instance Associations
- Click a target instance in the asset list to enter the detail page
- Switch to the "Relationships" tab
- Click "+Add Association"
- Select the relationship type and target instance
- Confirm and save
Typical association scenario examples:
| Source Instance | Relationship Type | Target Instance | Business Meaning |
|---|---|---|---|
| MySQL Instance | Runs on | Linux Host | Database deployment location |
| Business System | Depends on | MySQL Instance | Business dependency |
| Switch | Connected to | Router | Network topology |
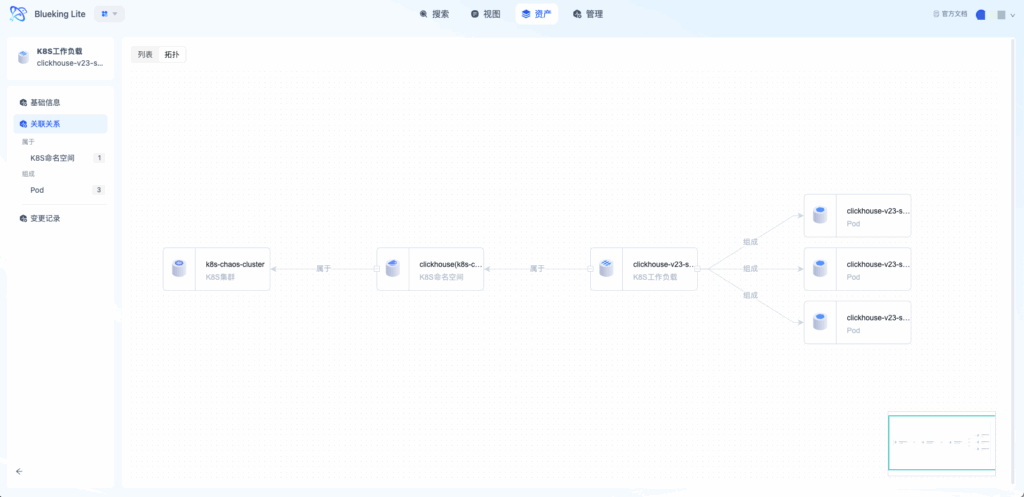
3.2 View Topology
- Click "Topology View" on the instance detail page
- Expand associated nodes upstream and downstream from the current instance
- Click "+" to expand more levels; click a node to view details
UI Guide:
- Diagram explanation: The topology view uses a force-directed graph layout, with node size reflecting the number of associations and line colors distinguishing relationship types. Supports box selection, drag-and-drop, zoom, and double-click on nodes to expand the next level of associations.
3.3 Specialized Views (Auto-appear by Model Type)
Beyond the common topology view, instance detail pages in the "Relationships" area will automatically show specialized tabs for certain model types:
| Tab Name | Appears When | Purpose |
|---|---|---|
| Network Topology | Network device models (switches, routers, etc.) | Interface-level network connection diagram with multi-hop expansion and manual connection editing |
| Rack View | rack model instances | U-position upright view of devices in the rack, highlighting overlap/boundary violations |
| Server Room View | server_room model instances | Floor plan top-down view showing rack positions in row/column grid, with racks color-coded by type; click to drill down to rack view |
Step 4: Configure Auto Discovery Tasks
Upgrade the CMDB from "one-time entry" to "continuous synchronization."
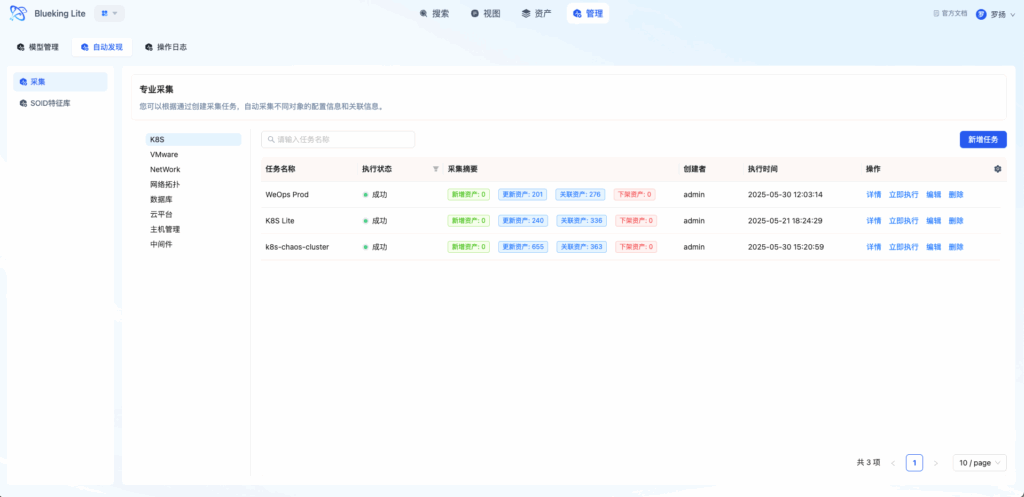
4.1 Select Collection Objects
- Navigate to the Auto Discovery page
- Select the target type from the "Collection Object Tree" on the left
- Supported collection objects include:
- Containers: K8s clusters, Docker
- Virtualization: VMware vCenter
- Network Devices: Switches, routers (SNMP)
- Databases: MySQL, PostgreSQL, Redis
- Cloud Platforms: Alibaba Cloud, Tencent Cloud
- Hosts: Linux/Windows hosts
- Middleware: Nginx, Kafka, Zookeeper, etc.
4.2 Configure Collection Task
Click "+New Task" and fill in the configuration:
| Configuration Item | Description | Recommendation |
|---|---|---|
| Task Name | An easily identifiable name | Include object type and environment, e.g., "Production K8s Collection" |
| Driver Type | Protocol / Job (Script) | Select Protocol for cloud resources and containers, Job for hosts |
| Access Point | Collection proxy or gateway address | Select an access point connected to the target network |
| Collection Scope | IP range or instance list | Use a small scope for initial testing |
| Credentials | Access account and password | Use a minimal-permission read-only account |
| Timeout | Per-object collection timeout | Increase for poor network environments |
| Execution Cycle | Whether to execute periodically | Recommended for dynamic environments, e.g., every 6 hours |
| Write Mode | Direct write / Approval before write | Recommended: "Approval before write" for production |
4.3 Execute Task and View Results
- After saving the task, click "Execute" to trigger the first collection
- Wait for the task to complete, then enter the task detail page
- View the "Collection Summary":
- Added: Newly discovered instances
- Updated: Instances with changed attributes
- Deleted: Instances that no longer exist (soft delete marker)
- Associated: Automatically discovered relationships
- Exceptions: Failed instances and reasons
UI Guide:
- Diagram explanation: The Auto Discovery page has a collection object tree on the left with different icons for different object types. The right panel shows the task list with execution status. Click a task name to enter details. The detail page displays the collection summary in card format, with expandable exception items for detailed error viewing.
Step 5: Verify Search and View Features
Confirm that asset data can be quickly retrieved and browsed.
5.1 Asset View Verification
- Navigate to the Asset View homepage
- Confirm that categories and models are displayed correctly
- Verify that instance count statistics are accurate
- Click a model card to verify navigation to the corresponding list
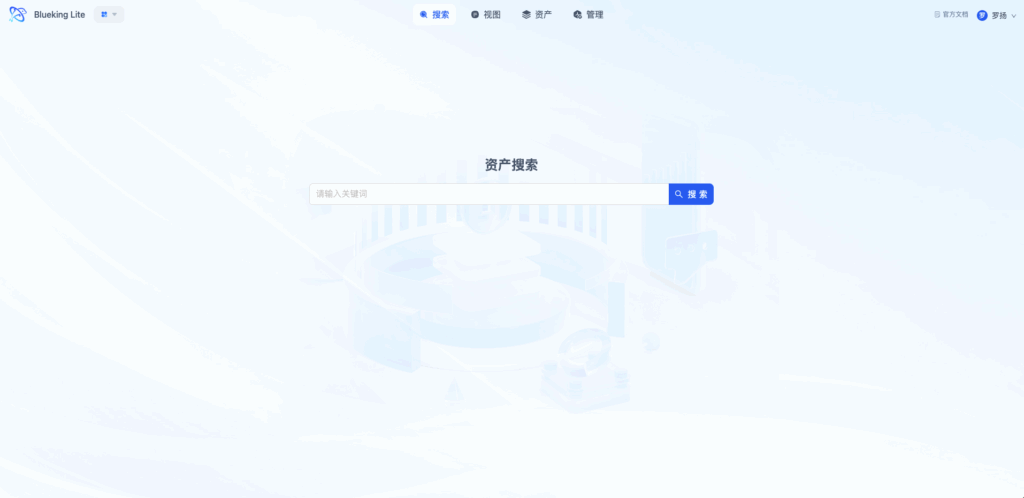
5.2 Full-Text Search Verification
- Enter an instance name or IP in the top search box
- View search results grouped by model with statistics
- Click an instance to enter the detail page and verify information completeness
- Try toggling the "Case Sensitive" option and observe result changes
UI Guide:
- Diagram explanation: Full-text search uses a "Model Aggregation + Instance List" dual-layer display. The left panel shows the number of matches per model, and the right panel shows specific instances. Supports paginated browsing; click an instance title to jump directly to the detail page.
Step 6: Configure Data Subscriptions
Enable proactive "data finds people" notification capabilities.
- Navigate to the Data Subscription page
- Click "+Subscription Rule"
- Configure the rule:
- Target Model: Select the asset type of interest
- Filter Method: Filter by conditions or directly specify instances
- Trigger Condition: Attribute change / Relationship change / Expiration reminder
- Recipients: Select notification recipients
- Notification Channel: In-app message / WeCom / DingTalk
- Enable the rule
2. Result Verification and Closure
Verification Checklist
| Verification Item | Verification Method | Expected Result |
|---|---|---|
| Model configuration is correct | Create one instance and check field display | Field groups, enumeration options, and required validation all match the design |
| Search function works | Search by IP, name, and tags | Accurate results returned in seconds |
| Topology relationships are accurate | Expand instance topology and check associations | Upstream/downstream dependencies match the actual architecture |
| Auto discovery is effective | Review collection summary | Added/updated counts match expectations, no error reports |
| Changes are traceable | Modify instance attributes and view change records | Can see operator, timestamp, and before/after value comparison |
3. Common Issues and Troubleshooting
| Symptom | Possible Cause | Solution |
|---|---|---|
| Import failed | Field mapping errors, enumeration value mismatch | Check that template fields match model attribute IDs, confirm enumeration option IDs are correct |
| Collection task exception | Network unreachable, incorrect credentials, insufficient permissions | Check access point connectivity, verify credential validity, confirm account permissions |
| Topology not displaying | No model relationships defined, no instance associations | First define relationship types at the model level, then create instance associations |
| Search returns empty | Index not updated, permission isolation | Wait for index refresh (~1 minute), check organization permission scope |
| Subscription not triggering | Rule not enabled, instances don't match filter conditions | Confirm rule status is "Enabled," check that filter conditions include target instances |
4. Next Steps
After completing the quick start, consider exploring the following advanced capabilities:
- Public Option Library: Unified maintenance of enumeration values for status, environment, etc., reusable across models
- Model Duplication: Quickly duplicate standard models to multiple business domains
- Advanced Search: Use combined condition filtering and save frequently used queries
- API Integration: Connect CMDB data to external systems via OpenAPI
- Dashboard Display: Build visual operations dashboards based on asset data
- Network topology manual maintenance: In the "Network Topology" tab's edit mode, manually supplement interface-to-interface connection relationships for links that auto-discovery cannot identify
- Server room/rack layout entry: Enter
row/colcoordinates forrackinstances andrack_u_start/u_sizefor network devices to enable server room floor plan and rack U-position views - Model layout management (administrators only): As a super administrator, enter "Management Sorting" mode to perform global sorting and show/hide management of categories and models
For more help, refer to the "Feature Guide" documentation or contact your platform administrator.